Gourmet Cooking for the Average Joe

post

Food Hacks

Posted on May 15, 2013 ·

Normally, I would be posting another recipe of something that I cooked during the last week, but this time I decided to do something a little different. As you may know, this blog was created for the purpose of an entrepreneurship class at Baruch College, and as the last required post, I am deciding to do something that may be a little more interesting to some of my viewers.

Lately, there have been a lot of “food hack” memes spreading throughout Reddit and I wanted to compile some of my favourite “food hacks” and share them with you.

1. Store ice cream in a resealable bag to prevent the ice cream from getting too hard.

2. Cook Lunchables with an iron or a blowdryer.
This is actually a really neat trick. I used to eat Lunchables a lot as a young kid and placed the the pepperoni pizza Lunchables in the microwave to heat it up.

3. Pull the side of condiment cups to increase its capacity.

This one literally blew my mind when I saw it. I’ve been using condiment cups for years at McDonalds and other fast food chains and never realized that I could make the cup bigger. If you’re concerned about going green, you can limit your usage of the condiment cups by pulling its side!

4. Filter cheap vodka with a filtration system for a better tasting spirit.

Now I normally don’t drink vodka, but I’m sure that some of my college student readers would really enjoy this one!

5.
Extremely helpful when you’re boiling pasta.

Now on to my favourite two “hacks” of all time:

6. When you’re almost done with your Nutella and can’t get the remainder off the side of the jar (don’t we all hate that?), put a scoop of vanilla ice cream in the jar. It’s like you’re eating ice cream with Nutella fudge!

7. My all-time favourite food hack is making a brownie in a cup with a microwave.
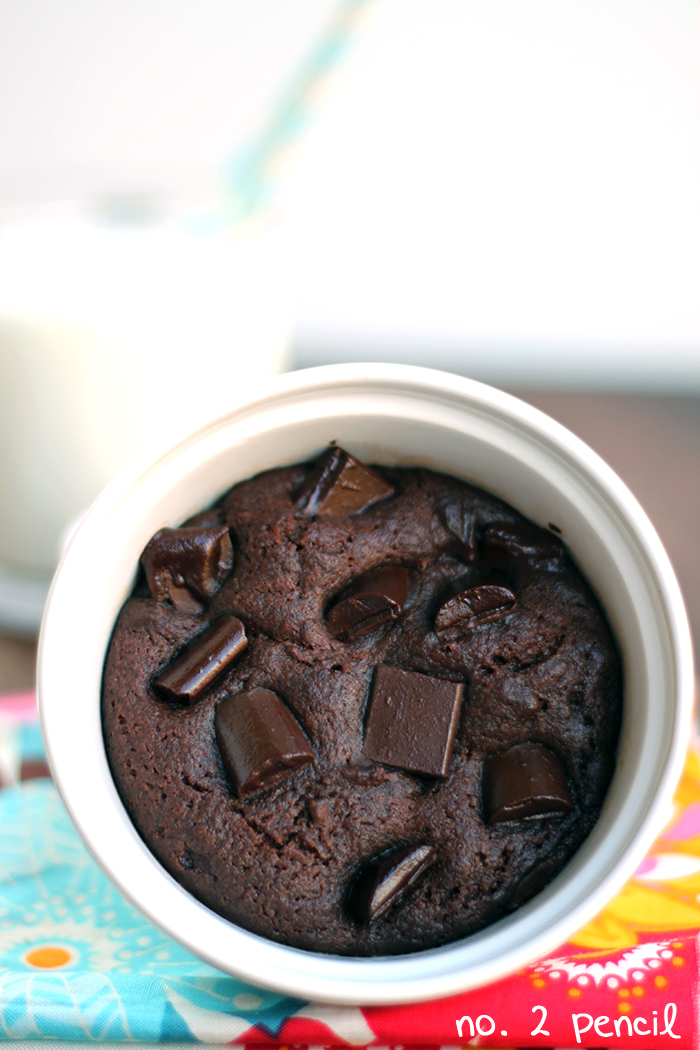
Image from No. 2 Pencil

Ingredients
2 tablespoon butter
2 tablespoon sugar
1 tablespoon firmly packed brown sugar
1/4 teaspoon pure vanilla extract (please don’t skimp and get the imitation vanilla!)
1 egg yolk
4 tablespoon all-purpose white flour
1 tablespoon unsweetened cococa powder
2 tablespoon semi sweet chocolate chunks (optional)
pinch of salt

Steps
1. Melt butter in a mug.
2. Mix in sugar, brown sugar, vanilla extract and salt.
3. Stir in elk yolk.
4. Add flour and cocoa powder and stir until well combined.
5. Add chocolate chunks (optional).
6. Cook for 45 to 60 seconds in microwave.

Bon appétit!

Filed Under: Uncategorized ·

post

Flavoured Popcorn

Posted on May 7, 2013 ·

I was on Facebook a few days ago and a friend posted up a Groupon link to this 12 pack deal of Sriracha flavoured popcorn. I don’t normally snack, but the idea of eating Sriracha flavoured popcorn intrigued me. Have you guys tried the Sriracha flavoured Lays? I have yet to see them, but I definitely need to pick up a bag the next time I come across them. I was just about to buy the Groupon deal but then I realized a few things. For starters, who’s to say that I’ll be in the mood for popcorn when it comes? And second, I realized that I had all the necessary ingredients to make my own Sriracha flavoured popcorn!

photo 3

Ingredients

1/4 cup popcorn kernels
4 tablespoon butter
1 tablespoon Sriracha hot sauce
3 tablespoon oil
2 garlic cloves
Salt and pepper

There’s a two step process in order to make this. First, melt 4 tablespoons of butter in a saucepan over medium heat. Once the butter is completely melted, add the Sriracha sauce along with the the garlic cloves (finely minced). Mix the ingredients around and turn off the flame. Let the flavours meld together for 10 minutes.

photo 1

Next, add 3 tablespoons of oil into a pot over medium high heat. Add the popcorn kernel. Cover the lid and as soon as the kernels start to pop, continually shake the pot so the popcorn rises to the top and the kernels stay at the bottom to prevent burning.

photo 2

Finally, place the popcorn in a paper bag and season to taste with salt and pepper. Add the Sriracha butter into the bag and shake until fully coated.

The great thing about this is that the possibilities are endless. You can substitute the Sriracha for other ingredients! The sky’s the limit.

Bon appétit!

Filed Under: Recipes ·

post

Fried Chicken Recipe

Posted on April 30, 2013 ·

One of my favourite food to eat is fried chicken, but unfortunately I have never been very good at making it. Every time I make fried chicken, the outside is extremely crispy and flakey but the inside was always tasteless. I could not understand why this kept happening until I discovered a technique called brining. Brining is the method of submerging an ingredient in a salt-water mixture for a few hours prior to cooking.

Today, I want to share with you a fried chicken recipe that I stumbled upon in one of my favourite cookbooks – Momofuku Cookbook. I do not take any credit for this recipe, but I have enjoyed it over the months and I have made a few tweaks to it here and there accounting for my personal taste.

photo 3

Ingredients

4 cups lukewarm water
¼ cup honey
8 garlic cloves
1 tablespoon black peppercorn (ground pepper works fine as a substitute)
½ cup kosher salt
3-4 pound chicken, cut into pieces
4 cups grapeseed or other natural cooking oil (vegetable oil works fine)

In order to brine the chicken, combine the water, honey, cloves, peppercorn and kosher salt together. Mix the ingredients and add the pieces of chicken – sometimes I am extremely picky when it comes to my fried chicken and instead of purchasing an entire bird; I just pick up drumsticks and wings. I have never enjoyed fried chicken breast but everyone is has their opinions.

Have I mentioned that most of the recipes in Momofuku’s cookbook are not something that you can prepare and cook on the whim? Most of his recipes take hours of preparation, but thankfully this recipe only requires a lot of downtime preparation. Let the pieces of chicken sit in the brine for at least an hour but for no more than six.

photo 2

This part gets extremely weird. Normally a regular fried chicken recipe would require you to dip it into some sort of batter, whether it be a beer batter or a butter milk batter but instead we are going to steam the chicken. This process allows the chicken to fully cook and once you fry the chicken, you get an extremely crispy piece of chicken!

Place the pieces of chicken into a steamer and steam for 40 minutes, or until cooked. One of the easiest ways to tell if your chicken is cooked without a meat thermometer is to stick the chicken and see if the juices that flow out are running clear.

After steaming the chicken, chill the cooked chicken in the fridge for at least two hours, or overnight if you are not in a hurry to prepare it.

When ready to cook the chicken, take the chicken out half an hour before you intend to fry it. I know, there is a lot of waiting, but I promise you, patience is a virtue.

Heat up the oil to 350 degrees Fahrenheit (175 degrees Celsius) in a deep skillet. It is essential to get the oil temperature to this exact temperature to fry the chicken properly. If you do not have an frying thermometer, you can easily pick one up from your local supermarket. I personally use this one – Frying Thermometer

Fry the chicken in batches to prevent overcrowding and sudden drops in the frying oil’s temperature. Cook the chicken for 6 to 8 minutes, flipping once to ensure that both sides turn a deep brown. Remove the chicken and place on a rack to let excess oil seep out. I do not like using paper towels to catch excess oil as the chicken is touching the paper towel and the skin gets extremely soggy after a while.

photo 5

Serve with your favourite sauce. Bon Appétit!

Oh, I almost forgot. David Chang, author of Momofuku, suggests that you use Chef Kevin Pemoulie’s octo vinaigrette sauce for his chicken. I absolutely love his octo vinaigrette and I use it on just about anything and everything. I always have a batch at home on handy in case I need to dip anything in. They go great with steamed seafood and fried dumplings!

sauce

Ingredients

2 tablespoons finely chopped garlic
2 tablespoons finely chopped peeled fresh ginger
1 fresh bird’s eye or Serrano chile
¼ cup rice wine vinegar
¼ cup light soy sauce
2 tablespoons grapeseed or other neutral oil (vegetable is fine)
¼ teaspoon Asian sesame oil
1 ½ tablespoon sugar
Freshly ground pepper, to taste

This recipe couldn’t be any simpler. Combine all ingredients in a lidded container and shake. Use within four to five days (if it even lasts that long!). I find that the octo vinaigrette tastes better after you leave it alone for a few hours so if you plan on using the octo vinaigrette with the fried chicken recipe, make it while you are brining the chicken.

[I will add pictures as soon as I figure out how to take professional quality food pictures. That is the one thing that I have to admit that I am not quite good at.]

Filed Under: Recipes ·

post

Hello world!

Posted on April 3, 2013 ·

Anyone can cook, but only the fearless can be great.
– Chef Gusteau, Ratatouille

In today’s fast paced society, we are spending less and less time in the kitchen, and more time eating out. I have been a victim of this for years, until I decided to learn how to cook. As a result, I began to eat healthier knowing what ingredients went into my food, saved a bunch of money by switching my food expenses to groceries instead of eating out, and lastly, cooking has given me a new hobby that I enjoy, and to be honest, it is extremely therapeutic.

One of the main reasons why people do not cook as much as they should is because they just do not know where to start. It can be pretty intimidating going to the grocery store and not knowing what ingredients you would need to make a meal. Ever followed a recipe where it asked for ingredients that you have never heard of, and would most likely use it only once or twice before it expires? This blog will set out to show you how easy cooking can be, without the need of purchasing tons of spices and groceries. Most of the recipes that I will share with you are variants of recipes that I have found online, and some of them that I have created myself.

I hope that my blog will inspire some of you to take that first step and start cooking at home, and hopefully will enjoy cooking as much as I do.

Filed Under: Welcome Page ·

Categories

  • Recipes
  • Uncategorized
  • Welcome Page