HW/DEMO 4: Animated Gifs with GIMP and VLC Player

First up: Your Homework:

WATCH FILM HEREhttp://vimeo.com/78979216

Your assignment is to watch the first part of All Watched Over by Machines of Loving Grace.  This is a three-part BBC2 series written and directed by British documentarian Adam Curtis.   Unlike Downloaded, I feel that Curtis’ film has more critics that find the film’s central theses to be flawed and his films laced with fallacies, and I encourage you all to watch the first film in the series with a critical eye.  After watching the film, I want you to take a screenshot of a scene you find interesting, include said image in an html document.  Beneath the screenshot image you are to write 200 words detailing your thoughts on the scene the image is meant to illustrate*.

Remember in our class on Tuesday I told you I want to give you a short homework assignment where you are to concentrate primarily on my expectations of you as academic writers.  I don’t want anyone to be shocked if they get a low score on Midterm Proposal A because they thought their copy/research was secondary to the techniques I’ve been demo-ing in class.  I’m not going to be overly strict, but I want the points made in your commentary to be cohesive/have cohesion.

*BONUS — If you use the following tutorial I’ve crafted in order to make a working animated gif as the central image in your homework I’ll give you BONUS points.  It has to be an animated image from All Watched Over by Machines of Loving Grace.


DEMO 4: The Animated Gif

For today’s demonstration I’m turning the class’ attention to the animated gif.  The animated gif is a fun addition to many html based deliverables, blog posts, and web apps.

Today I’m going to show you how to make this animated gif in particular:

animation

Okay, I’ll admit, this isn’t exactly the most amazing animated gif out there, but it is made up of only six frames.  If you use this technique to create an image with more frames per second you might come away with something as cool as one of these:

Buzzfeed15-time-lapse-gifs-that-will-change-the-way-you-see-the-world

Brother Brain: A video game animated gif themed tumblr blog.

Ann Street Studio: Cinemagraphs

So let’s get to it… First we are going to need something to animate.  Personally I find The Internet Archive to be an excellent resource of public domain, copyright-free, and creative-commons films.  For this demo I selected a short film on the erupting volcanoes of Hawaii.

Screen Shot 2014-10-01 at 8.58.41 PM

At the foot of the page there is a hyperlink for downloading the .avi file.  This is a video file containing the entire short film.  From there I opened up the film in a piece of software called VLC Player (An open source video player I highly recommend).

Screen Shot 2014-10-01 at 9.00.23 PM       Screen Shot 2014-10-01 at 9.00.52 PM

Next I took six screenshots from six successive seconds of digital video.  The issue here is that most digital video files do not play a frame of video per second, instead they usually play between 24 and 30 frames per second.  This is apparent when you see the choppiness in my final animated gif illustrated at the beginning of the tutorial.

Screen Shot 2014-10-01 at 9.10.14 PM

Now I have a folder with all of my images in it.  I’m going to keep this open in my finder window (Windows Explorer if using a PC).  Now it is time to open Gimp.  I will be opening it and immediately setting it to single window mode for the purposes of this tutorial.

Screen Shot 2014-10-01 at 9.12.59 PM

Next I want to open the first of the images I downloaded.  Notice I also changed their names to reflect the appropriate order of the animation.

Screen Shot 2014-10-01 at 9.18.45 PM

Screen Shot 2014-10-01 at 9.19.21 PM

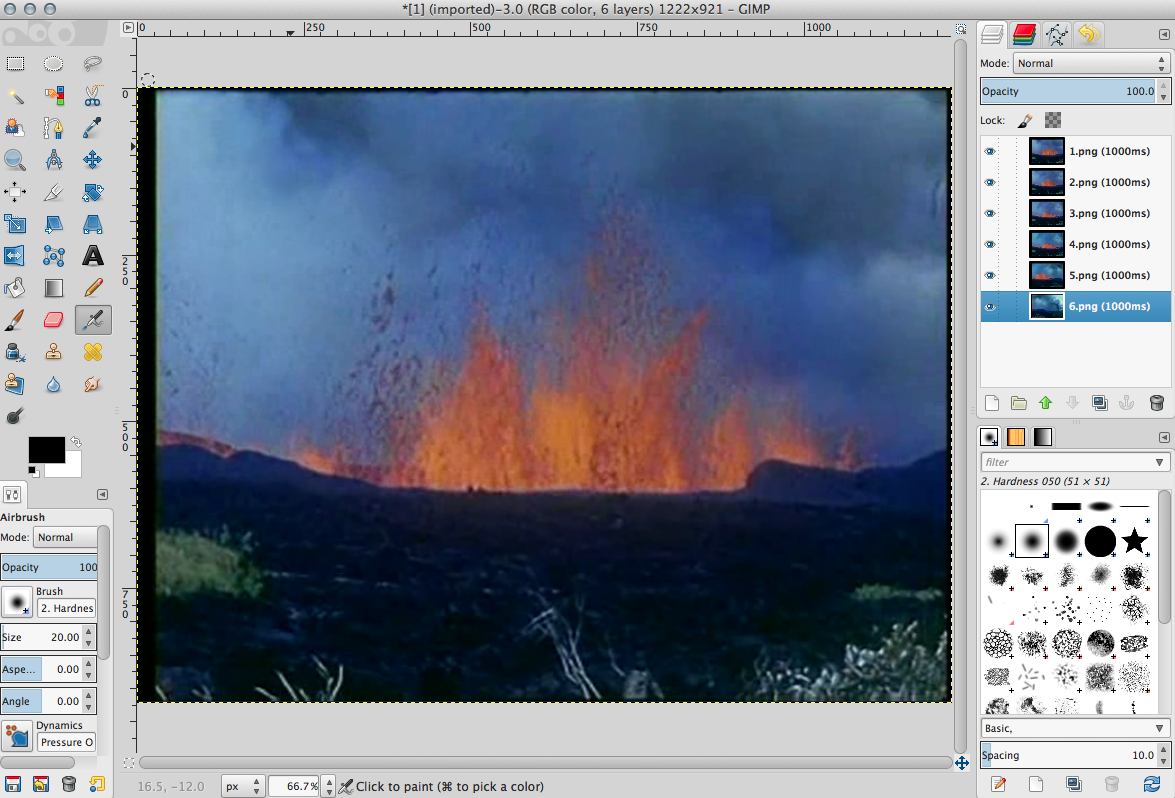
Now we need to concentrate our attention to the top-right side of our user interface.  This may be located in a different position if you are in a different version of GIMP.  Regardless of where you find the layers panel, it should look similar to this:

Screen Shot 2014-10-01 at 9.20.58 PM

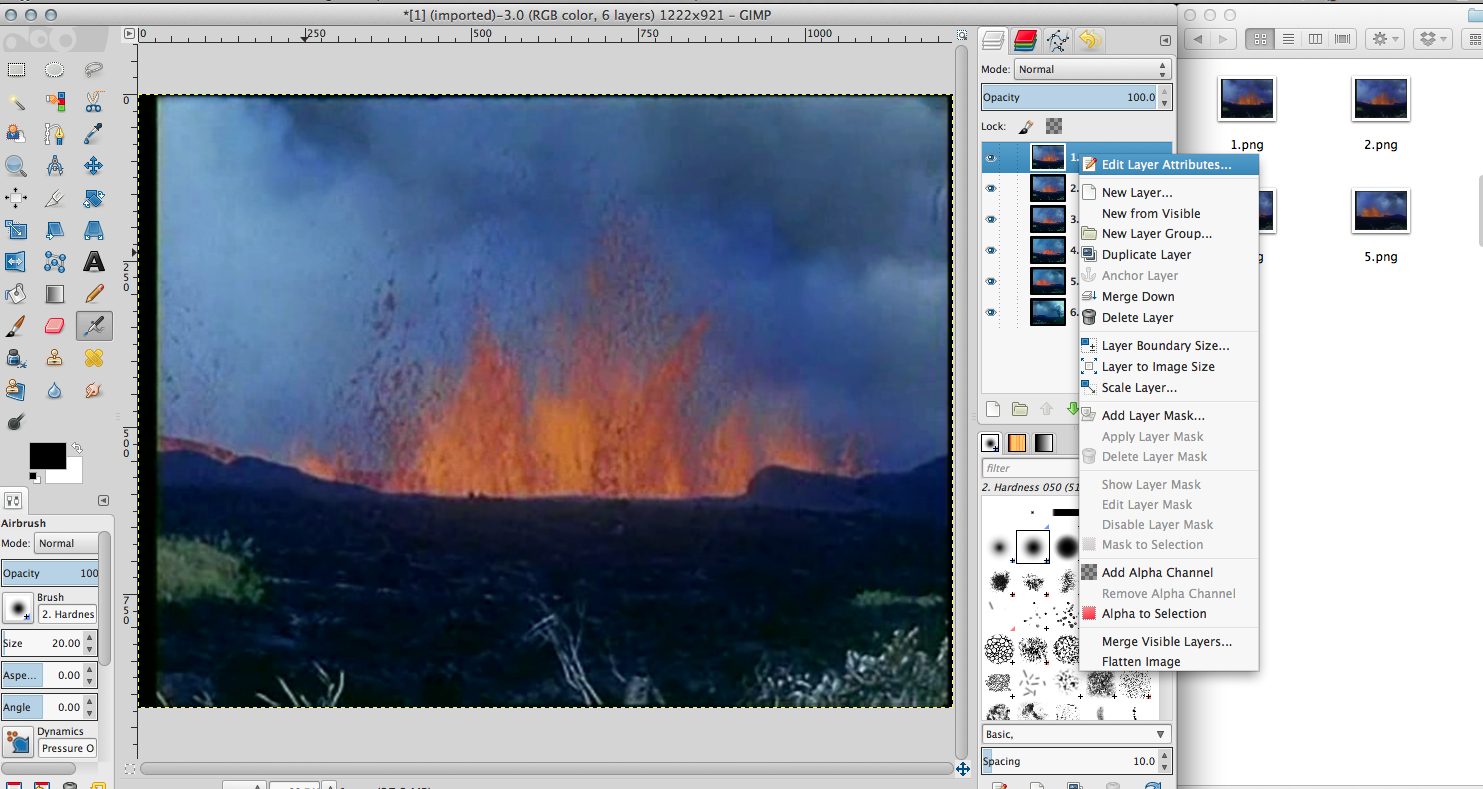
What I want to do now is make sure that all of my images that will be necessary to create the animation appear in this panel.  I could create new layers, meticulously open up each image in a new space.  With Mac (not using a windows or linux machine for this tutorial) I can just drag each image file in succession to the top of the first image and I see their thumbnail representations appear in the layers panel.

Screen Shot 2014-10-01 at 9.21.51 PM

Screen Shot 2014-10-01 at 9.24.02 PM

But in my moving my files around, I created an empty layer and got my layers all out of order.  This is easily fixed, I just drag the images into correct order from within this layers panel, simple as that.

Screen Shot 2014-10-01 at 9.25.51 PM

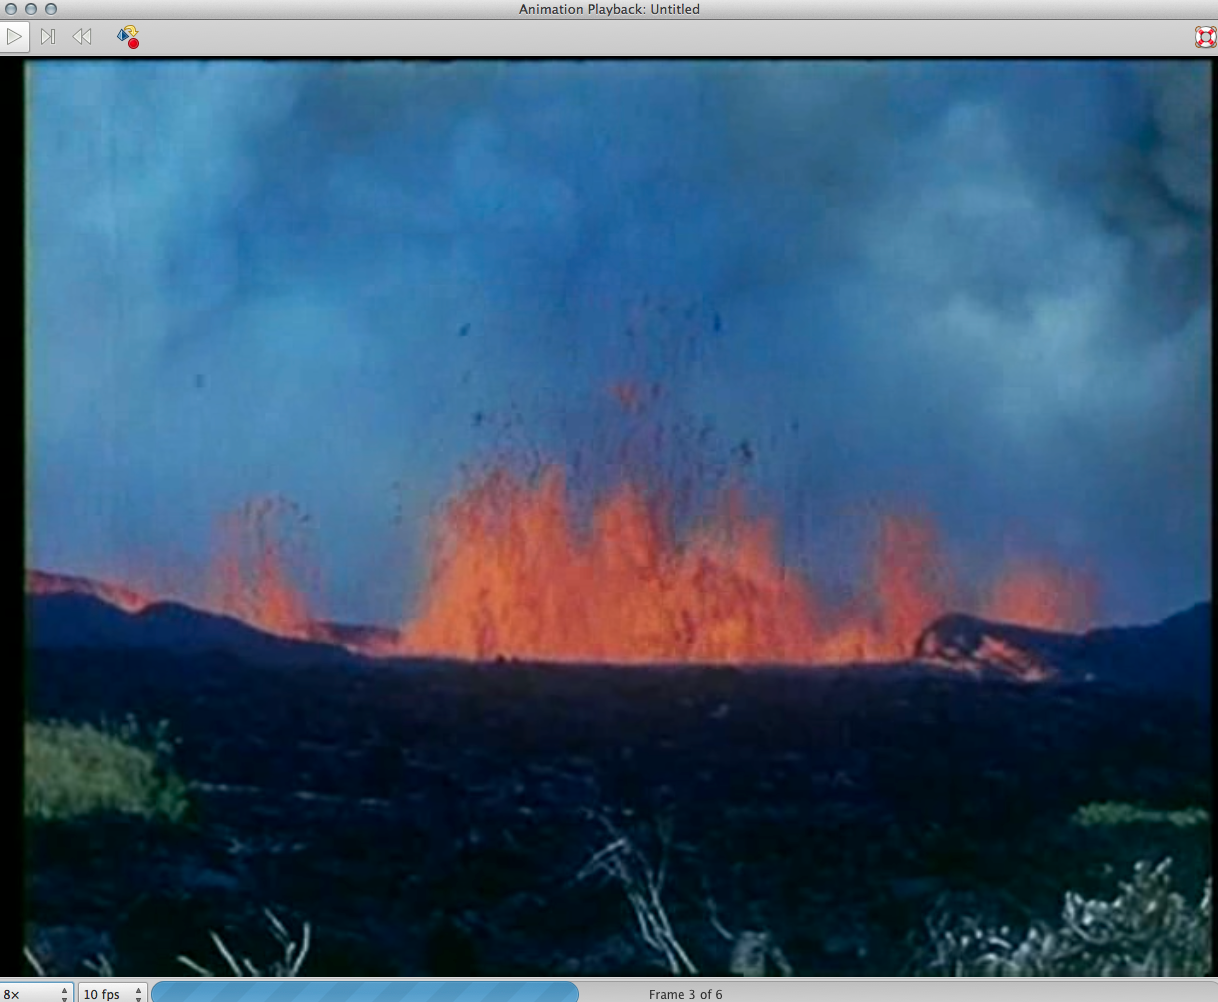
Believe it or not we are almost done.  You don’t believe me, well, check out the animation preview option illustrated here:

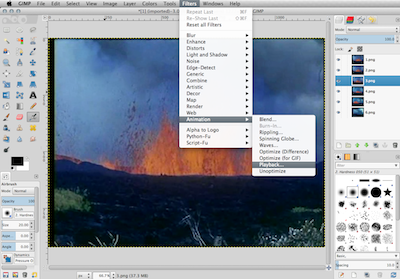
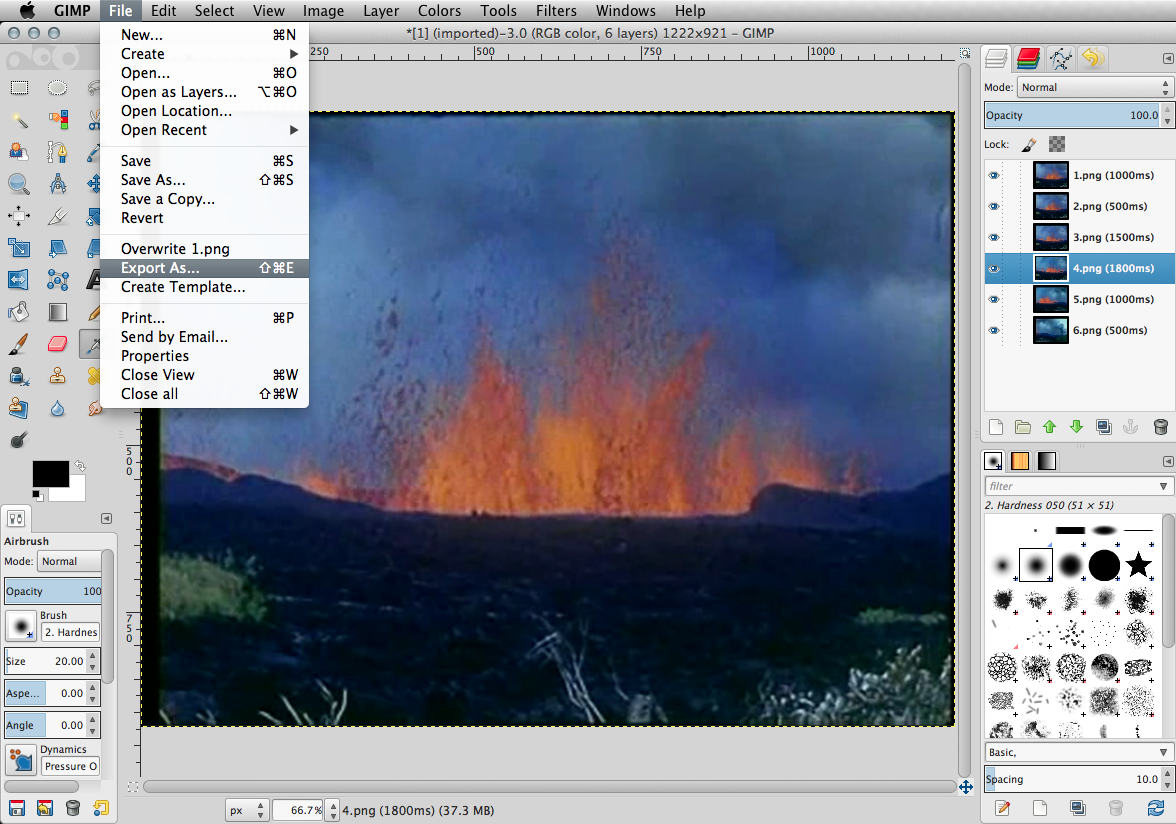
Now we could just stop here, export our image, and we would have a working animated gif.  But before we wash our hands of this, how about we give our animated gif some customization.  Maybe I want some images to play longer than others?  This is simple to accomplish, all we have to do is right click on each layer and access the Edit Layer Attributes option:

A box should pop up and here we will write in parenthesis next to the title of each layer the number of milliseconds we want each frame to appear in our animation

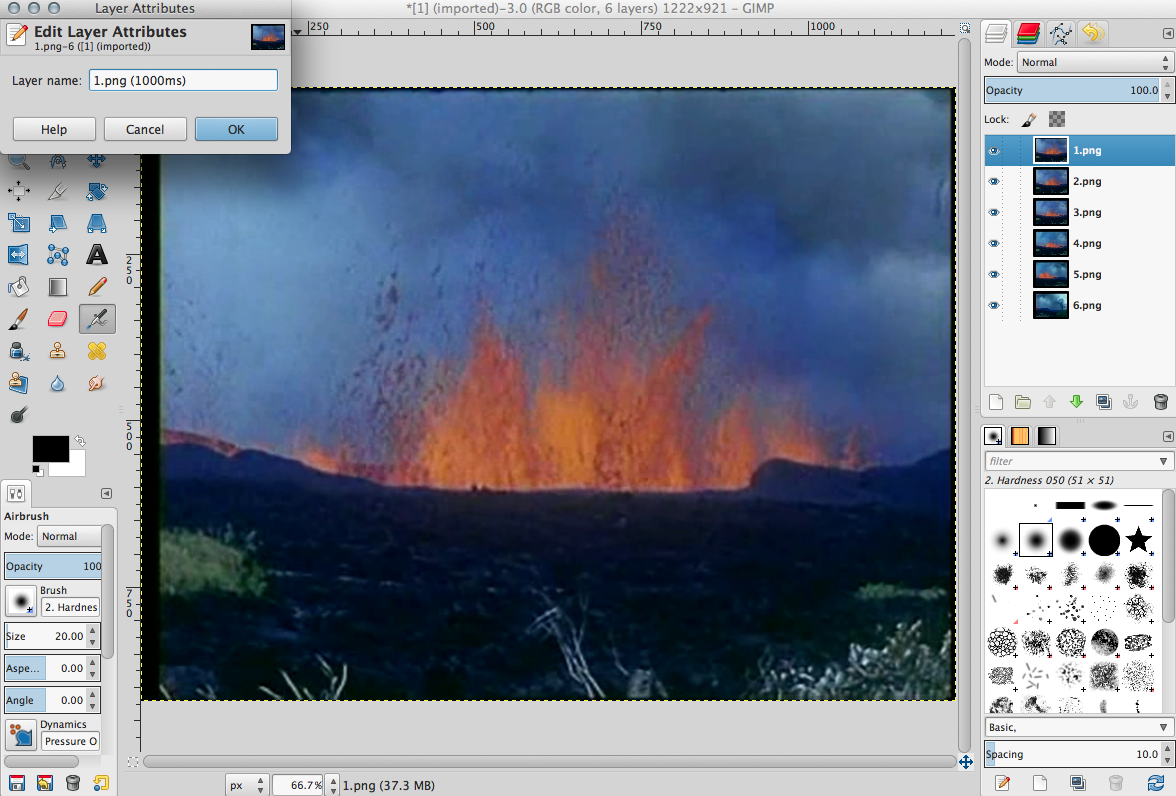
GIMP can recognize milliseconds (there are 1000 of them in one second), so most of the images appear for a slightly different amount of time in the context of what the animated gif will display.  Just by putting the time limits into parenthesis next to each titled layer in the layers panel we can give some specific instructions as to how quickly the animated gif will reach conclusion.

Now you can repeat the step where we looked at the animation preview if you are curious as to how your new time declarations affected your animation.

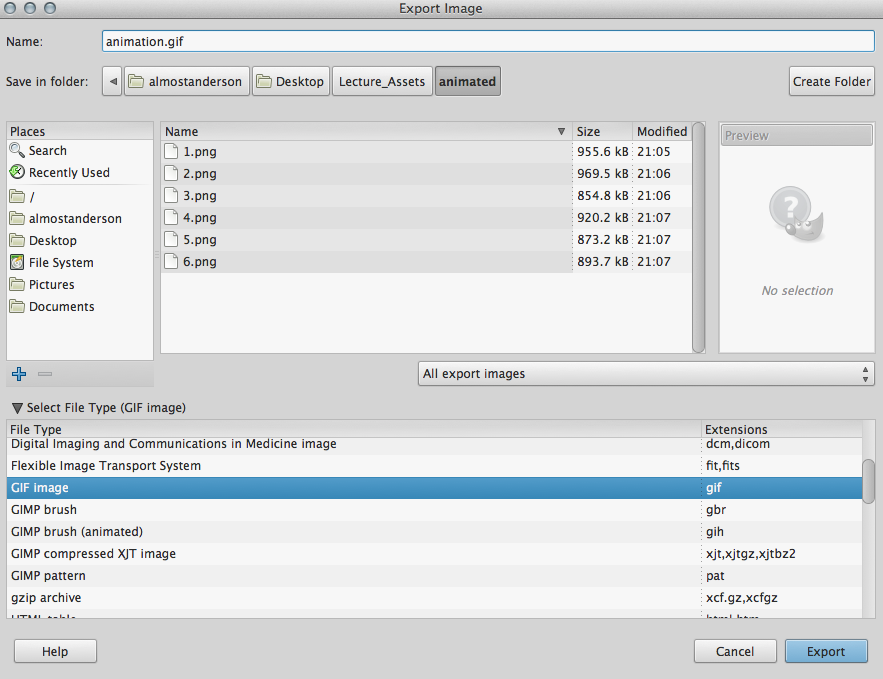
Well, it is time to finish our creation, so simply select FILE>EXPORT AS…

Which should bring up the following menu.  Make sure you select GIF image and declare your file with the .gif extension.

Now you should see the following final menu:

Now just a few adjustments and…

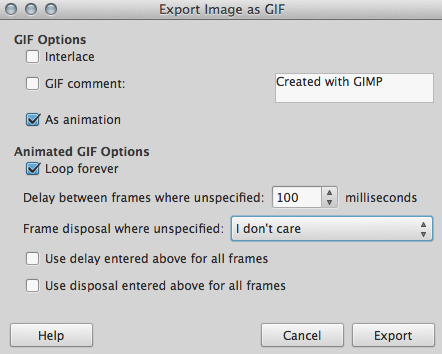
You have just exported your very own animated gif!!!  Congrats.

Posted in Assignments | Tagged | Comments Off on HW/DEMO 4: Animated Gifs with GIMP and VLC Player

Demo/HW: Screenshots and Image Manipulation in GIMP

Now that we’ve gotten familiarized with putting a basic HTML document together, now things should start getting more fun, because we’re going to start filling such documents with content.  We’ve learned how to put images into our HTML documents, but since we don’t want to just build a website where we rip off other people’s image content (since in most instances that is downright illegal!  That just won’t do, you know, assuming you want to show your website off at some point.), we’re going to want something that will allow us to digitally edit, customize, and even create images.  We COULD use Photoshop, but that is so, what’s the word?  That’s right: EXPENSIVE!  And in this class my goal is to introduce you to quality FREE software, because it isn’t always easy to find something with that price tag that is quality.  GIMP is definitely quality, and you can do almost anything you can do in Photoshop with the software package.  So let’s get started…

First and foremost you need to download GIMP:

http://www.gimp.org/

Here are some reference docs/videos that might help you if you get stuck trying to run the software:

Getting Started with GIMP:

http://docs.gimp.org/en/getting-started.html

Installing GIMP on Windows 6 and 7:

https://www.youtube.com/watch?v=QewBtpplRzA

First I’d ask you to play around with it.  I recommend you do this before doing anything else.  See if you can use the pencil or paintbrush tool to draw a stick figure, or use the text tool, and see if you can get some witty saying to display.  Maybe something like “Prof Anderson is incredible!  He would be an incredible MTV VJ.”  Do they still have MTV VJs?  I digress…

Back to reality:  What are some things you might do in an image editor?  Well maybe you, as a budding scholar, want to write some commentary on a documentary film, and you want to customize and display some images to put said commentary into proper context?  Surprise alert: That is exactly what you’ll be doing for the homework due during our next Tuesday class meeting.


HOMEWORK ASSIGNMENT:

Watch Downloaded, perhaps Bill S. Preston Esquire’s cinematic swan song…

Screen Shot 2014-09-17 at 8.48.53 PMbill


http://on.aol.com/video/downloaded—full-documentary-film-517844258

You need to find 3 scenes from this film that you feel you can write some commentary on.  Take 3 screenshots, size each screenshot at a width of 640 pixels and a height of 360 pixels, put the images into an html document, and beneath each screenshot write 200 words (600 words in total), and e-mail me the document and the images.


There are a lot of ways to take a screenshot on your computer.  I’m on a Mac at home, so I can literally just hit [COMMAND]+[SHIFT]+[4].  There are different techniques on Windows and Linux.  For the sake of getting you familiarized with GIMP, I’d ask you try to take a screenshot with this program.

Once you have GIMP open just go up to the top of your screen, find FILE, and beneath file you should see CREATE>, when you move your mouse over the word CREATE> you should see a SCREENSHOT option.  Move your mouse to SCREENSHOT and click.  You should have the video you are watching open at this point (Downloaded in the context of this class), and select “Select a region to grab”.  Now you should be able to hold your left mouse button down, or click your trackpad and hold, and you can select the video screen and let go when you’ve created a box around the image that you want to capture.

Screen Shot 2014-09-18 at 11.38.53 AM

Note that my version of Gimp will almost certainly look slightly different than yours, as it is a customized version.

Screen Shot 2014-09-18 at 11.39.11 AMScreen Shot 2014-09-18 at 11.39.29 AM

The image will now appear automatically in your GIMP editor window.  Now go back to the top of your computer screen and select the IMAGE option on the top toolbar.  Underneath you will see the CANVAS SIZE option.  Click this and in the WIDTH box write 640 and in the HEIGHT box write 360.

Screen Shot 2014-09-18 at 11.39.47 AM

Screen Shot 2014-09-18 at 11.40.10 AM

Screen Shot 2014-09-18 at 11.41.50 AM


Now your canvas is the correct size, but your image… well… isn’t!  Well we can fix that.  Right click on the image and find the option TOOLS and hover your mouse over this option now move your cursor slightly to the right and select TRANSFORM TOOLS and now once again move your cursor to the right and select the SCALE tool.  Now make sure the four large squares that appear around your image touch the corners of the canvas.  Now in the SCALE interface window that should have appeared hit the SCALE button.  TA DA!  You now have an image that has the required dimensions.

Screen Shot 2014-09-18 at 11.42.22 AM

Screen Shot 2014-09-18 at 11.42.50 AM

See the 8 bigger boxes surrounding the square? Click and drag those with your mouse to resize the image.

Screen Shot 2014-09-18 at 11.43.12 AM

Now you need to save your image.  Go to FILE > EXPORT AS.  Save each image with an extension (the three letters that follow the period in the file name) and write .png.

Screen Shot 2014-09-18 at 11.43.38 AM

Screen Shot 2014-09-18 at 11.43.57 AM

Now you should have an image that you can use your most non-heinously honed HTML skills to include in your HTML document (Remember make sure that whatever folder you store your image in, you store your html image in that same folder, or else your image will not show up (easily) when you are previewing your work before submission.

EXCELLENT!

lookinpic


So that’s it!  Again we’ll be going over this in class, but remember if you have any trouble JUST E-MAIL ME!  And I’ll walk you through the issues.

BONUS: Anyone that was enjoying the snippets of the Mailer v. Mcluhan video in class here is a link to the full video:

https://www.youtube.com/watch?v=PtzxWR-j1xY

Posted in Assignments | Tagged | Comments Off on Demo/HW: Screenshots and Image Manipulation in GIMP

UPDATED: Final/Midterm Page

https://blogs.baruch.cuny.edu/newmediacourse/?page_id=92

Posted in Uncategorized | Comments Off on UPDATED: Final/Midterm Page

Homework 3: HTML Praxis

Now that we are a few classes in I’m going to start giving you some homework based on the in-class demos, and based on much of your comments on spending less time on the text and more time with software.

From now on (I should say TENTATIVELY from now on) I’m going to want everyone to turn in homework to me, I ask that you send me an HTML file.  This means the file you send me should look something like this:

homework.html

Homework will need to be e-mailed to me, it is due on Tuesdays before class.

1. Select five of your favorite websites.

2. Write one 200 word paragraph about each site (1000 words all together)

3. Make sure each paragraph has at least one hyperlink, directing the visitor of your HTML page to the page you are writing about.

You will receive extra points if you get bootstrap working with your file or enact some significant CSS customization.

Posted in Uncategorized | Comments Off on Homework 3: HTML Praxis

Demo 2: Considering Bootstrap

I know many of you are new to HTML, and I do not intend to force you to spend the bulk of your time in this class strictly on html; we will be looking at all kinds of “cultural software.”  That said, the fact remains that most New Media deliverables are seen by  audiences via the internet, so in the context of this class html praxis is essential.  Even if you do not achieve true mastery over html, understanding the basic concepts of the markup language should help you understand the foundations of New Media content delivery.  I will be adding more html tutorials on the “Software Demos” page very soon, and I encourage all of you to at least get the basics we’ve gone over the past two classes down.

For those in the class that took to html, or already had experience, the following is a Twitter Bootstrap tutorial (because I feel like I struggled to explain the process of using this web framework during Thursday’s class session because of limits on time).  If you are interested in injecting bootstrap into a static html site, I hope the following write-up I’ve composed will help.


Once you unzip the file you should see something that looks like this in your file manager:

Now when I unzip the bootstrap-3.2.0-dist.zip I should see this:


Then open the newly unzipped folder
finder_css_js_fonts

And you should see folders with css, fonts, and js as their labels.  Now open atom:

blank_atom

Now you can, before you even write any html, go up to FILE > SAVE AS then locate the unzipped bootstrap folder and save your empty file as a .html file and place it there.

save_html_file

Now you should be able to build a quick and simple html page in atom and open it in firefox.  Here is firefox displaying a simple html page I wrote up in atom:

Now I can add the bootstrap functionality as described here ON THE BOOTSTRAP SITE, first the link to the CSS stylesheet:

bootstrap_css

Now we can add javascript and jquery for things like navbar dropdown functionality:

bootstrap_javascript

Now we’ve got Bootstrap working, right now our demo site isn’t going to look much different, but the Bootstrap page has very explicit instructions for what you have to do to add different components to your site.  I’m interested in putting a Navbar at the top of my site, so I just search the site for Navbar and I find the following, with all the markup I need to go into my .html file… like so:

add_navbar

And now when we go back to my website, you can see the default Navbar is now at the top of the page:

final_boot
Once you figure out how to get the Navbar to the top of the page you should be equipped with enough know-how to continue searching through the Bootstrap documentation to experiment with formatting your bootstrap infused .html site.


Posted in Uncategorized | Comments Off on Demo 2: Considering Bootstrap

Homework 2

The making of personal computers were a work in progress ever since the 1950s. Beginning with one of the most influential computers, the “Whirlwind” which was developed at Massachusetts Institute of technology  was the first computer to operate in real time. The Whirlwind set  foundation for future computers since it used video displays and later on led to the development of the Semi-Automatic Ground Environment (SAGE) as well business computers.

The future of computers had to be interactive in order for further development to occur. According to John McCarthy, developer of LISP,  computers had to have some sort of logic behind it. The “advice taker” would allow humans to deal with computers “in terms of their own common sense.”

Marshall McLuhan was a great thinker, he coined the idea that the way a message is received and interpreted depends on the medium by which it is conveyed (The medium is the message). Personally, I agree with this and it definitely stood out to me, for e.g. watching a trailer of a video game and actually playing a video game is a completely different experience. This same theory could be applied when trying to reach out to a specific group of people.

Computers have definitely evolved a great deal from the mid 1900’s where they were neither interactive or personal; from only being able to perform one task, to being able to satisfy almost all of its owner’s needs. The computer has become a cultural tool cornerstone in today’s world. This means that every day knowledge about computers are being passed on to the next generation  so they can further develop it to satisfy future needs.

From the idea of the Dynabook which was described as a personal computer for children we have laptops and tablets which make it easy for us to be ultra-mobile witch regards to large amounts of documents etc.

Today, computers are able to adapt to a user’s needs and even help inexperienced users to understand how a device works through use of a graphic user interface. This allows them to visualize and conceptualize things easier resulting in easier interaction with computers that facilitates “learning, discovery and creativity” although according to Manovich what media was did not follow the furtherance of digital development and growth through open source software.

*sorry about the late post, I had some internet issues over the weekend. *

Posted in Assignments | Tagged | 2 Comments

Demo 2: The Text Editor

I’m going to be adding to this post, but I wanted to give you all primary links to the text editors I’ll be using tomorrow (9/3/14) ASAP.  I’d like everyone to try and download/get one of these working before next Tuesday’s class (9/9/14).

I’ll go over any issues people are having after we finish our homework discussion on Alan Kay at the beginning of class (again: 9/9).

Atom

https://atom.io/

Gedit

https://wiki.gnome.org/Apps/Gedit

Notepad

http://windows.microsoft.com/en-us/windows/open-notepad#1TC=windows-7

Emacs

http://www.gnu.org/software/emacs/


From Wikipedia article on text editors:

Plain text files vs. word processor files[edit]

There are important differences between plain text files created by a text editor and document files created by word processors such asPages,[importance?] Microsoft Word, and WordPerfect.

  • A plain text file uses a simple character set such as ASCII to represent numbers, letters, and a small number of symbols. The onlynon-printing characters in the file that can be used to format the text are newline, tab, and formfeed.
  • Word processor documents generally contain formatted text, such as enabling text to appear in boldface and italics, to use multiplefonts, and to be structured into columns and tables. These capabilities were once associated only with desktop publishing, but are now available in the simplest word processor.
  • Marked up plain text files contain a combination of human-readable text and markup tags, e.g., web pages are plain text with HTMLtags to achieve formatting.

Word processors were developed to allow formatting of text for presentation on a printed page, while text produced by text editors is generally used for other purposes, such as input data for a computer program.

When both formats are available, the user must select with care. Saving a plain text file in a word-processor format adds formatting information that can make the text unreadable by a program that expects plain text. Conversely, saving a word-processor document as plain text removes any formatting information.


Markdown Tutorial

http://markdowntutorial.com/

HTML Tutorial

http://www.inform.umd.edu/UMS+State/UMD-Projects/MCTP/Technology/handouts/html.html#Graphics

HTML Cheat Sheet

http://www.cheat-sheets.org/saved-copy/html-cheat-sheet.png

CSS Tutorial

https://developer.mozilla.org/en-US/docs/Web/Guide/CSS/Getting_started

CSS Generator

http://jdstiles.com/java/ssgen.html


I’d like everyone to try using some form of computational syntax to keep track of their project development.

EX: Let’s say you are wanting to take some of your fashion illustration into an image editor, and add some textures to your design.  Before you even start messing with the graphics editor it is a good idea to start logging your progress, so when you are turning in your final deliverable you can basically just clean up your log and turn it in.


As we think about the text editor, I also just want us to be thinking about workflow:


Your midterm template will most likely appear on its own page on the blog sometime next week.  It will be a downloadable markdown file.  At minimum you will need to know how to open a markdown file in a text editor (which is about as easy as it gets)

Posted in Uncategorized | Comments Off on Demo 2: The Text Editor

Homework 2: Alan Kay’s Universal Media Machine

For next Tuesday’s class please read:

pages 55 – 91 in your textbook


Watch the following video

https://www.youtube.com/watch?v=tQg4LquY0uU

You only have to watch from 00:13:00 minutes in to 1:05:00

Posted in Assignments | Tagged | Comments Off on Homework 2: Alan Kay’s Universal Media Machine

New Media & Cultural Software

Lev Manovich’s article touches on several concepts of new media. Prior to this reading, all I knew about new media was that it is an upgraded form of mass communication that operates on digital technologies. New media is not something that just appeared out of nowhere, it was developed from older media such as print newspapers and magazines. New media is a more efficient and effective way of communicating and spreading the message across the globe than “old media”. New media functions by means of digital computer technologies such as web sites, chat rooms, e-mail, online communities, virtual reality environments, and mobile computing, just to list a few. In Manovich’s first proposition of new media, I found it interesting how he differentiated new media from cyberculture (from my perspective I would have said that they were virtually the same thing). The difference is that cyberculture does not immediately deal with new cultural objects that are made possible by network communication technologies, but instead these cultural objects are the concerns of new media and are made possible by computing, as well as networking. Therefore, we can see that this big difference is based on social phenomena.

Cultural software, on the other hand, offers a new theory of cultural evolution. It demonstrates to us how different ideologies and beliefs grow, spread, and develop. This in turn explains both shared understandings and disagreement and diversity within cultures. We as humans embrace cultural software into our daily lives, and we spread it through communicating with each other and by social learning. Cultural software includes search engines, mapping applications, blog tools, instant messaging clients, and, of course, platforms which allow others to write new software, for example, Facebook. These are all cultural in the sense that they are directly used by millions of people on a global scale and at the same time share loads of cultural media and information.

Cultural Software

Posted in Uncategorized | Tagged | 2 Comments

Homework 1: What Is New Media? What Is Cultural Software?

Welcome to the class blog, each Tuesday I will be putting up a new homework assignment, and assigned students will be asked to give a blog response.

Access syllabus HERE.

Your reading/video/discussion assignments will appear here on the blog each week.  If at any point you need to access only the assignments (not student posts/responses) just click the “Assignments” category on the right hand side of this page.

Each week I will assign one person to respond to the homework with a blog post composed of at least 300 words.  Then I will ask two other students to post a reply of 150 words or more.  I will have everyone in class perform both of these roles an equal number of times.  If you are the blogger-of-the-week, you will be expected to link to an article, image, or movie clip that you can discuss in relation with the week’s assigned reading/viewing.  This portion of your grade will be primarily based on effort, but if it is clear you haven’t actually done the assigned reading/viewing you will lose points.  The assigned blogger should create a new post and in the “tag” section on the right please enter the word “response.”  All assigned responses should be underneath the assigned student post, unless said post is not posted by Friday at midnight.  In this case one of the assigned responders should create a new post and tag it “alt_response”. 


SOFTWARE TAKES COMMAND

soft_takes

First, HERE is a quick introduction to Lev Manovich.  He wrote the textbook we’ll be using in class. || ACCESS CC TEXTBOOK HERE. ||  BUY TEXTBOOK HERE. || We won’t be reading the entire textbook (unless you just want to), but instead will use it as a guide through which to contextualize software we will demo in class.  You can see the list of software we will be taking a look at in Thursday class sessions HERE.

Your first assignment is to read the article What is New Media? 8 Propositions by Lev Manovich

ARTICLE LINKhttp://faculty.georgetown.edu/irvinem/theory/Manovich-NewMedia.pdf

I’d also like you to read pages 1 through 33 in our textbook Software Takes Command also by Lev Manovich.  Pay special attention to Manovich’s 7 aspects of “cultural software”:

  1. Creating cultural artifacts and interactive services which contain representations, ideas, beliefs, and aesthetic values
  2. Accessing, appending, sharing, and remixing such artifacts (or their parts) online
  3. Creating and sharing information and knowledge online
  4. Communicating with people using email, IM, online text and video chat, social networking features such as wall postings, pokes, events, etc.
  5. Engaging in interactive cultural experiences
  6. Participating in the online information ecology by expressing preferences and adding metadata
  7. Developing software tools and services that support all these activities

And if you haven’t had enough, and remain hungry for more lists of high minded concepts, check out 24 Things Most People Pretend To Understand But Don’t

http://www.buzzfeed.com/moerder/things-we-all-pretend-to-understand-but-dont

Have these read (though obviously you don’t have to read that last one) by Tuesday.  Students assigned to post, please do so by Tuesday’s class.

[Tuesday’s lecture slides will be posted here after Thursday’s class]

Posted in Assignments | Tagged | Comments Off on Homework 1: What Is New Media? What Is Cultural Software?