
Launching your site
- Log in at blogs.baruch.cuny.edu with your Baruch username and password.
- Click “Create a Whole New Site” and follow the instructions.
(Note that the site name cannot include spaces or characters other than numbers and letters, and cannot be changed after creating the site. The site title can be changed at any time.)
Navigating to your site
- An email containing a link to your site will automatically be sent to your Baruch address when you create a site.
- Your site is also listed under the “My Sites” top menu whenever logged into Blogs@Baruch, including links to the public area of the site and the Dashboard (administrative interface where you make changes to the site).

Changing privacy and other site settings
- Navigate to the Dashboard of your site via the “My Sites” menu, or via the top menu that appears under the name of your site.
- Select the Settings->Reading menu option (on the left-hand side of the Dashboard).
- Click the “Site Visibility” radio button the corresponds to the level of site privacy you prefer.
- This will affect the visibility of all content on your site. If you limit visibility to registered users you will need to add your instructor as a user of the site. To add a user, choose Users->Import Users from the left menu in the Dashboard and follow on-screen instructions.
- When choosing a privacy setting, keep in mind that you are able to password protect particular posts (instructions for this below).
- From the Settings menus you can also change things like the site title, home page content, and restrictions on commenting.
Customizing the appearance of your site
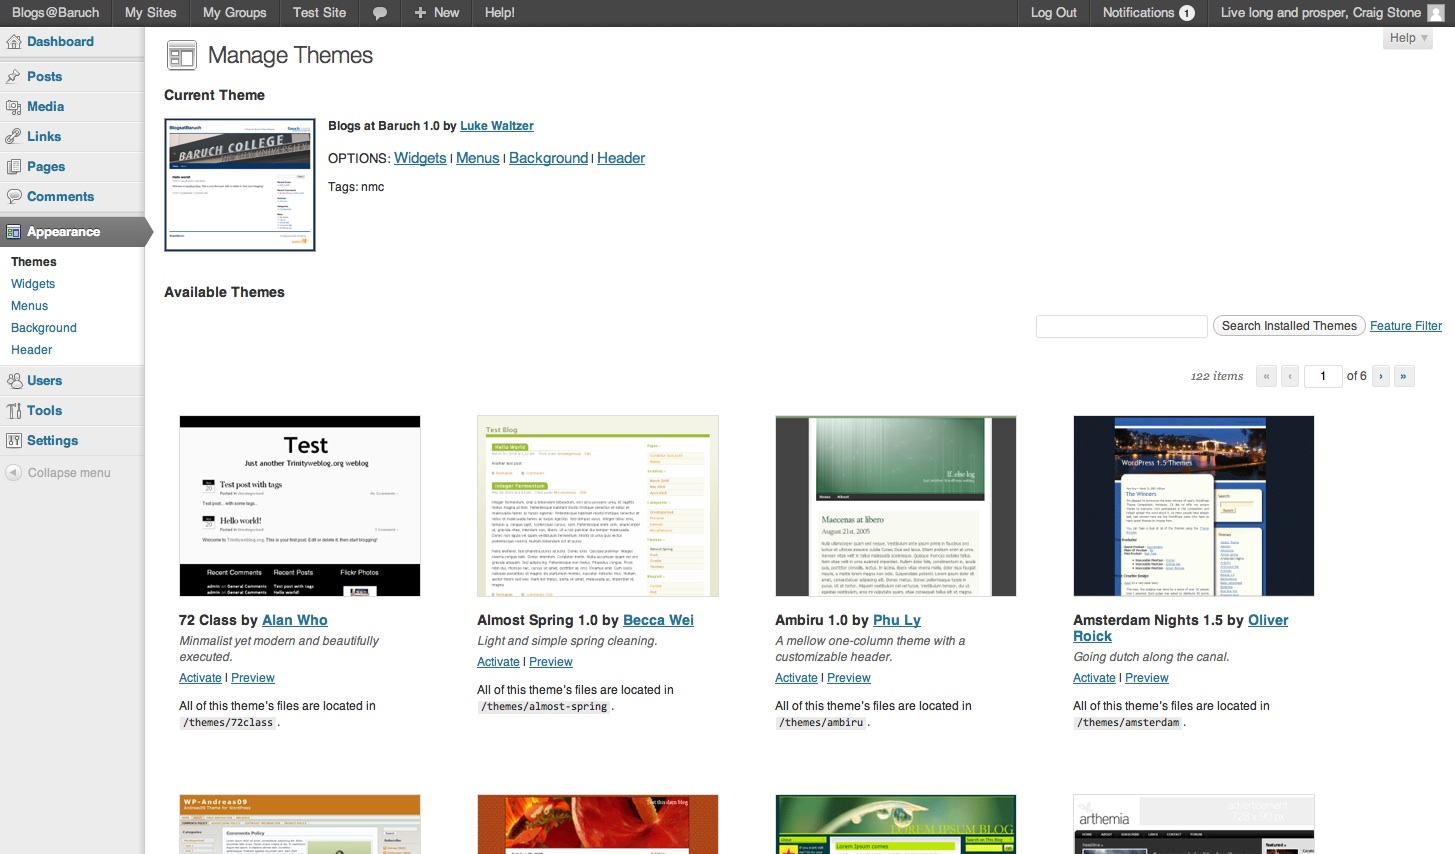
- Select a theme: From the Dashboard, click on the “Appearance” tab on the left and you will be presented with over 100 themes to choose from.
- Customize your theme: Most themes, including the Blogs at Baruch 2013 theme that is applied by default, can be customized by selecting “Customize” from the “Appearance” menu.
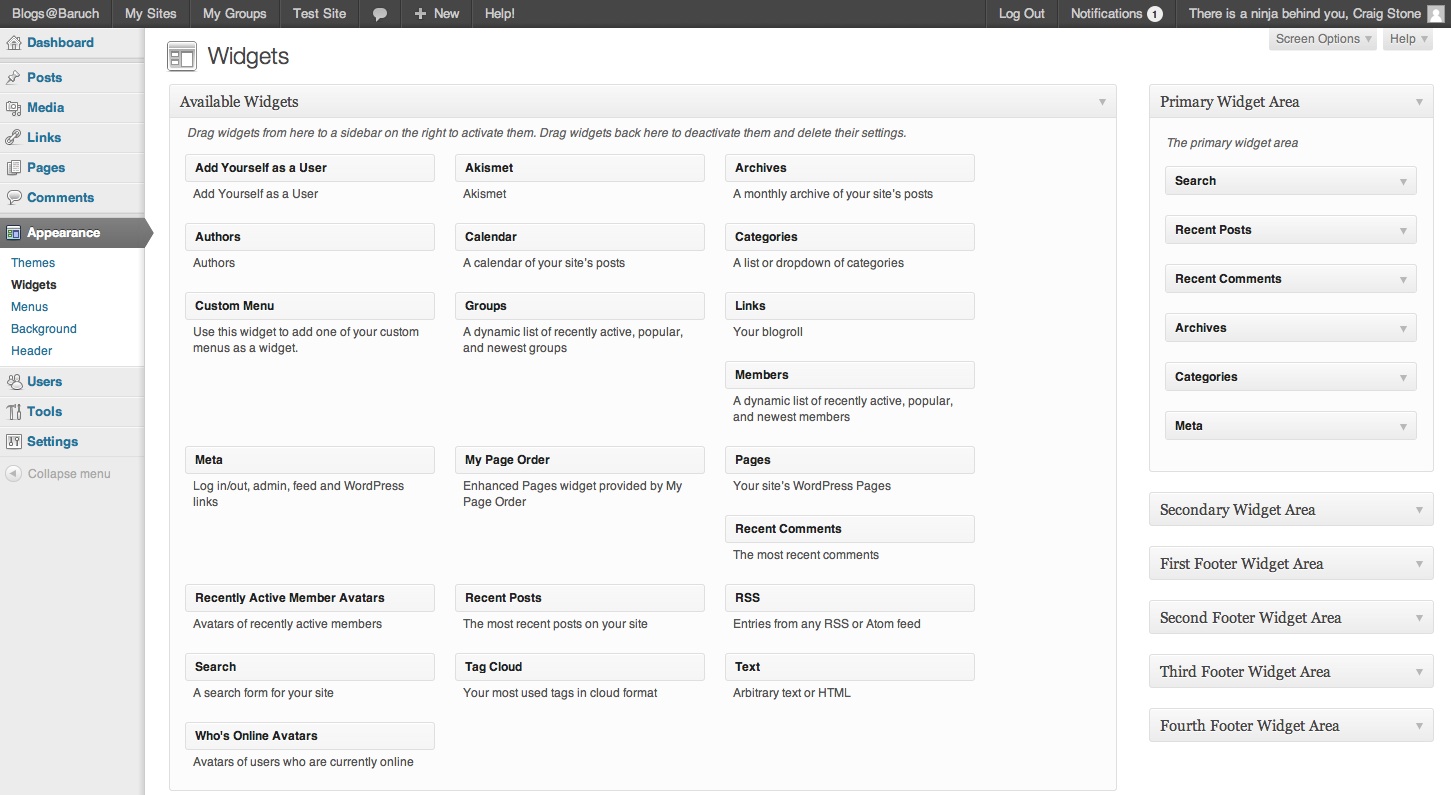
- Arrange widgets: Use the “Widgets” menu item under “Appearance” to adjust the contents in the sidebars and footer of your site.
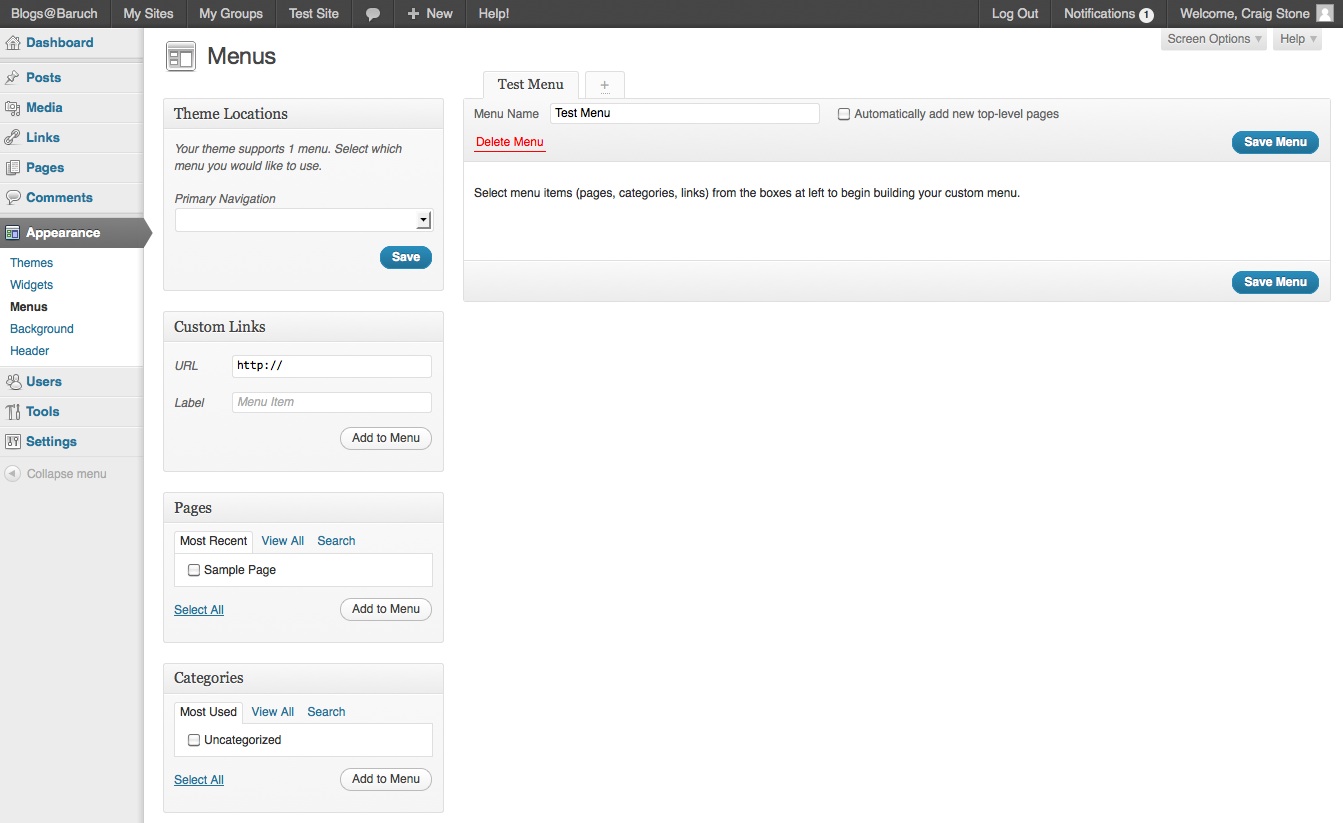
- Customize your navigation menu: Most themes place all of your pages in the blog’s top menu by default, but custom menus allow you to override the default top menu settings. You can create menus that will link to any page, post, category, tag, or outside link that you’d like.
- Choose Appearance->Menus from the Dashboard left menu to add a custom navigation menu to your site.
- Choose from pages, links, and categories on the left, and click the “Add to Menu” button.
- Under “Menu Structure,” arrange the menu items in the desired order. You can create sub-menus by dragging one menu item on top of another.
- Under “Menu Settings,” check off “Navigation Menu” if you wish for this menu to serve as the main site navigation menu (on the top of every page).
- Click “Save Menu” when finished.
Click the thumbnails below to see full-size images of each page.
- Choose Appearance->Menus from the Dashboard left menu to add a custom navigation menu to your site.
Writing a post
- Select Posts->Add New from the left menu in the Dashboard.
- Enter a title.
- Enter a body, which may consist of text and other forms of media. You can format, style, and link the text using the buttons at the top of the composition area.

Formatting Buttons — click for full-size - Hyperlink text by highlighting it with your cursor and clicking the formatting button that has an icon of a chain, which will prompt you for a web address to link to.
- Add media
- To add still images, click the “Add Media” button above the composition area.
- Insert a URL or upload a file, add metadata (including a link to the original content if found elsewhere on the web), and insert into post.
- (You are encouraged to select “Insert from URL” for copyright purposes and to minimize the file size stored on the Blogs@Baruch server. If you do choose to upload a file from your computer, reduce the file size as much as possible before uploading. If you exceed the file space limit for your blog, please contact [email protected]).
- To insert a gallery of images, select “Create a Gallery” after clicking “Add Media,” select or upload images, create the gallery, and click “Insert gallery.” Contact [email protected] if you wish to activate the Lightbox plugin shown in class.
- To embed video from YouTube and Vimeo into a post, copy the URL (not the embed code, just the web address) of the video into the post composition window and it will (provided sharing settings don’t restrict it) embed when you preview or publish the post.
- To embed audio from Soundcloud.com or Spotify.com, copy the URL of the audio into the post composition window.
- To embed slideshows, text, and PDF documents from www.scribd.com copy the URL of the media into the post composition window.
- To add still images, click the “Add Media” button above the composition area.
- Categorize your post in the “Categories” box on the right side of the post editor. As an administrator you can add new categories.
- Tag your post in the “Tags” box on the right side of the post editor. In combination with categories, these can be used later to sort your content.
- Password protect your post, if necessary, by changing the “Visibility” in the “Publish” box on the right side of the post editor.
- Preview, Save a Draft, or Publish your post using the buttons in the “Publish” box on the right side of the post editor.

Creating a page
- The benefit of creating a page (as opposed to a series of posts) is that you can publish content that remains in a single location of your site even as new material is added.
- Select Pages->Add New from the Dashboard left menu to create a new page on your site.
- Add content to the page and publish when finished.
- Most themes place all of your pages in the blog’s top menu by default, but custom menus allow you to override the default top menu settings. See “Customize your navigation menu” instructions above.
Questions?
- For assistance on the assignments for your class, please consult with your professor.
- For technical assistance, please see the help materials available via the “Help” menu at the top when logged in, or use the contact form at https://blogs.baruch.cuny.edu/contact/