Advanced Multimedia Reporting 2019

Settings Cheat Sheet

Settings Cheat Sheet

Movie rec. size: 1920×1080 and 30fps
Shutter speed: 1/60 (or multiples of 30, ie if it’s very low light you can go down to 1/30 or if it’s very bright you can go higher)
ISO: Remember that if you go much higher than 800 or 1600, the image will start to get grainy. Sometimes this can’t be avoided, but avoid it if you can.
Aperture: The lower the f-stop, the more light you’re letting in, and the more dramatic the depth of field.
White balance: You can use Auto White Balance (AWB) if you expect to be changing light temperatures mid-shot (following someone outdoors, for instance). Otherwise it’s best to set it manually.
Movie Servo AF: Disable if you want to be able to control focus manually, and set the button on the lens itself to Manual Focus (MF).

Class Agenda: Monday, Feb. 4

Workshop: Using the cameras

THE BASICS

How to turn the camera on

How to attach a lens

Where to put your card and battery

Formatting card

Toggle button over to red video camera icon

Set to Manual

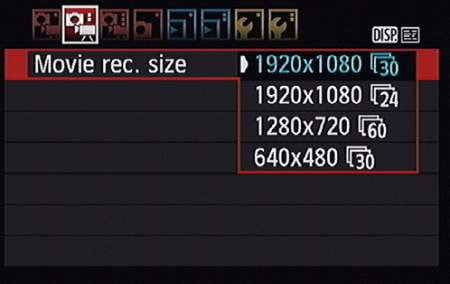
Movie rec. size: Most often in video journalism, you’re going to select 1920×1080 at 30 fps with IPB compression. 

You’ll select 60 fps if you’re shooting footage you intend to use in slow-mo.

Frame rate: 29.97 frames per second vs. 23.976 fps (realism vs. dreamy) and 30 vs. 60 fps (larger files and barely perceptible difference, it’s what you’ll use for shooting in slow-mo).

ALL-1 vs. IPB compression: Use All-I for short clips that need tight editing; IPB compression is good when long continuous recording is necessary but tight frame by frame editing is not required in post, and it is better if you’re concerned about running out of space on your card.

Video System: NTSC (most commonly used in North and South America; PAL tends to be the standard elsewhere)

Record button

Moveable LCD screen

FOCUS

It is really easy to shoot video that is OUT OF FOCUS with these cameras. If your stuff isn’t in focus, you just wasted a lot of people’s time. So pay attention to focus at all times.

  • Use the focus ring on the lens to shift focus (turn ring with your elbow down, not sticking out sideways)
  • Zoom in all the way on your subject and focus, then zoom back out to your desired framing; the subject will stay in sharp focus

SHAKY SHOTS

Because the sensor on these cameras is so large and sensitive, any little movement you make will cause camera shake. These cameras are basically impossible to handhold. Some camera lenses have image stabilization technology, but it makes a low-lowel, constant mechanical grinding sound that is audible on your camera, so unless you are recording audio separately and syncing later, TURN OFF THE IMAGE STABILIZATION (IS) FEATURE ON YOUR LENS. You should be using something else to stabilize the image anyway.

  • Use a tripod
  • Or use a monopod
  • Or use a shoulder mount
  • Set the camera down on a flat surface (the ground, a table, a stack of books, etc.)
  • If you are in a breaking news situation and must handhold (not recommended) or you are on top of a ladder or in some extreme circumstance, you can turn your body into a makeshift tripod by using both your arms and your face—if the camera is connecting with three points, it is always steadier.

IN-CLASS ASSIGNMENT: 10-shot sequence that tells a story

This will be similar to the 5-shot sequence you all learned in your previous multimedia class, but you have a bit more room to be creative. Feel free to start with a 5-shot sequence, or incorporate some of those shots throughout; remember that the purpose of a sequence is to orient the viewer as to where we are, what we’re seeing, what is happening, and how it’s happening. Use your ten shots to tell a story.

In terms of sound, it can be your choice: This can be a silent film, or you can use natural sounds, or you can choose a piece of music to accompany the action.

You’ll do this in groups of two or three people. If you aren’t able to finish editing and uploading the video this class, we will finish it at the beginning of next class and then screen them together.

Don’t forget to set up your shot before you hit record. Record a steady shot for at least ten seconds before you stop recording.

A couple of examples from previous classes:

Here are some resources where you can find free music/sounds:

https://freesound.org
http://soundbible.com
https://www.audioblocks.com
http://freemusicarchive.org
https://www.youtube.com/audiolibrary/music
http://dig.ccmixter.org

Call me if you run into any trouble:

7743190491

Reminder: Pitch for video #1, a visual poem, due on Monday Feb. 11, when we will workshop all your ideas as a class. Post it here on the class blog. The pitch should include what you plan to shoot, how you’re going to get access (if relevant), and how you plan to structure and edit it. What can we expect the visuals to look like? What sounds and music can we expect to hear? Do you have the rights to the music? What is the visual poem trying to do, exactly? Do you want it to tell a story? Convey a feeling?

You have the option of teaming up with a partner on this first major project for the shoot; however, everyone will need to submit an edited piece separately.

Class Agenda – Wednesday, Jan. 30

Upcoming Dates

Assignment: Pitch for video #1, a visual poem, due on Monday Feb. 11, when we will workshop all your ideas as a class. Post it here on the class blog. The pitch should include what you plan to shoot, how you’re going to get access (if relevant), and how you plan to structure and edit it. What can we expect the visuals to look like? What sounds and music can we expect to hear? Do you have the rights to the music? What is the visual poem trying to do, exactly? Do you want it to tell a story? Convey a feeling?

Next week in class, we will practice using the cameras and shooting and editing a short video.

Discussion

We’ll screen the videos you posted for your homework assignments and talk about them together: What you found inspiring about them, what worked or what didn’t, what we can surmise about the filmmaker’s process.

And a couple of refreshers before we get our hands on the cameras next week: Composition 101, DSLR camera settings, and how we apply these settings to video.

SETTINGS

White Balance

You can always use auto white balance on the fly or if you’re uncertain as to the light temperature. The problem with AWB though is that it can change when light changes, even a little bit. So if you’re shooting a person talking and they lean forward, the colors in your shot could potentially take on a different tint.

  • White balance will only appear in the menu as an option if you’re not shooting in Auto.
  • There are little pictures in the camera to help you with white balance.

  • The picture of the light bulb is TUNGSTEN LIGHT. Tungsten light is most indoor light (except for FLUORESCENT LIGHT, which has its own setting)—lamps, non-fluorescent overhead light, most stage lights, etc. Tungsten light is ORANGE. So when you tell your camera you are shooting in this orange Tungsten light, it corrects for it by adding what is at the opposite end of the color wheel (blue).
  • The picture of the sun is for outdoor light, or KELVIN LIGHT. Kelvin light is BLUE, so the camera corrects for it by adding orange. There are also pictures for different gradations of light (i.e. shade, cloudy).

  • You can also MANUALLY set your white balance in numbers based on the KELVIN SCALE. This is very useful for two-camera shoots where you want the light temp of both cameras to match.

EXPOSURE

When you are controlling for exposure, that means you’re telling the camera how much light to let in.

When using a DSLR, there are THREE WAYS to tell the camera how much light to let in

  • Shutter speed
  • ISO
  • Aperture (F-stop)

SHUTTER SPEED

  • For still photos, the shutter speed is important because it tells the camera in what way you want it to freeze motion (do you want a bike whizzing by to be a blur in the photo or do you want it to be completely frozen so you can see every detail?) Since we are shooting moving images, we don’t have to worry about this. For video, as a rule of thumb, you want your shutter speed to be double the number of frames per second you are recording. Since with these cameras, we’ll be shooting in 30 frames per second, WE SET OUR SHUTTER SPEED AT 1/60.

  • We shoot with our shutter speed at 1/60 probably 99% of the time. However, to let more light in in a low-light situation, you can get away with setting your shutter speed at 1/30.  DON’T SET IT LOWER THAN 30 BECAUSE IT WILL MAKE YOUR IMAGE STUTTER.
  • If it’s really bright out or you’re shooting a performance with hot stage lights and you want to let in less light, you can, however, set your shutter speed higher than 60 (in multiples of 30—so you can set it at 90, 120, etc.)

ISO

 ISO tells your camera sensor how much light to let in.

  • THE HIGHER YOUR ISO NUMBER, THE MORE LIGHT YOU ARE LETTING IN.
  • Remember, with DSLRs it is always a give and take, push and pull relationship with letting in light and image quality. So the higher your ISO number, the grainier your image.

  • In general, if you are outside you’re using a lower ISO (like 100 – 320) since outdoor light is brighter, and inside you’re using a higher number (like 800 – 1600) since indoor light is weaker.
  • Generally if you use an ISO 2000 or higher you start to see grain on these cameras (although that doesn’t mean you should never do it.) 

APERTURE (F-STOP) 

  • F-stop tells your lens how much light to let in
  • THE LOWER YOUR F-STOP NUMBER, THE MORE LIGHT YOU ARE LETTING IN
  • The other important thing your f-stop controls is your DEPTH OF FIELD
  • DEPTH OF FIELD: the distance between the nearest and the farthest objects in a shot that appear in focus.
  • The LOWER your f-stop number, the SHALLOWER your depth of field.
  • The HIGHER your f-stop, the DEEPER your depth of field (i.e. more is in focus)
  • Even though a shallow depth of field looks really cool and cinematic, you have to ask yourself if it is serving the story well. There are absolutely storytelling reasons you would want everything in the shot in focus and other storytelling reasons you would want only a small portion of the shot in focus.
  • MAINTAINING FOCUS WHEN SHOOTING WITH A SHALLOW DEPTH OF FIELD IS WHAT TRIPS A LOT OF PEOPLE UP. At f/2.8, for example, your subject’s eyes might be in focus, but the tip of her nose is not. If she moves forward even half an inch, her eyes are no longer in focus. So you have to be on your toes at all times shifting the focus ring to maintain focus on her when she leans in to tell you that juicy secret, or your moment is lost.

The relationship between the ISO and the f-stop is what you’re always negotiating when deciding what to shoot.

The LCD screens on our cameras skew a little dark, so it is easy to OVEREXPOSE (let too much light in so your shot is blown out—similar to blowing out your audio because your mic levels are up to high, or “too hot.)

What overexposure looks like.

Announcements

If you’re interested, please come out to the first Dollars and Sense meeting of the semester next Thursday at 1pm.

Consider joining the Baruch Journalism Students and Alumni Facebook group for job and internship postings and networking with alumni.