Advanced Multimedia Reporting

Class Agenda: Thursday, April 16

Long-Form Filmmaking

It’s an exciting time in the documentary filmmaking world, especially with streaming sites getting in on the game and producing and distributing so many buzzy, prestige, high-production-value feature-length docs and docu-series. Think about how many documentaries and docu-series in recent months and years have been talked about around the dinner table: Tiger King, Cheer, Surviving R. Kelly, Wild Wild Country, Leaving Neverland.

In this class, you have been learning to do things more or less “one-man-band” style. On a well-funded documentary project, there are more roles available: DP (director of photography), B camera operator, lighting technician, sound technician, producer, editor, etc. If you continue pursuing this field, you may find that there’s something in particular you are drawn to. Maybe you love shooting but hate editing, or vice versa. Maybe you’re a fantastic ideas person and extremely good with people and making things happen, but not as strong with the technical parts of filmmaking.

All that said, there are still plenty of documentary films out there being made by one person.

Benefits/costs of working alone vs. with a team?

Cartel Land: A film made mostly by one guy filming alone for nine months.

“As someone who [is] a director and a producer, and also shoots themselves, it makes it a lot easier to just jump in because I don’t have to necessarily raise money,” Heineman told IndieWire in a panel discussion at the Sundance Film Festival, where his first film “Ghosts” premiered. “Canon was very supportive of me — [they] give me a camera to help shoot this, so it was very easy to just dive in and start making this.”

Feature-length documentary shot by one woman: First to Fall

Interview with filmmaker Rachel Beth Anderson: 

How do these kinds of solo independent doc films get made, financially speaking?

Depends on the film. If it’s a passion project and the filmmaker has the access, equipment, and time, they might be able to do most of it themselves. Or the filmmaker may start off covering expenses themselves, and then once they have enough footage to show people, they cut together a “sizzle reel” and either crowd-fund it on something like Kickstarter, or they apply for grant funding, find a private donor, team up with a production company, etc.


When Lambs Become Lions director Jon Kasbe did several trips to Kenya and began filming on his own… once he had enough footage and had applied several times, he won a grant for $50,000 to finish it. Then he took it to film festivals hoping to find a distributor. It premiered at Tribeca and then the NY Wild Film Festival. Now you can rent it on Amazon Prime.

The Business of Multimedia Journalism

Learning how to come up with a story, report that story, compose a photograph, mix sound, and shoot B-roll and then put it all together into a clear and cohesive story is only half the battle. Something that often gets left out in school is the practical side of how to make a career out of this. Sure, you might get a good internship while you’re still in school and then get hired and start working your way up. But there are a lot of different ways into the industry, and a lot of them involve taking a little bit of initiative. I’d venture to say that most journalists I know have freelanced at one point or another.

Freelancing can be a great gig, and it can also be terrifying when you’re first starting out. Here are a few common issues freelancers often run into:

What’s the deal with taxes? You still have to pay them. You’ll become very familiar with the 1099-MISC form. Keep your receipts so you can write off as many business-related expenses as possible: Equipment, plane tickets, etc.

How do you make sure you get paid in a timely manner? Send an invoice as soon as you file the story. I usually ask the person receiving it to confirm they’ve received it and to tell me when I should expect the money to arrive. If they don’t respond, follow up early and often. “Polite but incessant” is my motto.

How do you know how much money to ask for? It’s easy to undervalue your skills when you’re first starting out, but it’s worse to ask for too little money than to ask for too much. Some publications have set rates: a flat rate for a certain kind of story, or a day rate, or they’ll pay by the word. In other cases, there’s room for negotiation. If you’re not sure how much to ask for, consult your colleagues. Always try and get them to reimburse expenses.

I can’t use the school’s programs anymore. How much is it to buy Adobe Premiere and Lightroom and all that stuff? Not actually as bad as you might think, because you no longer even have the option to buy them outright; there’s a monthly subscription service to the Adobe Creative Suite that costs anywhere from $10 to $50 a month, depending on how many programs you need.

Do I need a website? YES. Showcasing your previous work is more important than any well-crafted resume. The importance of being able to refer an editor to a slick portfolio website cannot be overstated.

What kind of equipment should I invest in? When it comes to still cameras, if you’re on a small budget, I usually advise people to start with a pretty basic camera body and to invest in a few good lenses if you’re going to spend money somewhere. When it comes to video, it’s become kind of an arms race out there and DSLR cameras don’t always cut it anymore. Take a look at Storyhunter assignments to get a sense of what outlets are looking for:

“C300 or C100 strongly preferred—higher end DSLRs accepted”

“Need to have a C100 or equivalent and lav mics”

“A camera capable of shooting 1080p 24fps and 60 fps for slow motion, if possible 4k video and 120 fps for slow mo”

The good news is that if you don’t have five grand to drop on a camera and audio equipment tomorrow, you can rent gear from places like Adorama and KitSplit.

I just spent an insane amount of money on my new equipment. How do I protect it? Insure your stuff! Renter’s insurance can sometimes cover your gear, but there’s usually a pretty high deductible for theft etc. If you’re planning on working internationally, insurance tends to be quite expensive, especially if you’re working in areas considered “high-risk.” NPPA members get a discount through one company, but make sure to shop around.

Freelancing is lonely. How do I meet other people in the industry? Journalists tend to be a social bunch. It’s an industry where skills are obviously important but where you can also go pretty far on the strength of your personality and on who you know. You already have a huge advantage by virtue of the fact that you live in New York, one of the world’s biggest media hubs. Make yourself known to editors and colleagues by checking out industry events like these:

ScreenUp NYC 

Video Consortium (New York chapter)

The Bronx Documentary Center

RISC Training (first aid training for freelancers who work in remote, sensitive, and conflict areas, often host events/panel discussions at the Brooklyn Brewery
risctraining.org

Resources

  • Photojournalism

The National Press Photographers Association (NPPA membership gets you certain benefits, including discounted camera insurance and press accreditation; follow them to find out about grants)
https://www.facebook.com/groups/2233179993/

Photography/Multimedia Internships and Jobs (great place to find out about entry-level opportunities)
https://www.facebook.com/groups/608650785837641/

Photo Grant Opportunities (great place to learn about grants/competitions/exhibitions for emerging photojournalists) https://www.facebook.com/groups/205928780146/

Lightstalkers/N11 (for photojournalists)
https://www.facebook.com/groups/5235712822/

Photojournalism Now (blog focused on photojournalism and social documentary photography)
https://www.facebook.com/PhotojournalismNow/

Women Photograph (a resource for female* documentary and editorial photographers and the people who would like to hire them—GRANTS!)
https://www.womenphotograph.com/

Eddie Adams Workshop (a prestigious, game-changing, three-day workshop for emerging photographers in upstate NY that puts you in a room with some of the biggest names and top editors in the industry)
https://www.facebook.com/EddieAdamsWorkshop/

The New York Times Portfolio Review (free but competitive, puts you in a room with some of the top photo editors in the world for advice and critiques on your ongoing photo projects)
https://lens.blogs.nytimes.com/…/applications-open-for-the…/

Photoville
http://photoville.com/

The International Festival of Photojournalism
http://www.visapourlimage.com/en

  • Audio Journalism

Third Coast Audio Festival
https://thirdcoastfestival.org/

Public Radio NYC Google group. Be warned, you’ll get a LOT of emails but it’s a great place to pick up transcription work and the occasional tape sync, which usually pays about $150 for a fairly easy recording gig: [email protected]
(Let me know if you’d like me to add you.)

Radio Women Rule the World (for women in radio) https://www.facebook.com/groups/1514423228769048/

  • Video Journalism

Storyhunter (online brokerage where videojournalists and filmmakers can apply for assignments)
https://storyhunter.com

Global VJs
https://www.facebook.com/groups/globalvjs/

Binders Full of Video Journalists (for female VJ’s) https://www.facebook.com/groups/1006816089433804/

  • All Media

Vulture Club (for international journalists) https://www.facebook.com/groups/197918473577006/

The NVC (the non-Vulture Club, founded by people who were kicked out of Vulture Club—long story)
https://www.facebook.com/groups/439000736155194/

Freelancers Get Your Freak On (for freelancers who work in different media and are looking to collaborate) https://www.facebook.com/groups/1021852794578554/

Journo Housing Exchange (for wandering journalists looking for short-term housing around the world) https://www.facebook.com/groups/1639458896367607/

Journalism and Trauma (a place to discuss how we as journalists engage with trauma, from how to interview someone who has experienced it to how to cope with our own direct or indirect trauma)
https://www.facebook.com/groups/468146643386958/

Ladies Writing and Journalism (for female print journalists)
https://www.facebook.com/groups/159810750800770

Binder of International Reporters (for women who work internationally) https://www.facebook.com/groups/634887219990543/

Binders Full of Digital Journalists (for female journos who work in digital) https://www.facebook.com/groups/globalvjs/

Riot Grrrls Of Journalism (global group for women who work in all different media) https://www.facebook.com/groups/1698979077092920/

  • Formal Groups/Organizations

New York Association of Black Journalists (NYABJ) https://www.facebook.com/NYABJ/

(NABJ) National Association of Black Journalists
https://www.facebook.com/NABJOfficial/

South Asian Journalists Association (SAJA)
https://www.facebook.com/South.Asian.Journalists.Associati…/

Asian American Journalists Association
https://www.facebook.com/AAJAHQ/?ref=br_rs

National Association of Hispanic Journalists
https://www.facebook.com/NAHJFan/

Arab and Middle Eastern Journalists Association (AMEJA)
https://www.facebook.com/AMEJAGlobal

Association of Health Care Journalists
https://www.facebook.com/healthjournalists

Society of Environmental Journalists
https://www.facebook.com/SocietyOfEnvironmentalJournalists

Native American Journalists Association
https://www.facebook.com/NativeJournalists

The International Association of Religion Journalists
https://www.facebook.com/The-International-Association-of-R…

Association of Food Journalists
https://www.facebook.com/AFJeats

Overseas Press Club of America
https://www.facebook.com/opcofamerica/

Society of Professional Journalists
https://www.facebook.com/SocietyofProfessionalJournalists/

Committee to Protect Journalists
https://www.facebook.com/committeetoprotectjournalists/

Blink (resource where outlets can search for and hire freelancers)
https://blink.la/

  • Funding Opportunities

International Center for Journalists
https://www.facebook.com/icfj.org/

The International Women’s Media Foundation
https://www.facebook.com/IWMFpage/

Pulitzer Center on Crisis Reporting
https://www.facebook.com/Pulitzercenter/

Open Society Foundations
https://www.opensocietyfoundations.org/

(And many more.)

Class Agenda: Thursday, April 2

Reminder on Dates:

Rough cuts of your docs will be due on Thursday, April 23. Leading up to that date, our equivalent to in-class production days will be a series of 1-on-1 phone check-ins on your progress so if you need coaching or feedback, I can help you with that before it’s all due.

Final cuts of the short doc will be due  Thursday, May 7.

Your portfolio website, which is no longer required to include a reel, will be due on Thursday, May 14, the last day of class.

Discussion: Making a great portfolio website

What medium (or media) are you going to be featuring prominently? Keep that in mind when choosing a template.

A portfolio website is basically an online resume. You’re selling yourself, so make sure you’re putting your best foot forward. Link to your various social media profiles, Vimeo/YouTube accounts, etc. You can even post your resume on there if you like. And write a good bio for your About page, and make sure you have a great picture of yourself.

Some people choose to adopt a more formal tone, while others let a bit of their personality show through. Think about how you want to brand yourself.

Requirements for Final Portfolio and Reel

You’ll need at least two main pages on your site: a Video or Home page where we can view your projects, and an About/Bio page where you describe yourself and your work (names/sections can vary, but that’s the general idea). Some people put their contact info on this page, while others choose to have an entirely separate Contact page. Those of you who have a reel might decide to put it under a designated Reel page. If you have work you’d like to showcase from other classes or personal projects, you are welcome to create a Photography or Audio page… or organize it entirely differently if there’s another system that works for you! Maybe you have a food blog or something you want to integrate into this somehow.

You’ll want a nice professional-looking headshot taken for your bio page, or a shot of you in action reporting. I recommend taking advantage of having your school cameras to do this. And please make sure you proofread. I want to see a sentence or short paragraph introducing each of your projects, on the portfolio site if the template allows space for it as well as on the Vimeo page where the video is hosted.

It is recommended but *not required* for you to link the website to your own domain name, because I don’t want to require any of you to pay a website subscription.

Most of the site builders listed below have basic options that will allow you to host your site for free if you have a ____.wordpress.com or a ____.weebly.com address; often your site will show up with advertisements unless you upgrade (the monthly fee varies). It’s up to you whether or not it’s worth it at this stage to pay for the more polished, professional-looking website that a personalized domain will give you. A domain name will usually run you about $10 a year and it’s fairly simple to link your portfolio site to it by going into the settings and making a few changes. Let me know if you run into any difficulty here and I’ll be happy to help you.


Some examples of multimedia journalist websites:

https://marianahenninger.com/

http://www.amandamustard.com/

http://www.edouphoto.com/

http://www.esthermbabazi.com/

https://www.keithlanephotography.com/

https://www.dannygoldjournalist.com/

https://emilyjreports.com/

https://www.amralfiky.com/

http://www.neilbrandvold.com/


A few popular website builder options:

WordPress

Adobe Portfolio (free if you subscribe to an Adobe programs)

Weebly

Wix

Squarespace (does not have a free version)

Jimdo

Behance


Buying a website domain:

Domain.com

GoDaddy.com

Even if you don’t want to pay to subscribe to a site builder, it might be worth buying your preferred domain name sooner rather than later just to lock it down. (Depends on how common your name is.) Years ago it was somewhat more common to have some kind of creative website name, but that’s rarer these days. I recommend using some version of your own name dot com because it will look the cleanest and most professional.

The process of linking a domain to a website varies slightly based on which ones you’re using, but if you are planning on doing this and having trouble following the instructions most sites provide on this, let me know and I can help walk you through it.

Remote Class: Thursday, March 26

Discussion: The new additional instructional recess, updated spring break dates, and what that means for this class.

  • We won’t “meet” again until next Thursday. If you feel you don’t have the right computer equipment/reliable internet at home to complete the documentary and portfolio website assignments, please let me know so we can get you set up in this interim period.
  • Considering how much this is putting us behind, I’m cutting the breaking news assignment entirely. The logistics are just too complicated and with the constantly moving scheduling goalposts of the last couple of weeks, I won’t be giving an alternate/replacement assignment. If you already filed it, I will give you the option to have it replace your portfolio website assignment OR count for extra credit.
  • I’m also removing the reel requirement for your portfolio websites. You’re welcome to include one, and I recommend that you do if you’re serious about filmmaking as a career. But it’s not required, and because of the limitations on going out and shooting right now, most of you won’t be coming out of the class with as much footage to show for yourselves as you otherwise would have.

Rough cuts of your docs will be due on Thursday, April 23. Leading up to that date, our equivalent to in-class production days will be a series of 1-on-1 phone check-ins on your progress so if you need coaching or feedback, I can help you with that before it’s all due.

Final cuts of the short doc will be due  Thursday, May 7.

Your portfolio website, complete with your reel, will be due on Thursday, May 14, the last day of class.

Discussion: Your audio exercise.

How did it go? Did anyone run into any issues with the Tascam, lav mic, or whatever other setup you ended up using? Now is the time to troubleshoot so we can make sure you’re up and running as you start work on your short docs.

Screening: Visual poems

We’ll look at the handful of visual poems we didn’t get a chance to see yet. (I plan to have these graded for you this weekend—sorry for the delay while I update the curriculum and adjust to remote teaching.)

Remote Class: Tuesday, March 24

No Zoom meeting today!

DSLR Audio Workshop

DSLR cameras shoot gorgeous video, but they are… not great when it comes to audio. They’re not built for capturing high-quality audio; even when you capture it with a decent mic and feed it directly into the camera, it will be compressed and not nearly as good as audio recorded separately on proper audio recorder, ideally with a lavalier or “lav” mic clipped to the collar. Which creates a whole other set of issues when it comes to syncing the audio in post. Fun times! Fortunately, there are a lot of creative solutions out there available at not TOO high of a price.

The Rode Videomic

One thing to be aware of with the Rode Videomic is that most Canon DSLRs with video capability register a pretty audible hiss if you use them with an external microphone in Auto and with the default settings in a quiet environment. This is because the camera has an automatic feature that increases the audio gain in a quiet setting because it’s essentially looking for sound.

With the Videomic Pro, there are recommended settings you can change manually to eliminate this hiss. Unfortunately, we have the Videomic Go, so this doesn’t apply to our equipment, but I still mention it because the Pro is an affordable and a very common mic for videographers who are starting out. (By setting the Rode Videomic Pro’s dB switch to +20 and adjusting the manual sound level setting on the camera to about 20%, you can achieve a virtually hiss-free recording if you’re recording in Manual.)

Still, don’t worry about the hiss too much. It’s great for low-fuss recording in situations where there might be a low level of background noise (outside with birds chirping, etc., on a street with a bit of traffic noise, etc.) and if you’re in a totally quiet environment there’s a good chance you’re in a controlled environment like an office where it’ll be easier to use the lav mic anyway.

Using the Tascam

The Tascam is the audio mixer in your kits in the bubble wrap. It allows you to record audio from multiple mics/sources at once. You can record that audio separately to be synced later or feed it directly into your camera to avoid having to sync it. There are good reasons why you may or may not want to do that.

If you’re feeding audio from multiple mics into the Tascam, it will record them separately which can help you in editing later, but when you’re monitoring the audio on your headphones you will hear the sound from both mics at once together. If you feed the audio directly into the camera, each separate track will be combined into one (and at a lower, more compressed quality to boot) meaning you will lose the ability to mix those multiple sources separately in post.

It will, however, allow you to avoid the often time-consuming process of syncing your high-quality audio with the clips filmed on your camera that are paired with the low-quality, built-in camera audio.

You can sync audio within Premiere Pro using the Merge Clips feature (demonstrated below) which is a lot easier than trying to do it manually. Watch this and pay attention to what he says about doing a loud clap once both camera and audio recorder are recording, which will help when it comes time to sync the audio.

But even with this tool, syncing can be a pain, especially when you consider that DSLR interviews are by necessity often broken into shorter clips than you might find with other video cameras (they can generally only record for about 12 minutes before they will stop recording automatically and you will need to begin a new clip, meaning you may need to do this a number of times).

I’ve also found sometimes that “Merge Clips” doesn’t always work, and you’ll need to go in and line things up manually, which usually requires you to zoom all the way in and adjust the sync frame by frame to make sure it’s lined up perfectly. The visual waveforms are hugely helpful in terms of making sure the sync is exact; I recommend stretching out your audio tracks vertically so you can see the waveforms while you’re doing this.

So whether or not you decide to input the Tascam audio into the camera will depend on your individual assessment of what’s most important for this project; ie ease vs. quality/control. I personally always record the audio separately.

Exercise

Set up your cameras for an interview with the lavalier mic. Practice interviewing someone about their day, first with the Tascam recording the audio separately and then with the Tascam feeding the audio into the camera. (You can also just mic yourself and talk about your own day if you’re the only one at your place right now.) Make sure to start a new video clip when you switch recording methods. It only needs to be 30 seconds to a minute. Upload your footage and your audio into a new Premiere Pro project and practice syncing the audio. Post on the blog.

The Tascam gets mounted onto your tripod and then your camera gets mounted on top of it. The long XLR cable will connect the Tascam to the lav mic. Clip the lav mic pack to your belt, and ask your interviewee to run the lav mic under their shirt and clip it to their collar. Plug your headphones into the Tascam as well so you can monitor the audio. The very small cable in the clear box is what allows you to feed the Tascam audio directly into the camera.

I know it’s not ideal that I can’t be there with you in a classroom to give hands-on instruction while you’re getting the hang of this equipment, but I’ll be available by phone/FaceTime etc. in case you need assistance! Please don’t hesitate to call.

Class Agenda: Tuesday, March 10

Upcoming dates: Pitches for 4-5 minute short doc due Tuesday next week, March 17.

Breaking news story must be completed and filed by class time on March 24. 

The first rough cuts of your docs will be due on Thursday April 2, before we split for spring break.

Final cuts of the short doc will be due  Tuesday, May 5.

Your portfolio website, complete with your reel, will be due on Thursday, May 14.


Today’s Discussion:

We’ll look at a selection of short docs for inspiration.

As watch these, I’d like you to pay attention to the following things and make notes so that you can refer to them when we discuss afterward:

Is there music? How is it used? How do you feel about the sound mixing in general?

How would you describe the filmmaker’s shooting style? (For instance, are there lots of slow-mo, lots of handheld shots, lots of close-ups?) What about their editing style? (Frenetic/fast-paced? Clever transitions? Slow/lingering/meditative?)

What is the pacing like? How does it serve the story?

How is the story structured? Are there different scenes/chapters? How many? Are there clear scenes or does it all flow together?

What kind of B-roll is there? Is some of it creative/thematic B-roll, rather than a more literal visual of what is being discussed?

Finally, ask yourself what went into the making of this doc. How do you think the filmmaker got access? How much trust was necessary in order to achieve the sense of intimacy the film conveys? How much time do you think they spent with their subjects? What challenges would they have had to contend with in their audio/mic setup?

https://vimeo.com/129230742?fbclid=IwAR10Dre2bqQs3UyvLb0pU-t1SxDm7Op6_kFPEpxe7kIPL6hOcMi8Y-MwXTg

Class Agenda: Thursday, Feb. 20

Discussion

Debrief on our visit to the Bronx. Was it useful? Did it spark any ideas?

Breaking news in video

Most of the work we’ll be doing this semester is slower-paced video where you’ll have the ability to take your time to put together a thoughtful, carefully edited final product. But you might one day find yourself in a spot news or breaking news situation where you’re filing material throughout the day as you get it.

If you are working or stringing for a wire service, they will have a system for filing footage. You’ll need to file something called a dopesheet along with your video material. The dopesheet is basically a summary of what you’re sending them so they can see it all at a glance.

Information Document for AFP TV

Here is an actual dopesheet I filed on a breaking news assignment; feel free to use it as a template. The trick with dopesheets is not only to transcribe your sound bites accurately; it’s to distill the main takeaway of the story, because the news outlets that subscribe to your wire need to know at a glance what the point of it is, why they should care, and why it’s worth them deciding to run it. So it does come back down to good writing. Think about what your nut graph would be.

Chiromo dopesheet

The actual video file you’ll send them (I usually use WeTransfer, although some places may have another system in place, often via FTP) will be minimally edited, but the trick is that you have to work fast. You pull out soundbites, transcribe them, and cut together a sequence of your best B-roll. Then you put it all in one video project (sound bites first, then B-roll), export, and send. It will look something like this:


Discuss: What are some of the practical considerations you might want to keep in mind when covering a breaking news event?

Assignment:

At any point between now and March 18, you will cover a spot/breaking news story. You will file a video with at least three sound bites (from at least two different interviews) and 45 seconds of sequenced B-roll (3-5 seconds per shot) with accompanying dopesheet. The trick is that you must file it within 24 hours of wrapping your filming.

It’s up to you what you want to cover: one option is the Queens St. Patrick’s Day Parade which takes place on the first Saturday of March (I highly recommend this one over the big official parade in Manhattan; I covered that parade once and it was possibly my least favorite assignment of all time. I don’t want to be responsible for any of you quitting journalism).

In addition to the material you film with the school cameras, you will cover the story on social media. I’ve set up an Instagram account for our class where you will post at least one photo to the grid and three Stories updates before you leave the scene. Password: studioh160

What makes a good (or fun) journalistic Instagram post and an informative series of Story updates?

Brainstorm: Breaking news stories/events in the next few weeks.

Rough cuts of your visual poems will be due by class time on Tuesday, March 3.

Reminder: Bring your footage to class this coming Tuesday! We will be devoting both classes next week to in-class editing/production. You should be just about done with your rough cut by the end of Thursday’s class. However, if you would like to hold off on posting it to the blog because you plan to make additional changes to your video outside of class, you may post or update it at any time before class the following Monday, when we will screen and workshop them together.

Final cuts of your visual poems will be due on Tuesday, March 10.

Class Agenda: Wednesday, Feb. 13

Announcement

This annual Roz Bernstein Reporting Day will take place next week (Tuesday, Feb. 18) in the Bronx. Our class will be meeting either at the usual time here at Baruch or at 10am at The Point CDC the Bronx, and we’ll be having a guest speaker. You have the option of attending the entire day of reporting in the Bronx if your schedule permits. (Includes 9:05 or 10am at location TDB, followed by Bronx Defenders at 11:30, 1pm lunch at Xochimilco, and 3pm visit to the Bronx Documentary Center.) Please let me know by the end of the day if you’d like to RSVP to any additional part of this itinerary.

Screenings

We’ll take a look at your 10-Shot Sequences together. Did any questions or challenges arise in the process of shooting and editing these?

Discussion

Things to keep in mind on shooting days:

Get comfortable with the settings and equipment before you go out, especially your tripods since those can be a little tricky.

Bring snacks/water! Filming is physically demanding work.

Know where the public restrooms are near you.

Fully charge your spare battery (as well as the one in the camera) and bring it with you.

Dress warm! Keep your spare battery in a pocket where it won’t get cold;  battery power and camera equipment in general don’t do well in extreme cold or heat.

These are large kits and you won’t need all the gear in them for this video, so anyone who would like to leave the bag in my office is welcome to.

Consider what kind of light you’ll be working with ahead of time and plan accordingly; if it’s likely to be a low light situation, you may want to check out a lens with a lower f-stop.

In video recording settings, Movie Servo AF is the setting which, if enabled, will automatically cause the lens to focus on a subject as it moves. In some situations, you may want this enabled, but remember that it takes control out of your hands so in many situations you may want to disable it.

Settings Cheat Sheet

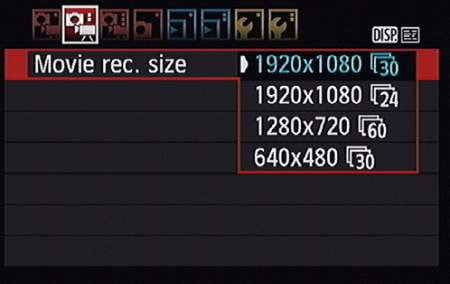
Movie rec. size: 1920×1080 and 30fps
Shutter speed: 1/60 (or multiples of 30, ie if it’s very low light you can go down to 1/30 or if it’s very bright you can go higher)
ISO: Remember that if you go much higher than 800 or 1600, the image will start to get grainy. Sometimes this can’t be avoided, but avoid it if you can.
Aperture: The lower the f-stop, the more light you’re letting in, and the more dramatic the depth of field.
White balance: You can use Auto White Balance (AWB) if you expect to be changing light temperatures mid-shot (following someone outdoors, for instance). Otherwise it’s best to set it manually.
Movie Servo AF: Disable if you want to be able to control focus manually, and set the button on the lens itself to Manual Focus (MF).

We’ll wrap up a little early today so everyone can check out cameras.

Class Agenda: Thursday, Feb. 6

Today we’ll start off by editing your 10-shot sequences.

  • Create a new folder and put all the raw footage in there.
  • Create a new project in Premiere and under Scratch Disks, change the settings so that every part of the project is saved in that same folder.
  • If you’re using an external hard drive, you can place a copy of that folder on your drive when you’re finished to back it up, or you can edit from a folder on that drive to begin with.
  • Export the video, upload it to your Vimeo account, and post it here on the class blog.

Reminder: Pitch for video #1, a visual poem, is due next class (Tuesday Feb. 11) when we will workshop all your ideas as a class. Post it here on the class blog. The pitch should include what you plan to shoot, how you’re going to get access (if relevant), and how you plan to structure and edit it. What can we expect the visuals to look like? What sounds and music can we expect to hear? Do you have the rights to the music? What is the visual poem trying to do, exactly? Do you want it to tell a story? Convey a feeling?


Class Agenda: Tuesday, Feb. 4

Workshop: Using the cameras

THE BASICS

How to turn the camera on

How to attach a lens

Where to put your card and battery

Formatting card

Toggle button over to red video camera icon

Set to Manual

Movie rec. size: Most often in video journalism, you’re going to select 1920×1080 at 30 fps with IPB compression. 

You’ll select 60 fps if you’re shooting footage you intend to use in slow-mo.

Frame rate: 29.97 frames per second vs. 23.976 fps (realism vs. dreamy) and 30 vs. 60 fps (larger files and barely perceptible difference, it’s what you’ll use for shooting in slow-mo).

ALL-1 vs. IPB compression: Use All-I for short clips that need tight editing; IPB compression is good when long continuous recording is necessary but tight frame by frame editing is not required in post, and it is better if you’re concerned about running out of space on your card.

Video System: NTSC (most commonly used in North and South America; PAL tends to be the standard elsewhere)

Record button

Moveable LCD screen

SETTINGS

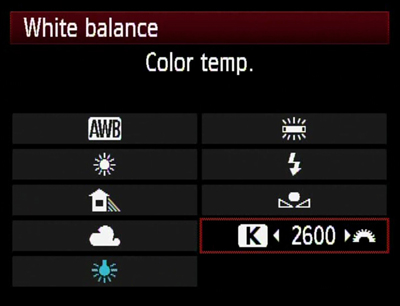
White Balance

You can always use auto white balance on the fly or if you’re uncertain as to the light temperature. The problem with AWB though is that it can change when light changes, even a little bit. So if you’re shooting a person talking and they lean forward, the colors in your shot could potentially take on a different tint.

  • White balance will only appear in the menu as an option if you’re not shooting in Auto.
  • There are little pictures in the camera to help you with white balance.

  • The picture of the light bulb is TUNGSTEN LIGHT. Tungsten light is most indoor light (except for FLUORESCENT LIGHT, which has its own setting)—lamps, non-fluorescent overhead light, most stage lights, etc. Tungsten light is ORANGE. So when you tell your camera you are shooting in this orange Tungsten light, it corrects for it by adding what is at the opposite end of the color wheel (blue).
  • The picture of the sun is for outdoor light, or KELVIN LIGHT. Kelvin light is BLUE, so the camera corrects for it by adding orange. There are also pictures for different gradations of light (i.e. shade, cloudy).

  • You can also MANUALLY set your white balance in numbers based on the KELVIN SCALE. This is very useful for two-camera shoots where you want the light temp of both cameras to match.

EXPOSURE

When you are controlling for exposure, that means you’re telling the camera how much light to let in.

When using a DSLR, there are THREE WAYS to tell the camera how much light to let in

  • Shutter speed
  • ISO
  • Aperture (F-stop)

SHUTTER SPEED

  • For still photos, the shutter speed is important because it tells the camera in what way you want it to freeze motion (do you want a bike whizzing by to be a blur in the photo or do you want it to be completely frozen so you can see every detail?) Since we are shooting moving images, we don’t have to worry about this. For video, as a rule of thumb, you want your shutter speed to be double the number of frames per second you are recording. Since with these cameras, we’ll be shooting in 30 frames per second, WE SET OUR SHUTTER SPEED AT 1/60.

  • We shoot with our shutter speed at 1/60 probably 99% of the time. However, to let more light in in a low-light situation, you can get away with setting your shutter speed at 1/30.  DON’T SET IT LOWER THAN 30 BECAUSE IT WILL MAKE YOUR IMAGE STUTTER.
  • If it’s really bright out or you’re shooting a performance with hot stage lights and you want to let in less light, you can, however, set your shutter speed higher than 60 (in multiples of 30—so you can set it at 90, 120, etc.)

ISO

 ISO tells your camera sensor how much light to let in.

  • THE HIGHER YOUR ISO NUMBER, THE MORE LIGHT YOU ARE LETTING IN.
  • Remember, with DSLRs it is always a give and take, push and pull relationship with letting in light and image quality. So the higher your ISO number, the grainier your image.
  • In general, if you are outside you’re using a lower ISO (like 100 – 320) since outdoor light is brighter, and inside you’re using a higher number (like 800 – 1600) since indoor light is weaker.
  • Generally if you use an ISO 2000 or higher you start to see grain on these cameras (although that doesn’t mean you should never do it.) 

APERTURE (F-STOP) 

  • F-stop tells your lens how much light to let in
  • THE LOWER YOUR F-STOP NUMBER, THE MORE LIGHT YOU ARE LETTING IN
  • The other important thing your f-stop controls is your DEPTH OF FIELD
  • DEPTH OF FIELD: the distance between the nearest and the farthest objects in a shot that appear in focus.
  • The LOWER your f-stop number, the SHALLOWER your depth of field.
  • The HIGHER your f-stop, the DEEPER your depth of field (i.e. more is in focus)
  • Even though a shallow depth of field looks really cool and cinematic, you have to ask yourself if it is serving the story well. There are absolutely storytelling reasons you would want everything in the shot in focus and other storytelling reasons you would want only a small portion of the shot in focus.
  • MAINTAINING FOCUS WHEN SHOOTING WITH A SHALLOW DEPTH OF FIELD IS WHAT TRIPS A LOT OF PEOPLE UP. At f/2.8, for example, your subject’s eyes might be in focus, but the tip of her nose is not. If she moves forward even half an inch, her eyes are no longer in focus. So you have to be on your toes at all times shifting the focus ring to maintain focus on her when she leans in to tell you that juicy secret, or your moment is lost.

The relationship between the ISO and the f-stop is what you’re always negotiating when deciding what to shoot.

The LCD screens on our cameras skew a little dark, so it is easy to OVEREXPOSE (let too much light in so your shot is blown out—similar to blowing out your audio because your mic levels are up to high, or “too hot.)

What overexposure looks like.

FOCUS

It is really easy to shoot video that is OUT OF FOCUS with these cameras. If your stuff isn’t in focus, you just wasted a lot of people’s time. So pay attention to focus at all times.

  • Use the focus ring on the lens to shift focus (turn ring with your elbow down, not sticking out sideways)
  • Zoom in all the way on your subject and focus, then zoom back out to your desired framing; the subject will stay in sharp focus

SHAKY SHOTS

Because the sensor on these cameras is so large and sensitive, any little movement you make will cause camera shake. These cameras are basically impossible to handhold. Some camera lenses have image stabilization technology, but it makes a low-lowel, constant mechanical grinding sound that is audible on your camera, so unless you are recording audio separately and syncing later, TURN OFF THE IMAGE STABILIZATION (IS) FEATURE ON YOUR LENS. You should be using something else to stabilize the image anyway.

  • Use a tripod
  • Or use a monopod
  • Or use a shoulder mount
  • Set the camera down on a flat surface (the ground, a table, a stack of books, etc.)
  • If you are in a breaking news situation and must handhold (not recommended) or you are on top of a ladder or in some extreme circumstance, you can turn your body into a makeshift tripod by using both your arms and your face—if the camera is connecting with three points, it is always steadier.

IN-CLASS ASSIGNMENT: 10-shot sequence that tells a story

This will be similar to the 5-shot sequence you all learned in your previous multimedia class, but you have a bit more room to be creative. Feel free to start with a 5-shot sequence, or incorporate some of those shots throughout; remember that the purpose of a sequence is to orient the viewer as to where we are, what we’re seeing, what is happening, and how it’s happening. Use your ten shots to tell a story.

In terms of sound, it can be your choice: This can be a silent film, or you can use natural sounds, or you can choose a piece of music to accompany the action.

You’ll do this in groups of two or three people. If you aren’t able to finish editing and uploading the video this class, we will finish it at the beginning of next class and then screen them together.

Don’t forget to set up your shot before you hit record. Record a steady shot for at least ten seconds before you stop recording.

An example from a previous class:

Here are some resources where you can find free music/sounds:

https://freesound.org
http://soundbible.com
https://www.audioblocks.com
http://freemusicarchive.org
https://www.youtube.com/audiolibrary/music
http://dig.ccmixter.org

Call me if you run into any trouble:

7743190491

Reminder: Pitch for video #1, a visual poem, due on Tuesday Feb. 11, when we will workshop all your ideas as a class. Post it here on the class blog. The pitch should include what you plan to shoot, how you’re going to get access (if relevant), and how you plan to structure and edit it. What can we expect the visuals to look like? What sounds and music can we expect to hear? Do you have the rights to the music? What is the visual poem trying to do, exactly? Do you want it to tell a story? Convey a feeling?

Class Agenda: Thursday, Jan. 30

Upcoming Dates

Assignment: Pitch for video #1, a visual poem, due on Tuesday Feb. 11, when we will workshop all your ideas as a class. 

Post your pitch here on the class blog. It should include what you plan to shoot, how you’re going to get access (if relevant), and how you plan to structure and edit it. What can we expect the visuals to look like? What sounds and music can we expect to hear? Do you have the rights to the music? What is the visual poem trying to do, exactly? Do you want it to tell a story? Convey a feeling?

Next week in class, we will practice using the cameras and shooting and editing a short video.

Discussion

We’ll screen the videos you posted for your homework assignments and talk about them together: What you found inspiring about them, what worked or what didn’t, what we can surmise about the filmmaker’s process.

And a couple of refreshers before we get our hands on the cameras next week: DSLR camera settings and how we apply these settings to video.

SETTINGS

White Balance

You can always use auto white balance on the fly or if you’re uncertain as to the light temperature. The problem with AWB though is that it can change when light changes, even a little bit. So if you’re shooting a person talking and they lean forward, the colors in your shot could potentially take on a different tint.

  • White balance will only appear in the menu as an option if you’re not shooting in Auto.
  • There are little pictures in the camera to help you with white balance.

  • The picture of the light bulb is TUNGSTEN LIGHT. Tungsten light is most indoor light (except for FLUORESCENT LIGHT, which has its own setting)—lamps, non-fluorescent overhead light, most stage lights, etc. Tungsten light is ORANGE. So when you tell your camera you are shooting in this orange Tungsten light, it corrects for it by adding what is at the opposite end of the color wheel (blue).
  • The picture of the sun is for outdoor light, or KELVIN LIGHT. Kelvin light is BLUE, so the camera corrects for it by adding orange. There are also pictures for different gradations of light (i.e. shade, cloudy).

  • You can also MANUALLY set your white balance in numbers based on the KELVIN SCALE. This is very useful for two-camera shoots where you want the light temp of both cameras to match.

EXPOSURE

When you are controlling for exposure, that means you’re telling the camera how much light to let in.

When using a DSLR, there are THREE WAYS to tell the camera how much light to let in

  • Shutter speed
  • ISO
  • Aperture (F-stop)

SHUTTER SPEED

  • For still photos, the shutter speed is important because it tells the camera in what way you want it to freeze motion (do you want a bike whizzing by to be a blur in the photo or do you want it to be completely frozen so you can see every detail?) Since we are shooting moving images, we don’t have to worry about this. For video, as a rule of thumb, you want your shutter speed to be double the number of frames per second you are recording. Since with these cameras, we’ll be shooting in 30 frames per second, WE SET OUR SHUTTER SPEED AT 1/60.

  • We shoot with our shutter speed at 1/60 probably 99% of the time. However, to let more light in in a low-light situation, you can get away with setting your shutter speed at 1/30.  DON’T SET IT LOWER THAN 30 BECAUSE IT WILL MAKE YOUR IMAGE STUTTER.
  • If it’s really bright out or you’re shooting a performance with hot stage lights and you want to let in less light, you can, however, set your shutter speed higher than 60 (in multiples of 30—so you can set it at 90, 120, etc.)

ISO

 ISO tells your camera sensor how much light to let in.

  • THE HIGHER YOUR ISO NUMBER, THE MORE LIGHT YOU ARE LETTING IN.
  • Remember, with DSLRs it is always a give and take, push and pull relationship with letting in light and image quality. So the higher your ISO number, the grainier your image.
  • In general, if you are outside you’re using a lower ISO (like 100 – 320) since outdoor light is brighter, and inside you’re using a higher number (like 800 – 1600) since indoor light is weaker.
  • Generally if you use an ISO 2000 or higher you start to see grain on these cameras (although that doesn’t mean you should never do it.) 

APERTURE (F-STOP) 

  • F-stop tells your lens how much light to let in
  • THE LOWER YOUR F-STOP NUMBER, THE MORE LIGHT YOU ARE LETTING IN
  • The other important thing your f-stop controls is your DEPTH OF FIELD
  • DEPTH OF FIELD: the distance between the nearest and the farthest objects in a shot that appear in focus.
  • The LOWER your f-stop number, the SHALLOWER your depth of field.
  • The HIGHER your f-stop, the DEEPER your depth of field (i.e. more is in focus)
  • Even though a shallow depth of field looks really cool and cinematic, you have to ask yourself if it is serving the story well. There are absolutely storytelling reasons you would want everything in the shot in focus and other storytelling reasons you would want only a small portion of the shot in focus.
  • MAINTAINING FOCUS WHEN SHOOTING WITH A SHALLOW DEPTH OF FIELD IS WHAT TRIPS A LOT OF PEOPLE UP. At f/2.8, for example, your subject’s eyes might be in focus, but the tip of her nose is not. If she moves forward even half an inch, her eyes are no longer in focus. So you have to be on your toes at all times shifting the focus ring to maintain focus on her when she leans in to tell you that juicy secret, or your moment is lost.

The relationship between the ISO and the f-stop is what you’re always negotiating when deciding what to shoot.

The LCD screens on our cameras skew a little dark, so it is easy to OVEREXPOSE (let too much light in so your shot is blown out—similar to blowing out your audio because your mic levels are up to high, or “too hot.)

What overexposure looks like.

Announcements

If you’re interested, please come out to the first Dollars and Sense meeting of the semester next Thursday at 1pm.

Consider joining the Baruch Journalism Students and Alumni Facebook group for job and internship postings and networking with alumni.