Categories
Uncategorized

Documentary Filmmaking

Reminders and Due Dates

Class on Monday next week (March 4) will be an editing and production day.

The rough cut of the visual poem will be due March 6, which is next Wednesday. The final cut will be due March 18.

Class on Monday next week will be an editing and production day.

Discussion: 20 Days in Mariupol

Let’s go over your thoughts on the film. How did it fit within the storytelling frameworks we talked about last class?

Longer-form Filmmaking

It’s an exciting time in the documentary filmmaking world, especially with streaming sites getting in on the game and producing and distributing so many buzzy, prestige, high-production-value feature-length docs and docu-series. Think about how many documentaries in recent months and years have been talked about around the dinner table: Leaving Neverland, the R Kelly documentary, Wild Wild Country, Abducted in Plain Sight, The Ted Bundy Tapes, Icarus (about Russian doping in the Olympics).

In this class, you have been learning to do things more or less “one-man-band” style. On a well-funded documentary project, there are more roles available: DP (director of photography), B camera operator, lighting technician, sound technician, producer, editor, etc. If you continue pursuing this field, you may find that there’s something in particular you are drawn to. Maybe you love shooting but hate editing, or vice versa. Maybe you’re a fantastic ideas person and extremely good with people and making things happen, but not as strong with the technical parts of filmmaking.

All that said, there are still plenty of documentary films out there being made by one person.

Benefits/costs of working alone vs. with a team?

Cartel Land: A film made mostly by one guy filming alone for nine months.

“As someone who [is] a director and a producer, and also shoots themselves, it makes it a lot easier to just jump in because I don’t have to necessarily raise money,” Heineman told IndieWire in a panel discussion at the Sundance Film Festival, where his first film “Ghosts” premiered. “Canon was very supportive of me — [they] give me a camera to help shoot this, so it was very easy to just dive in and start making this.”

https://youtube.com/watch?v=xC5bpPfltOI%3Ffeature%3Doembed

Feature-length documentary shot by one woman: First to Fall

Interview with filmmaker Rachel Beth Anderson: 

While there seems to be no shortage of cursory stories from the front lines of recent Middle Eastern conflicts, filmmaker Rachel Beth Anderson decided to dig deeper. During the Libyan uprising the duo smartly embedded themselves not with emotionally inaccessible military units but with two Canadian students – friends who cast away their safe and secure western lives to take up arms in the fight to overthrow their homeland’s dictator. The resulting documentary “First to Fall” is an unflinching look not just into the struggle that would eventually oust Gaddafi, but a cinematic, exacting account of how war turns boys into men.

Lauren Wissot: So how did this doc come about in the first place? How did you meet Hamid and Tarek?

Rachel Beth Anderson: I had been living and working in Cairo as a journalist prior to the Arab Spring. When the Egyptian uprising began in 2011 I found myself filming my own friends as they turned from everyday civilians into revolutionaries. Their world as they’d known it was quickly consumed by protests, teargas, and risking their own livelihoods for the hope of a better future. I was fascinated by how quickly they rose to this “call to action,” never wavering as the danger increased, until the current dictator was removed and they were celebrating what they felt was a victory at the time.

It seemed natural to me that I should cover the next country, which happened to be Libya, where everyday people were rising up. Following the youth in Libya was an entirely different experience than in Egypt, because they weren’t just battling teargas, but were up against Gaddafi’s army who had turned his guns on his own people. Specifically, I found myself fascinated with stories such as that of my main protagonists, Libyan expatriates Hamid and Tarek. They were young men my age, studying at university like I did, living a free and comfortable life – and had felt it their personal duty to give up everything, travel thousands of miles, and go to war as untrained soldiers. I knew they would be the perfect individuals to help reach audiences beyond the borders of Libya. Tarek was incredibly sweet and he always felt it was his responsibility to help me tell the story of Libya, and Hamid had one of those strong and silent personalities that magnetized the other young fighters – everyone flocked to be around him. He took on the role of big brother to Tarek, and you could immediately tell there was something to take from these young men who idealistically wanted to create change as freedom fighters, but hadn’t yet considered the outcome.

How do these kinds of solo independent doc films get made, financially speaking?

Depends on the film. If it’s a passion project and the filmmaker has the access, equipment, and time, they might be able to do most of it themselves. Or the filmmaker may start off covering expenses themselves, and then once they have enough footage to show people, they cut together a “sizzle reel” and either crowd-fund it on something like Kickstarter, or they apply for grant funding, find a private donor, team up with a production company, etc.

Example of verite filmmaking: Flint Town

https://youtube.com/watch?v=EfNURrdgWTU%3Ffeature%3Doembed
Categories
Uncategorized

Thursday, Feb. 22: Storytelling Basics

Pitch Workshop

Before we do anything else today, we’ll finish up workshopping the last handful of visual poem pitches.

Storytelling in Film

Here are two frameworks through which we can think about storytelling.

  • THEME
  • MOTIVATION
  • DRAMATIC ARC
    • EXPOSITION
    • RISING ACTION
    • TURNING POINT
    • FALLING ACTION
    • DENOUEMENT
  1. You — A character is in a zone of comfort,
  2. Need — But they want something.
  3. Go — They enter an unfamiliar situation,
  4. Search — Adapt to it,
  5. Find — Get what they wanted,
  6. Take — Pay a heavy price for it,
  7. Return — Then return to their familiar situation,
  8. Change — Having changed.

Homework Assignment

Watch the following feature-length documentary in its entirety. While you’re watching, please note down how the components of this film fit into the basic elements of storytelling discussed above. Which of the two frameworks fit the story told here? (Does one fit better than the other, or do they both/neither work?) Please write a brief (250-300 words) blog post analyzing the scenes, editing, and structure of this film, how it aligns with one or both of these two frameworks, and any other observations or takeaways you feel about the experience of watching it. Post it here on the class site by class time on Monday.

Categories
Uncategorized

Wednesday, Feb. 21: Pitch Workshop

Today’s Class

We’ll go over all of your visual poem pitches and workshop them together.

Tomorrow’s Class (Thursday, Feb. 22)

No homework; we’ll be talking about storytelling.

Categories
Uncategorized

Introducing Video Project #1: The Visual Poem

The idea behind this assignment is to produce a roughly two-minute video that does not rely on interviews to convey a story, but rather the other tools that we have in our video toolbox: visuals, sounds, music, transitions, pacing, etc. Your visual poem should convey something: a narrative, a message, a feeling. It can be something high-concept, or something more straightforward. I’ll show you some examples.

Pitches for the first major assignment of the semester will be due next class, Wednesday Feb. 21, when we will workshop your ideas. Please post your pitch here on the class site by the start of class.

The rough cut of the visual poem will be due March 6. The final cut will be due March 18.

Here is what I’m looking for out of your pitches:

Visual Poem Pitch

  • Access! If this film involves a specific person or place, make sure you have permission from whoever is in a place to give it.
  • A strong sense of what story or feeling you want to convey without words.
  • Ideas for music/use of sound.
  • A clear plan for what you intend to shoot, and the kinds of scenes/imagery you want to come back with.
  • A vision for the editing, both in terms of pace and style.
Categories
Uncategorized

Wednesday, Feb. 7: Premiere Workshop, cont’d

Today we’ll take a look at some of your practice videos using the sample footage I gave you. I’ll then walk you through what I did with the same footage, showing you all my edits on the timeline so you can see my process.

Finally, you’ll get to work on editing your 10-shot sequences. Once you’re satisfied with yours, you can export, upload it to Vimeo, and post it to the class site. If you finish all this in class, you won’t have any homework for Monday. Please make sure they’re posted on the class site by class time on Monday.

Wednesday 2/14 (no class Monday the 12th): We’ll screen your 10-shot sequences as a class and I’ll introduce the first main assignment, a visual poem.

Wednesday 2/21 (no class Monday the 19th): Visual poem pitches due. Pitch workshop.

Categories
Uncategorized

Adobe Premiere Pro: A Refresher on Video Editing

Today, we’re going to make sure you all have access to the editing program you’ll need for all your video projects this semester, and do a quick refresher on using the program to edit video.

First things first: Go ahead and log into one of the classroom computers and open Adobe Premiere Pro. When it asks you to log in, enter first your Baruch email address and then your usual email username and password.

I’m going to give you all some practice footage to work with. You can download it here: Bidibidi footage

In-Class Assignment: Start a new project in Premiere and import the practice footage. Locate the clip that contains an interview. Using soundbites from that interview to provide the narrative structure, edit a one-minute video. You also have a selection of shots that you can browse through to select your B-roll. By the end of class, export your final, edited video, upload it to Vimeo, and post it here on our class site.

Reminder: Your 10-shot sequence is due by class time this Wednesday, Feb 7.

Categories
Assignment #1

Wednesday, Jan. 31: Checking Out Cameras and a Refresher on Settings

Signing Out Cameras

We’ll get everyone set up with a camera—you will receive either a Canon EOS 77D or a Canon EOS T6S.

Please take a thorough inventory of your kit and let me know if anything is missing!

Review: Composing and Framing Shots

What are the two basic categories of shots in video journalism?

What are some of the elements of photo composition that are applicable to video as well?

How does the added element of movement play into composition when it comes to video? What are some ways you might consider framing your shots to capture motion? How can static shots be used intentionally to make use of motion?

What are some narrative reasons you might want to include certain types of shots? (Establishing shots, medium shots, close-ups, five-shot sequence, for example.)

FOCUS

 It is really easy to shoot video that is OUT OF FOCUS with these cameras. If your stuff isn’t in focus, you just wasted a lot of people’s time. So pay attention to focus at all times.

  • Use the focus ring on the lens to shift focus (turn ring with your elbow down, not sticking out sideways)
  • Zoom in all the way on your subject and focus, then zoom back out to your desired framing; the subject will stay in sharp focus

SHAKY SHOTS

Because the sensor on these cameras is so large and sensitive, any little movement you make will cause camera shake. These cameras are basically impossible to handhold. Some camera lenses have image stabilization technology, but it makes a low-lowel, constant mechanical grinding sound that is audible on your camera, so unless you are recording audio separately and syncing later, TURN OFF THE IMAGE STABILIZATION (IS) FEATURE ON YOUR LENS. 

  • Use a tripod
  • Use a monopod
  • Use a shoulder mount
  • Set the camera down on a flat surface (the ground, a table, a stack of books, etc.)
  • If you are in a breaking news situation and must handhold (not recommended) or you are on top of a ladder or in some extreme circumstance, turn your body into a tripod by using both your arms and your face—if the camera is connecting with three points, it is always steadier.

The importance of good quality audio:

https://youtube.com/watch?v=-PLMiA18tBc%3Fstart%3D63%26feature%3Doembed

Review of DSLR Camera Settings
…and how we apply these settings to video

White Balance

https://youtube.com/watch?v=iu1LxvYUXZ

You can always use auto white balance on the fly or if you’re uncertain as to the light temperature. The problem with AWB though is that it can change when light changes, even a little bit. So if you’re shooting a person talking and they lean forward, the colors in your shot could potentially take on a different tint.

  • White balance will only appear in the menu as an option if you’re not shooting in Auto.
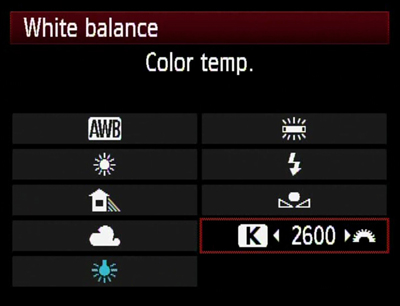
  • There are little pictures in the camera to help you with white balance.
  • The picture of the light bulb is TUNGSTEN LIGHT. Tungsten light is most indoor light (except for FLUORESCENT LIGHT, which has its own setting)—lamps, non-fluorescent overhead light, most stage lights, etc. Tungsten light is ORANGE. So when you tell your camera you are shooting in this orange Tungsten light, it corrects for it by adding what is at the opposite end of the color wheel (blue).
  • The picture of the sun is for outdoor light, or KELVIN LIGHT. Kelvin light is BLUE, so the camera corrects for it by adding orange. There are also pictures for different gradations of light (i.e. shade, cloudy).
  • You can also MANUALLY set your white balance in numbers based on the KELVIN SCALE. This is very useful for two-camera shoots where you want the light temp of both cameras to match.

EXPOSURE

When you are controlling for exposure, that means you’re telling the camera how much light to let in.

What overexposure looks like.

When using a DSLR, there are THREE WAYS to tell the camera how much light to let in

  • Shutter speed
  • ISO
  • Aperture (F-stop)

SHUTTER SPEED

  • For still photos, the shutter speed is important because it tells the camera in what way you want it to freeze motion (do you want a bike whizzing by to be a blur in the photo or do you want it to be completely frozen so you can see every detail?) Since we are shooting moving images, we don’t have to worry about this. For video, as a rule of thumb, you want your shutter speed to be double the number of frames per second you are recording. Since with these cameras, we’ll be shooting in 30 frames per second, WE SET OUR SHUTTER SPEED AT 1/60.
  • We shoot with our shutter speed at 1/60 probably 99% of the time. However, to let more light in in a low-light situation, you can get away with setting your shutter speed at 1/30.  DON’T SET IT LOWER THAN 30 BECAUSE IT WILL MAKE YOUR IMAGE STUTTER.
  • If it’s really bright out or you’re shooting a performance with hot stage lights and you want to let in less light, you can, however, set your shutter speed higher than 60 (in multiples of 30—so you can set it at 90, 120, etc.)

ISO

 ISO tells your camera sensor how much light to let in.

  • THE HIGHER YOUR ISO NUMBER, THE MORE LIGHT YOU ARE LETTING IN.
  • Remember, with DSLRs it is always a give and take, push and pull relationship with letting in light and image quality. So the higher your ISO number, the grainier your image.
  • In general, if you are outside you’re using a lower ISO (like 100 – 320) since outdoor light is brighter, and inside you’re using a higher number (like 800 – 1600) since indoor light is weaker.
  • Generally if you use an ISO 2000 or higher you start to see grain on these cameras (although that doesn’t mean you should never do it.) 

APERTURE (F-STOP) 

  • F-stop tells your lens how much light to let in
  • THE LOWER YOUR F-STOP NUMBER, THE MORE LIGHT YOU ARE LETTING IN
  • The other important thing your f-stop controls is your DEPTH OF FIELD
  • DEPTH OF FIELD: the distance between the nearest and the farthest objects in a shot that appear in focus.
  • The LOWER your f-stop number, the SHALLOWER your depth of field.
  • The HIGHER your f-stop, the DEEPER your depth of field (i.e. more is in focus)
  • Even though a shallow depth of field looks really cool and cinematic, you have to ask yourself if it is serving the story well. There are absolutely storytelling reasons you would want everything in the shot in focus and other storytelling reasons you would want only a small portion of the shot in focus.
  • MAINTAINING FOCUS WHEN SHOOTING WITH A SHALLOW DEPTH OF FIELD IS WHAT TRIPS A LOT OF PEOPLE UP. At f/2.8, for example, your subject’s eyes might be in focus, but the tip of her nose is not. If she moves forward even half an inch, her eyes are no longer in focus. So you have to be on your toes at all times shifting the focus ring to maintain focus on her when she leans in to tell you that juicy secret, or your moment is lost.

The relationship between the ISO and the f-stop is what you’re always negotiating when deciding what to shoot.

The LCD screens on our cameras skew a little dark, so it is easy to OVEREXPOSE (let too much light in so your shot is blown out—similar to blowing out your audio because your mic levels are up to high, or “too hot.)

Settings Cheat Sheet (TL;DR)

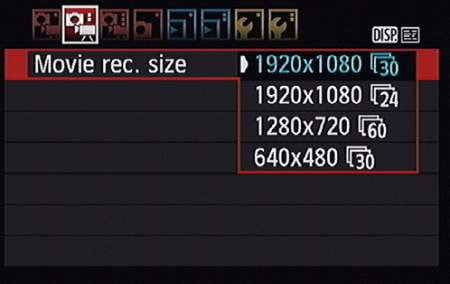
Movie rec. size: 1920×1080 and 30fps
Shutter speed: 1/60 (or multiples of 30, ie if it’s very low light you can go down to 1/30 or if it’s very bright you can go higher)
ISO: Remember that if you go much higher than 800 or 1600, the image will start to get grainy. Sometimes this can’t be avoided, but avoid it if you can.
Aperture: The lower the f-stop, the more light you’re letting in, and the more dramatic the depth of field. For low-light shoots, consider checking out a lens with a lower f-stop.
White balance: You can use Auto White Balance (AWB) if you expect to be changing light temperatures mid-shot (following someone outdoors, for instance). Otherwise it’s best to set it manually.
Movie Servo AF: Disable if you want to be able to control focus manually, and set the button on the lens itself to Manual Focus (MF).
Lens: Deactivate the Image Stabilization function if you intend to use the camera audio, because a mechanical sound can be heard sometimes as it adjusts.


Practice Assignment (due by class time Wednesday, Feb. 7)

Film a story in 10 shots, set to music. There will be no interview component. (Something like the YouTube Audio Library is a good resource for free music.) It can be anything—you can collaborate on this with a classmate if you like, or recruit a family member, or simply go out and see what stories you find on the street. It can be staged or candid. Upload it to your Vimeo account, and create a post here on the site with the link.

This will be similar to the 5-shot sequence, but you have a bit more room to be creative. Feel free to start with the classic shots of a 5-shot sequence, or incorporate some of those shots throughout; remember that the purpose of a sequence is to orient the viewer as to where we are, what we’re seeing, what is happening, and how it’s happening. Use your ten shots to tell a story.

Don’t forget to set up your shot before you hit record. Record a steady shot for at least ten seconds before you stop recording.

Here’s an example of a past student’s 10-shot sequence. Here’s another. And one more.