Signing Out Cameras
We’ll get everyone set up with a camera—you will receive either a Canon EOS 77D or a Canon EOS T6S.
Please take a thorough inventory of your kit and let me know if anything is missing!
Review: Composing and Framing Shots
What are the two basic categories of shots in video journalism?
What are some of the elements of photo composition that are applicable to video as well?
How does the added element of movement play into composition when it comes to video? What are some ways you might consider framing your shots to capture motion? How can static shots be used intentionally to make use of motion?
What are some narrative reasons you might want to include certain types of shots? (Establishing shots, medium shots, close-ups, five-shot sequence, for example.)
FOCUS
It is really easy to shoot video that is OUT OF FOCUS with these cameras. If your stuff isn’t in focus, you just wasted a lot of people’s time. So pay attention to focus at all times.
- Use the focus ring on the lens to shift focus (turn ring with your elbow down, not sticking out sideways)
- Zoom in all the way on your subject and focus, then zoom back out to your desired framing; the subject will stay in sharp focus
SHAKY SHOTS
Because the sensor on these cameras is so large and sensitive, any little movement you make will cause camera shake. These cameras are basically impossible to handhold. Some camera lenses have image stabilization technology, but it makes a low-lowel, constant mechanical grinding sound that is audible on your camera, so unless you are recording audio separately and syncing later, TURN OFF THE IMAGE STABILIZATION (IS) FEATURE ON YOUR LENS.
- Use a tripod
- Use a monopod
- Use a shoulder mount
- Set the camera down on a flat surface (the ground, a table, a stack of books, etc.)
- If you are in a breaking news situation and must handhold (not recommended) or you are on top of a ladder or in some extreme circumstance, turn your body into a tripod by using both your arms and your face—if the camera is connecting with three points, it is always steadier.
The importance of good quality audio:
Review of DSLR Camera Settings
…and how we apply these settings to video
White Balance
https://youtube.com/watch?v=iu1LxvYUXZ
You can always use auto white balance on the fly or if you’re uncertain as to the light temperature. The problem with AWB though is that it can change when light changes, even a little bit. So if you’re shooting a person talking and they lean forward, the colors in your shot could potentially take on a different tint.
- White balance will only appear in the menu as an option if you’re not shooting in Auto.
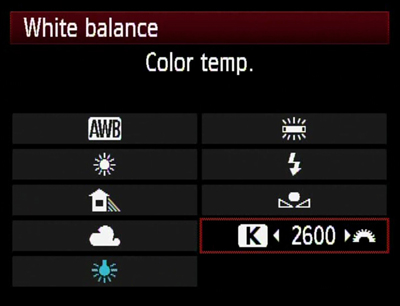
- There are little pictures in the camera to help you with white balance.

- The picture of the light bulb is TUNGSTEN LIGHT. Tungsten light is most indoor light (except for FLUORESCENT LIGHT, which has its own setting)—lamps, non-fluorescent overhead light, most stage lights, etc. Tungsten light is ORANGE. So when you tell your camera you are shooting in this orange Tungsten light, it corrects for it by adding what is at the opposite end of the color wheel (blue).
- The picture of the sun is for outdoor light, or KELVIN LIGHT. Kelvin light is BLUE, so the camera corrects for it by adding orange. There are also pictures for different gradations of light (i.e. shade, cloudy).

- You can also MANUALLY set your white balance in numbers based on the KELVIN SCALE. This is very useful for two-camera shoots where you want the light temp of both cameras to match.

EXPOSURE
When you are controlling for exposure, that means you’re telling the camera how much light to let in.
What overexposure looks like.
When using a DSLR, there are THREE WAYS to tell the camera how much light to let in
- Shutter speed
- ISO
- Aperture (F-stop)
SHUTTER SPEED
- For still photos, the shutter speed is important because it tells the camera in what way you want it to freeze motion (do you want a bike whizzing by to be a blur in the photo or do you want it to be completely frozen so you can see every detail?) Since we are shooting moving images, we don’t have to worry about this. For video, as a rule of thumb, you want your shutter speed to be double the number of frames per second you are recording. Since with these cameras, we’ll be shooting in 30 frames per second, WE SET OUR SHUTTER SPEED AT 1/60.

- We shoot with our shutter speed at 1/60 probably 99% of the time. However, to let more light in in a low-light situation, you can get away with setting your shutter speed at 1/30. DON’T SET IT LOWER THAN 30 BECAUSE IT WILL MAKE YOUR IMAGE STUTTER.
- If it’s really bright out or you’re shooting a performance with hot stage lights and you want to let in less light, you can, however, set your shutter speed higher than 60 (in multiples of 30—so you can set it at 90, 120, etc.)
ISO
ISO tells your camera sensor how much light to let in.
- THE HIGHER YOUR ISO NUMBER, THE MORE LIGHT YOU ARE LETTING IN.
- Remember, with DSLRs it is always a give and take, push and pull relationship with letting in light and image quality. So the higher your ISO number, the grainier your image.
- In general, if you are outside you’re using a lower ISO (like 100 – 320) since outdoor light is brighter, and inside you’re using a higher number (like 800 – 1600) since indoor light is weaker.
- Generally if you use an ISO 2000 or higher you start to see grain on these cameras (although that doesn’t mean you should never do it.)
APERTURE (F-STOP)
- F-stop tells your lens how much light to let in
- THE LOWER YOUR F-STOP NUMBER, THE MORE LIGHT YOU ARE LETTING IN
- The other important thing your f-stop controls is your DEPTH OF FIELD
- DEPTH OF FIELD: the distance between the nearest and the farthest objects in a shot that appear in focus.
- The LOWER your f-stop number, the SHALLOWER your depth of field.
- The HIGHER your f-stop, the DEEPER your depth of field (i.e. more is in focus)
- Even though a shallow depth of field looks really cool and cinematic, you have to ask yourself if it is serving the story well. There are absolutely storytelling reasons you would want everything in the shot in focus and other storytelling reasons you would want only a small portion of the shot in focus.
- MAINTAINING FOCUS WHEN SHOOTING WITH A SHALLOW DEPTH OF FIELD IS WHAT TRIPS A LOT OF PEOPLE UP. At f/2.8, for example, your subject’s eyes might be in focus, but the tip of her nose is not. If she moves forward even half an inch, her eyes are no longer in focus. So you have to be on your toes at all times shifting the focus ring to maintain focus on her when she leans in to tell you that juicy secret, or your moment is lost.
The relationship between the ISO and the f-stop is what you’re always negotiating when deciding what to shoot.
The LCD screens on our cameras skew a little dark, so it is easy to OVEREXPOSE (let too much light in so your shot is blown out—similar to blowing out your audio because your mic levels are up to high, or “too hot.)
Settings Cheat Sheet (TL;DR)
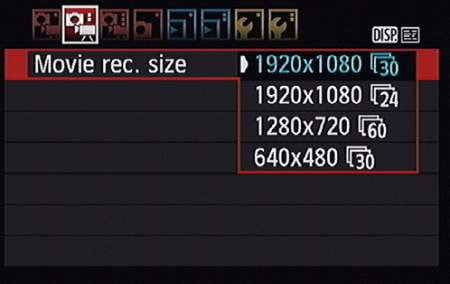
Movie rec. size: 1920×1080 and 30fps
Shutter speed: 1/60 (or multiples of 30, ie if it’s very low light you can go down to 1/30 or if it’s very bright you can go higher)
ISO: Remember that if you go much higher than 800 or 1600, the image will start to get grainy. Sometimes this can’t be avoided, but avoid it if you can.
Aperture: The lower the f-stop, the more light you’re letting in, and the more dramatic the depth of field. For low-light shoots, consider checking out a lens with a lower f-stop.
White balance: You can use Auto White Balance (AWB) if you expect to be changing light temperatures mid-shot (following someone outdoors, for instance). Otherwise it’s best to set it manually.
Movie Servo AF: Disable if you want to be able to control focus manually, and set the button on the lens itself to Manual Focus (MF).
Lens: Deactivate the Image Stabilization function if you intend to use the camera audio, because a mechanical sound can be heard sometimes as it adjusts.
Practice Assignment (due by class time Wednesday, Feb. 7)
Film a story in 10 shots, set to music. There will be no interview component. (Something like the YouTube Audio Library is a good resource for free music.) It can be anything—you can collaborate on this with a classmate if you like, or recruit a family member, or simply go out and see what stories you find on the street. It can be staged or candid. Upload it to your Vimeo account, and create a post here on the site with the link.
This will be similar to the 5-shot sequence, but you have a bit more room to be creative. Feel free to start with the classic shots of a 5-shot sequence, or incorporate some of those shots throughout; remember that the purpose of a sequence is to orient the viewer as to where we are, what we’re seeing, what is happening, and how it’s happening. Use your ten shots to tell a story.
Don’t forget to set up your shot before you hit record. Record a steady shot for at least ten seconds before you stop recording.
Here’s an example of a past student’s 10-shot sequence. Here’s another. And one more.