MakerHub Blog


3D modeling isn’t just for printing; Tinkercad (the free online platform on which the MakerHub will help you design during classes or if you stop by) is a simplified version of CAD (computer-aided design) software commonly used not only in manufacturing but in optimization, architecture, and engineering. That makes Tinkercad useful for prints and also for designing scale models of bigger projects.
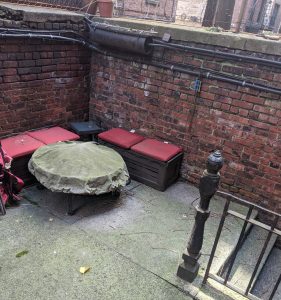
The COVID-19 lockdown of 2020 was dragging on forever, it seemed, and cabin fever was definitely setting in by the end of week three in NYC. I am lucky and rent an apartment with a small outdoor space including a small deck and small patio, but it was still easy to go stir crazy. As a rock climber of 26 years and no gyms open, I decided to build a climbing wall.
My property manager did not want me drilling into the building, so I needed to build a free-standing structure that wouldn’t interfere with the fire code. Space being limited, the first step was to take measurements to determine if this project was even possible.
Any construction worker will tell you “Measure twice, cut once”: check your measurements for space and markings before you cut a piece of material, because an incorrect cut cannot be reversed. I reasoned I should do the same in building the schematic, as it would make a difference in what I could build and the materials (and permission) needed. If I created an incorrect model it would be useless in the end, so take the time now to get the perspectives correct.
And it was a good thing I checked; I wanted to build a corner wall for some extra challenge, but as I started measuring it began to appear unlikely. The back wall (on the left side of the photo) was about 13 feet long but the corner to the stairs to the small back alley only 7 feet to the top of the step. The stairs are part of the fire exit, so I really only had about four or five feet to work with, not enough space for a full wall panel. “Measure twice, model once” ended up saving me a lot of headaches.
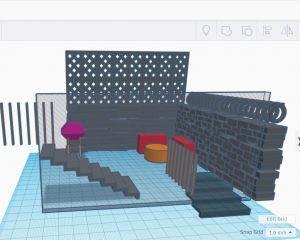
Tinkercad allows you to snap to a 1mm scale, so I calculated accordingly on a 1:1 ratio to inches. I included obstacles like railings and stairs, and objects I might have to relocate like the grill and the benches I’d built a few years prior.
Zooming in, around, and above the space was the perfect way to make sure I would have enough room to fit the structure. I calculated – in inches – the length of the brick and how deep each wall went in case I needed to brace the structure. Stair width and clearance were also issues to consider, and different perspectives prompted different measurement considerations. Heights and overhangs might easily be overlooked if the plan is only calculated from one view.
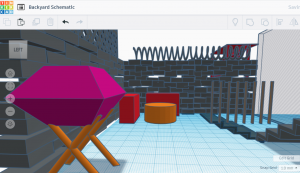
Once I had everything in place from every perspective, I could get to designing the wall (tune in next week for that part of the process). Then I would be able to drop in the model structure to the schematic.
Need a new couch or want to see if a shelf will fit under your bedroom window? What spaces are you going to model for your Quarantine2020 project?