Since early February, I’ve been staying in my family’s home in Wilkes-Barre, PA where I had to withdraw from my Spring semester at Baruch to help my mother find legal counsel for my father and uncle, who were detained by ICE and imprisoned awaiting trials for deportation. They both worked together at our family car repair shop, and although my father was able to come home after three months of detainment, my uncle was deported back to the Dominican Republic. Our family business is depended on by our fellow neighbors and locals and being considered an essential business, my father was eager to reopen, despite a pending hearing in December that will determine whether he is both eligible for immigration relief and able to remain in the country. Despite not being a mechanic, or even knowing how to drive, I’ve taken on my uncle’s role as assistant at the shop.
I want to take the opportunity I’ve had to observe my father in his natural element to take photographs of what a day of work looks like for him, a family man who has lived in the United States for over twenty five years, who has been legally married to my mother for 15 years, who has raised me and my sisters here, and who is an essential worker to so many people in our local township. Despite his tireless efforts to provide for our family and his clients, he may not be able to stay in the country come winter. He works himself to the bone, likes he’s running out of time, which is unfortunately true if things don’t go as planned. I think I’d be able to capture great photographs, since I spend most of the day following him around and seeing the work he accomplishes as well as what his workspace looks like. I think I can find great pattern photos, as well as photos with nice use of color. I don’t have any real camera equipment but I have an iPhone 11 camera, and I’ve taken decent pictures with it so far, I think it will be good enough for the assignment.
For my photojournalism assignment, I want to explore the impact COVID-19 has on local retail shops. As NYC works towards envisioning a new “normal”, businesses are facing new challenges. Many local businesses have been affected, some even going out of business. I want to examine how those that are still open, or reopening, are coping with the new social distancing restrictions and regulations.
For this assignment I will be focusing specifically on a local neighborhood shoe store in Brooklyn called Windsor Shoes. I will focus on how they are dealing with the competition from e-commerce moguls like Amazon, as well as those who do not feel safe enough to shop inside the store, but still wish to support their business. I also want to figure out what the business envisions their future looking like, as well as how their employees are coping with everything going on.
I plan on taking pictures of the customers coming in with their masks on, how employees handle and take care of the employees with the new guidelines, I also want to try to capture the mood and feelings of the employees during these difficult times.
My first one is about a small business taking photos of how they are handling the virus. I would show the new precautions they’ve introduced and how they have tried to keep people safe.
The second one is a candlelight service for Vanessa Guillen, I will show how a crowd of people try and protect themselves while paying their service to Mrs. Guillen.
The last is a Long Island March for Justice, according to the information I’ve seen the leaders of this march are demanding people to wear masks and take safety precautions. So it’d be interesting comparing and contrasting what we see in the mainstream media compared to this smaller scale protest.
Discuss, brainstorm, workshop story ideas for photo essays.
Photo Scavenger Hunt:
We’ll look at photos together from your in-class assignment. You’ll also use these for some practice photo editing and using Exposure.
Once you’ve finished, you can send what you think are your best 5 images to me using wetransfer.com.
Reminder:
On Monday, we will NOT be holding a formal class on Zoom; instead, that day will be devoted to reporting/production/editing. I will, however, make myself available all day on Monday for anyone who wants feedback and one-on-one coaching/editor feedback. I strongly encourage you all to try and get most of your photos and reporting done over the weekend so you can take advantage of this. If you want to schedule a Zoom session that day, please shoot me an email or text sometime between now and then.
Photo essays will be due by class time next Wednesday, July 22.
For my photojournalism assignment, I want to explore the changing circumstances in New York. What used to be the city that never sleeps has been hit particularly hard by COVID-19 and retreated indoors for everyone’s safety. Now as it’s waking back up, New Yorkers are navigating a new normal.
People are slowly reentering the outdoors but not without a mask. The subways have resumed regular service but still feel hollow. Department stores are open but someone will point a temperature gun at your head. We resist the idea of a brisk walk through the park if other people have the same idea.
I work in the city near Columbus Circle and was used to the packed train cars and the crowd of people sharing my sidewalk before the sun finished rising. Now when I have to pick up a morning shift I have the train cart to myself, and walk quickly to my job so I don’t have to acknowledge the echoing avenues.
I want to specifically focus my assignment on the emptiness of mornings in New York. Few people have to make a morning commute, so when New York would normally be thriving by 8am it’s still empty.
New York is slowly recharging but isn’t where it used to be. New York is embracing the New Normal.
For my photojournalism assignment I would like to do a visual representation of the construction of The New York Islanders new arena in Elmont, NY. The New York Islanders played hockey from 1972-2015 at the Nassau Coliseum in Uniondale, NY. Various owners tried to get the arena upgraded but it never led to anything.
in 2015, they were pushed out by local government and had to move to the Barclays Center in Brooklyn, NY. That really didn’t work out either and wound up splitting time between Barclays Center and Nassau Coliseum.
Finally, the Islanders were approved for a new arena in by Belmont Park. For my assignment I would like to go to the construction site and take various pictures, that visually represent this story and show the progress that is ongoing to create this new state of the art arena.
Hello, JRN 3510 students! This class blog is where you’ll pitch stories, submit drafts, publish your edited stories, and workshop each other’s projects and ideas. I will also post my lectures here so that you can refer back to them.
I essentially run my classes like a small newsroom. So for the duration of this course, you will be the reporters and I will be your editor. If you have any questions or run into any problems on your assignments and need a quick response, the best way to reach me is just to text me; my number is in the syllabus. For anything less time-sensitive, email is fine.
What does “multimedia” journalism mean and how is it changing?
Traditional forms like writing, radio and broadcast have moved online and can complement each other when it comes to telling a complete, dynamic story.
The old forms of traditional media still exist, but they have adapted to new methods of delivery and consumption.
Radio stories on the air –> downloadable/streamable podcasts and web versions of stories with photos
TV news –> online video (compositional framing changes, video length changes, formatting optimized for mobile)—and the bar for web video is getting higher and higher
Newspaper-style photography and landscape orientation –> Instagram and the rise of medium format (square) and portrait orientation (contains more information)
The availability of online multimedia content has also made aggregation easy (tweet roundups, etc.) and helped to create a click-driven economy. Twitter and other social platforms have changed the way news breaks.
Intro to Photojournalism
Here are some basic rules and guidelines of photo composition to keep in mind as you start developing your eye:
1. The Rule of Thirds.
If you pay attention to only one element of composition, the rule of thirds should be it. If you start shooting with this “rule” in mind, your pictures will begin to look a lot better immediately.
The general idea is to imagine breaking an image down into thirds, both horizontally and vertically. If you place the main points of interest in your photo where the lines intersect, or along the lines themselves, your image will be far more visually interesting than if you just put the subject smack in the middle. Studies have shown that composing photos this way draws the human eye far more effectively.
Screen Shot: Google ImagesCredit: Emily H. JohnsonCredit: Emily H. Johnson
2. Use color.
Black and white photography is a beautiful art form, but in photojournalism, most of the time you’ll be shooting in color. It helps to know what combinations of color to look for if you want your images to really pop.
Credit: Steve McCurry
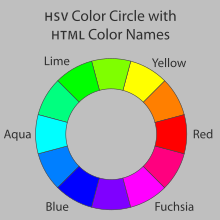
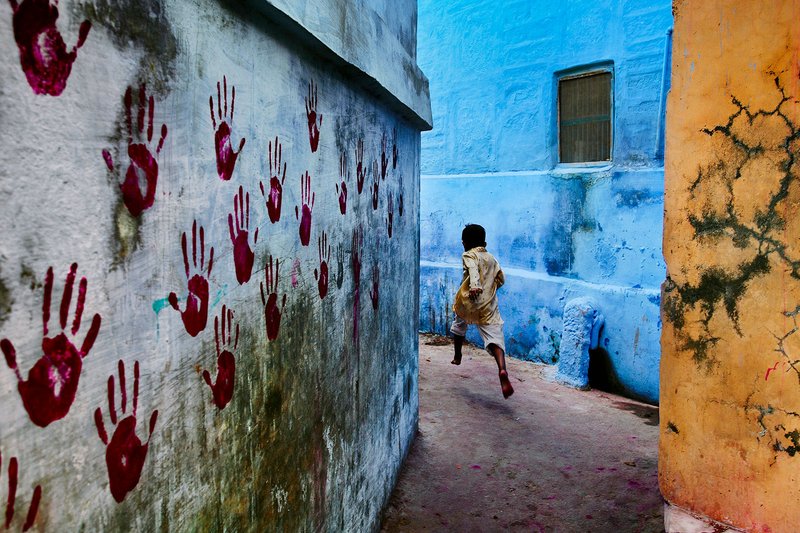
You probably recognize this photo. Known as Afghan Girl, it is one of National Geographic’s most iconic images and was taken by color master Steve McCurry. One of the reasons this relatively simple picture is so stunning and so well-known is the colors: red and green, which fall on opposite sides of the color wheel.
Credit: Wikipedia
Opposite colors, paired together, can make each other look more vibrant. Notice how the green of the girl’s eyes is picked up by the wall behind her and set off by the rusty red of her scarf.
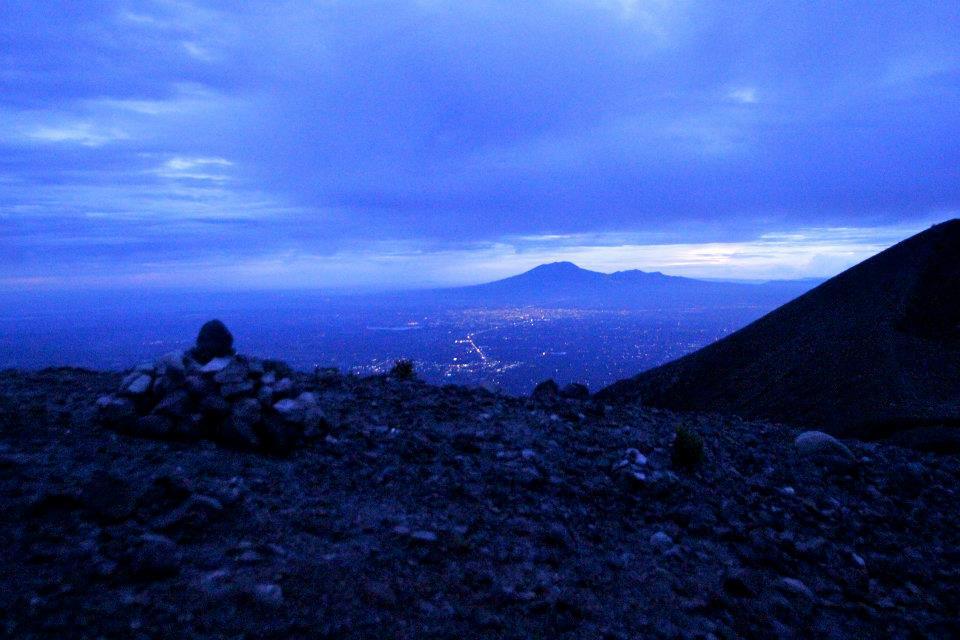
Images with variations on the same color, known as monochromatic images, can also be quite striking:
Credit: Emily H. JohnsonCredit: Emily H. Johnson
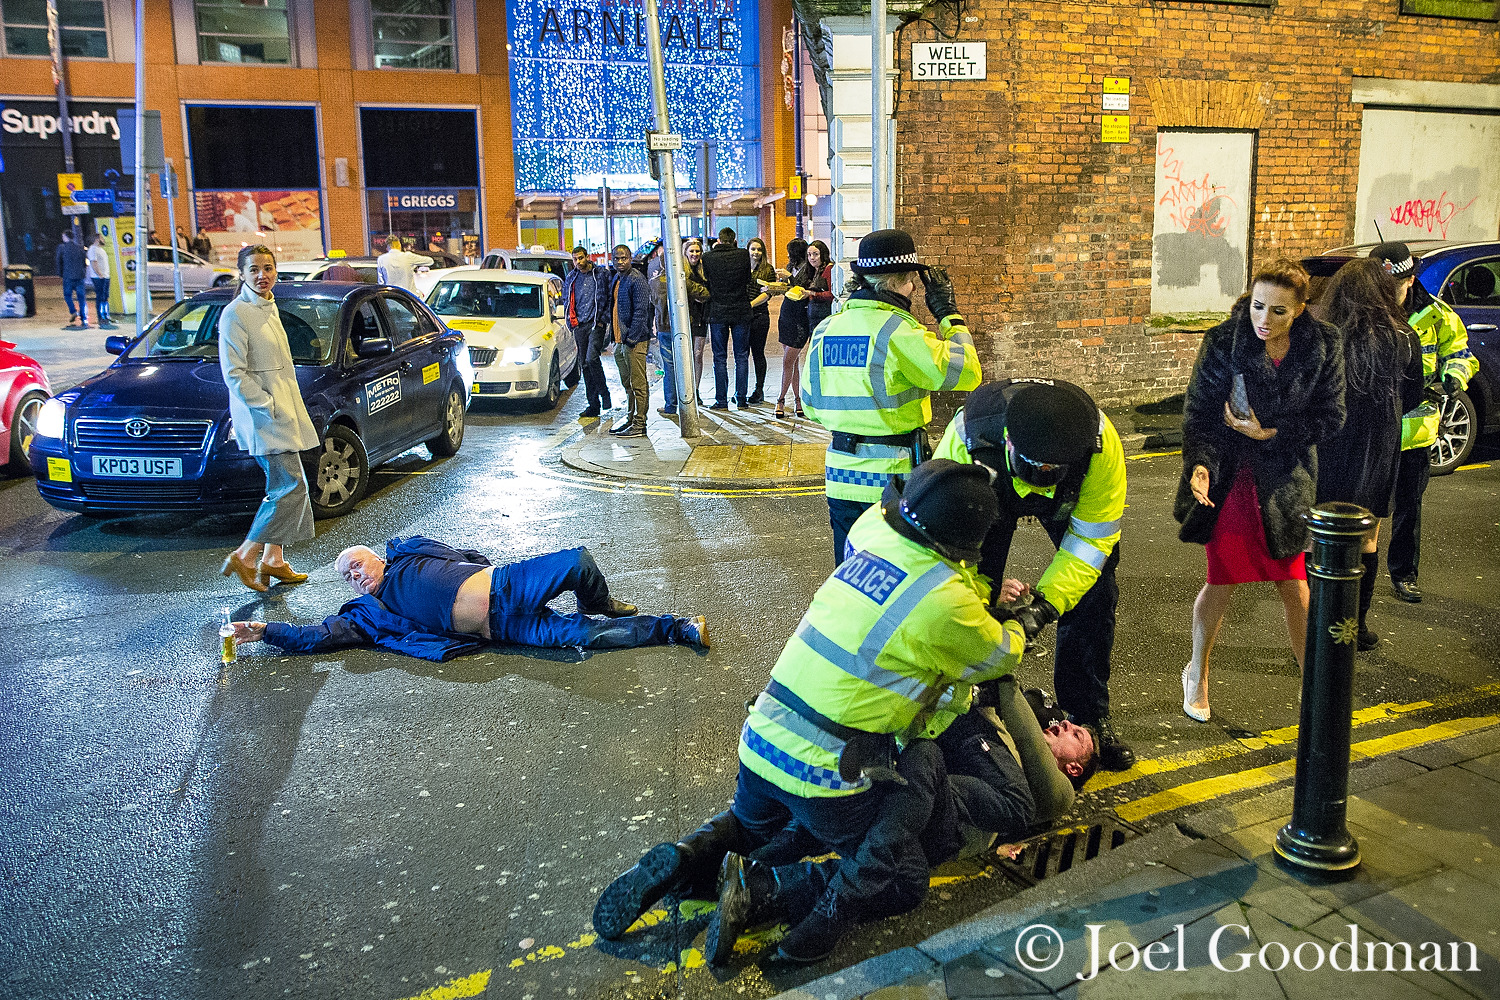
3. Capture the decisive moment.
“The decisive moment” is a term that was coined by renowned photographer Henri Cartier-Bresson. It refers to that fleeting instant that photographers love to capture: When someone leans in for a kiss, when a soccer player connects with with the ball, or when a protester throws a rock. If you aren’t ready with your finger on the shutter, you’ll miss the moment. If Bresson had taken this photo a split second earlier or later, it would have been a much more ordinary photo of a man splashing through a puddle. These moments don’t need to be that dramatic; for your assignments, it may be as simple as capturing the moment when the food truck owner you’re profiling flips some meat on the grill or hands the food to her customer. Action shots vs static shots tell more of a story.
Credit: Henri Cartier-Bresson
Another decisive moment, this one also by “Afghan Girl” photographer Steve McCurry.
Leading lines are lines that move the eye from one part of the image to another part, or sometimes out of the image. They add a sense of drama and perspective, so it’s always good to be on the lookout for roads, bridges, fences, shorelines and the like.
Credit: Emily H. JohnsonScreen Shot: Google Images
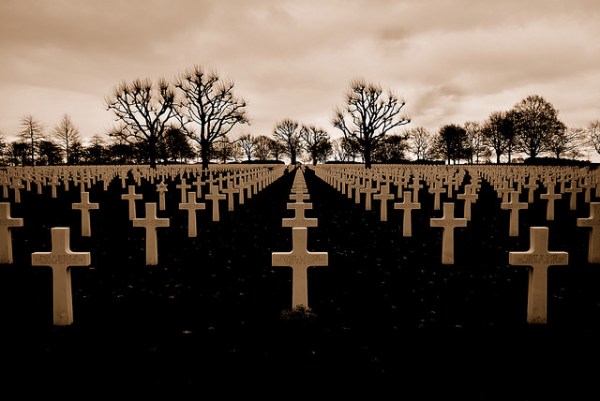
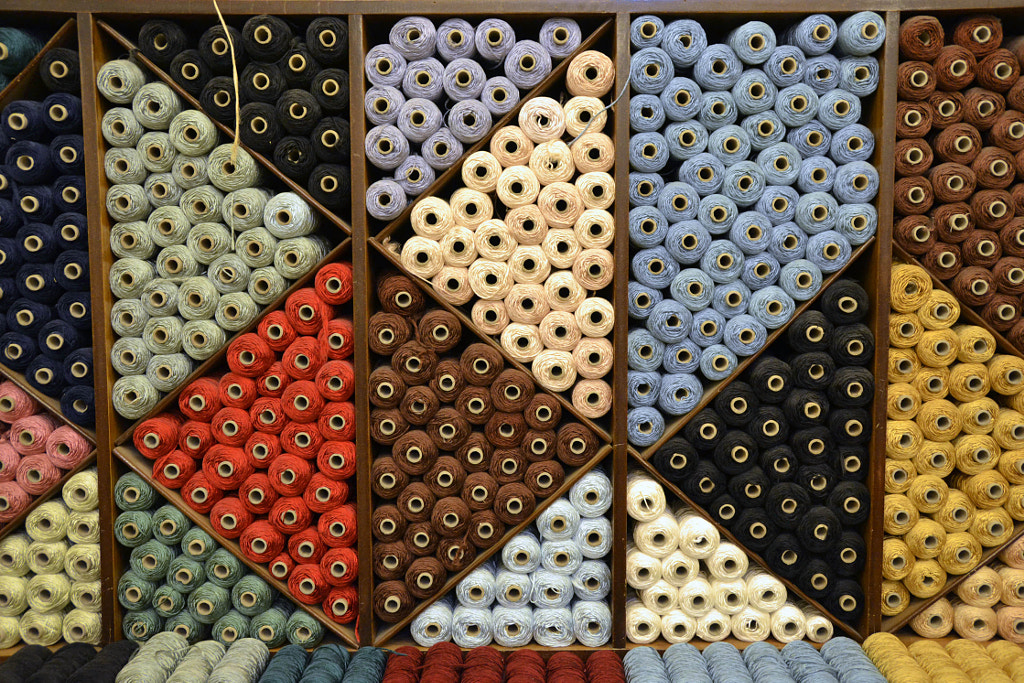
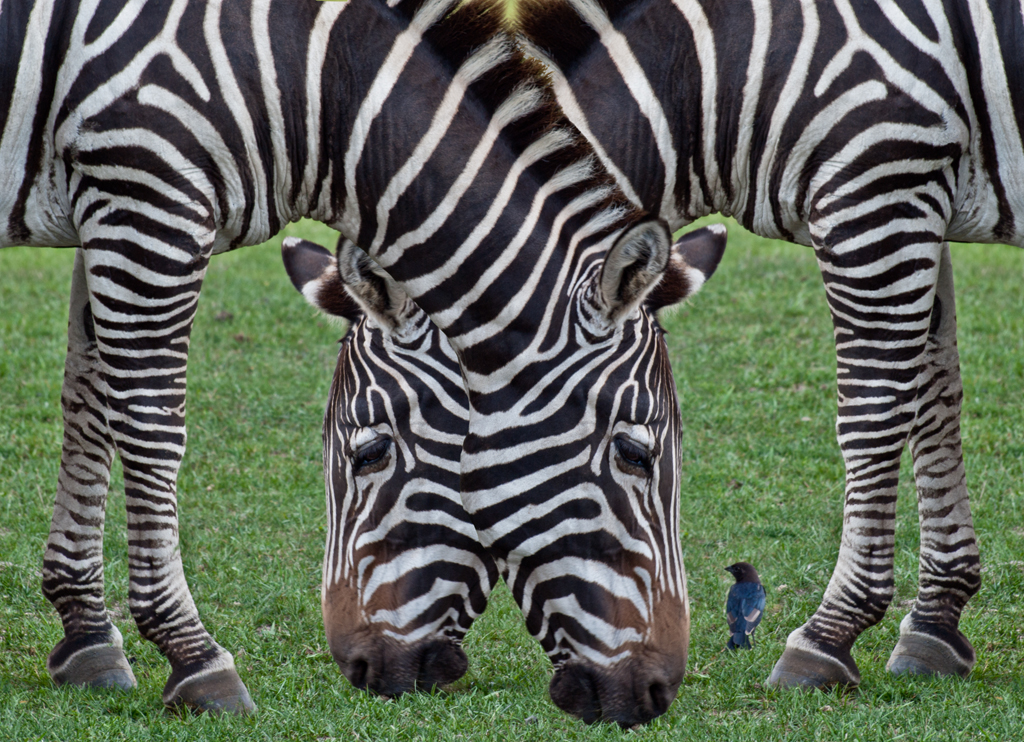
5. Symmetry and patterns.
Symmetry and patterns exist everywhere, both in nature and man-made sights. Looking for repetitions and symmetries, while staying alert to things that then break those very patterns (especially on the thirds!) is a sure way to make an arresting image.
Credit: Emily H. JohnsonA moment of political passion breaks out amongst tens of thousands who gathered for a pre-election protest in Tahrir Square in Cairo, Egypt. Credit: Amanda Mustard
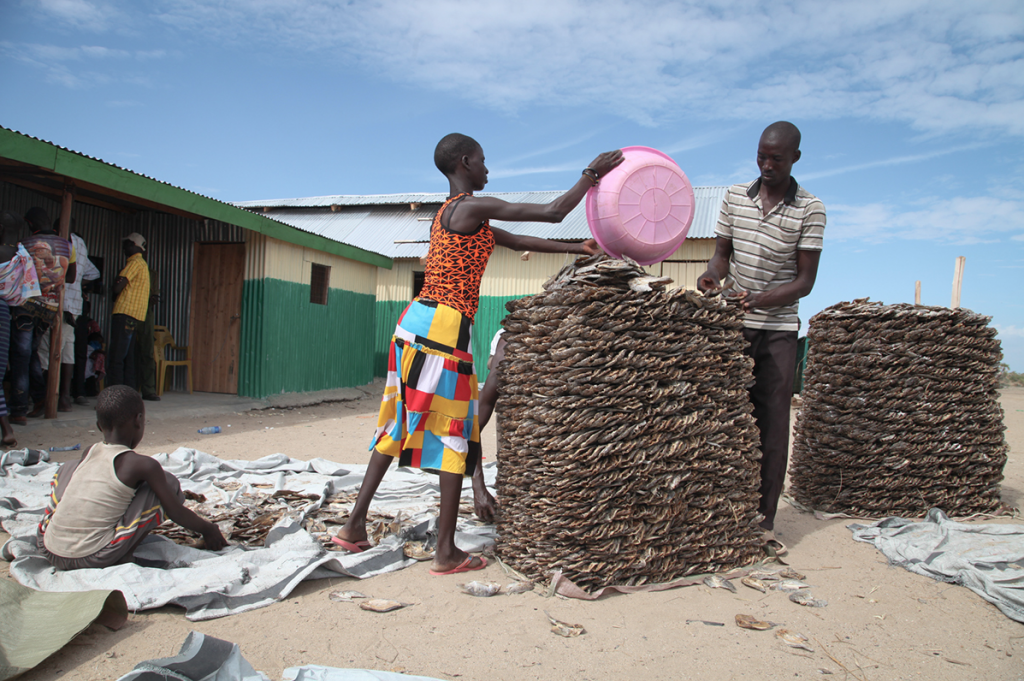
6. Layers.
Another great way to make sure your images are visually interesting is to keep an eye out for what’s happening up close, in the middle distance, and far away. Think in layers. If you can frame your shots so that interesting things are happening in the background as well as at your focal point five feet away, you’re onto something.
Layers will be one of your greatest tools as a photojournalist, because layers add context. They tell a story.
Credit: Emily H. JohnsonCredit: Emily H. Johnson
This is a famous photograph by South African photojournalist Kevin Carter. He won a Pulitzer Prize for this image, which showed the effects of the 1993 famine in Sudan.
Credit: Kevin Carter
“Photojournalism” means you’re telling a story, not just taking a picture.
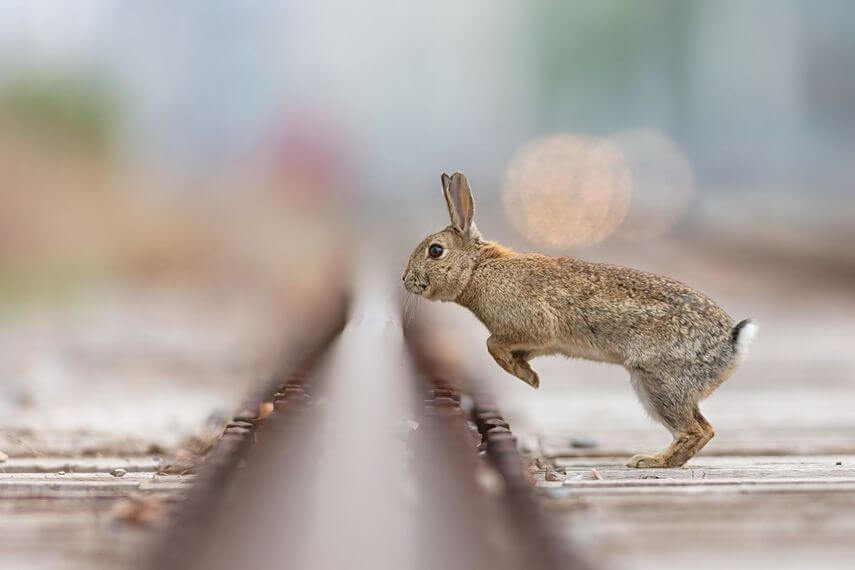
Layers are also a great chance to play around with something called depth of field. This refers to the difference in focus between things that are in the foreground vs. the background—if there isn’t much difference, like in the Kevin Carter photo above, then you’re using greater depth of field. When that difference is dramatic, like when your phone is in Portrait Mode, it’s called shallow depth of field. Shallow depth of field also gives you something called bokeh, which turns background lights into warm globes.
“City Hurdling” by Henrik Spranz
Depth of field is affected by a few things: the focal length of your lens, your distance from the thing in focus, and aperture. We’ll talk more about that when we get into camera settings.
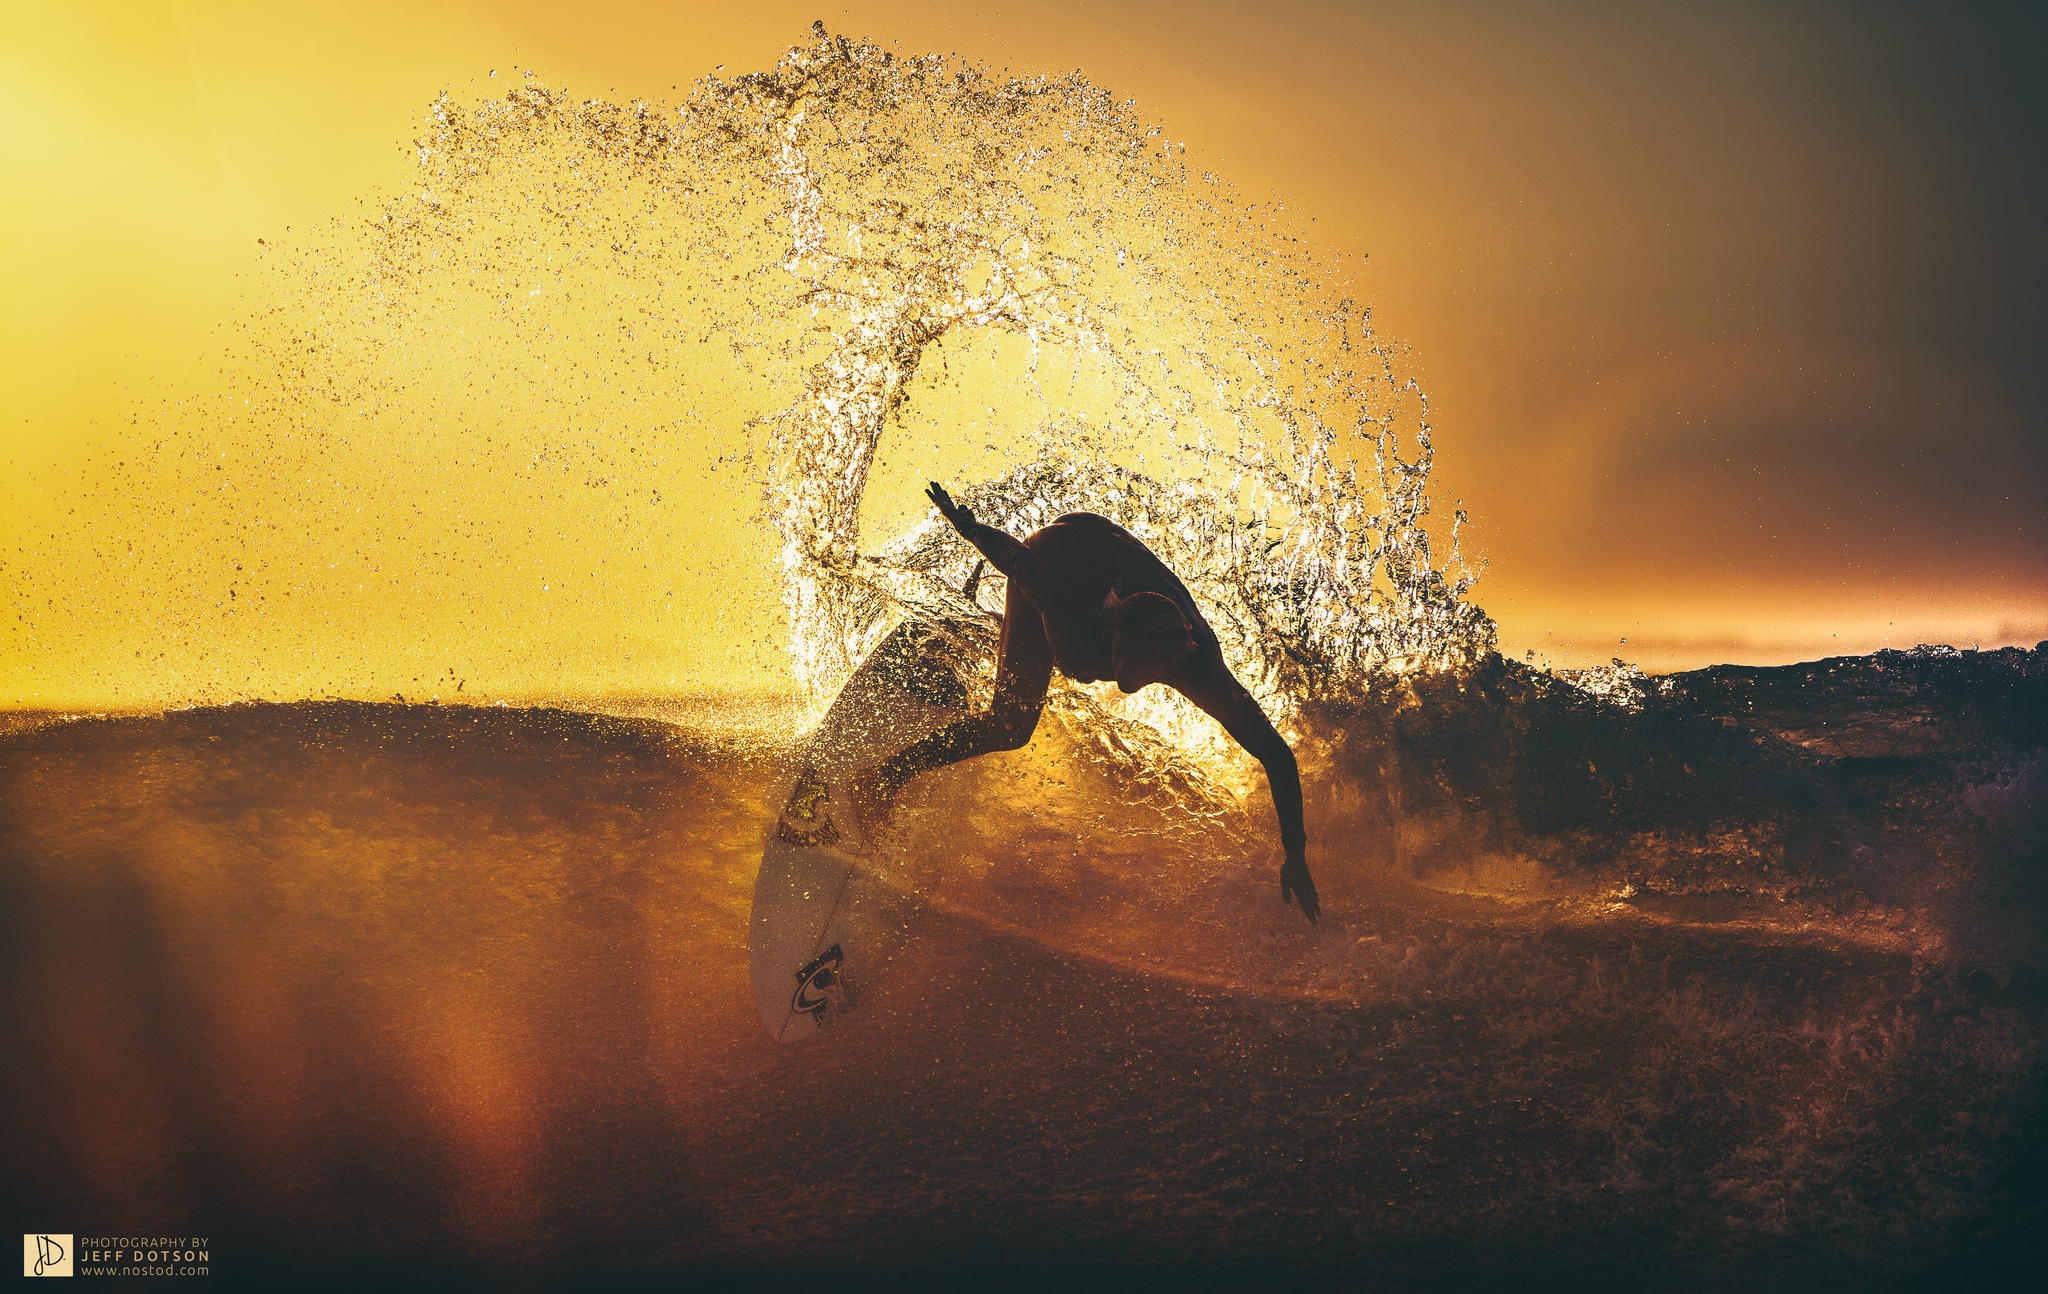
7. Light.
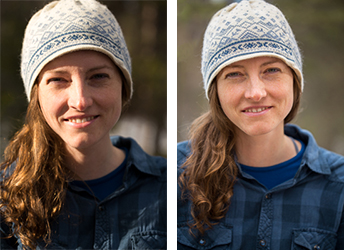
Light impacts everything we do as photographers. How much are we working with? Is it natural or artificial? What is the temperature of the light? What direction is it coming from? Is it harsh or diffuse? What time of day is it? Are you using a flash? Many photojournalists prefer to shoot with natural light as much as possible. Portrait photographers and fashion/fine art photographers often use studio lighting to create interesting lighting environments.
Different kinds of light will affect how different people look in photographs depending on their skin tone.
Photographer Robert Capa famously said, “If your pictures aren’t good enough, you’re not close enough.” Proximity with your subjects makes for more powerful and intimate photos. Don’t be afraid to get right in someone’s face with your camera. It may feel intrusive and strange at first, but a huge part of being a reporter is engaging with people and making them feel comfortable.
What’s the process like? How do you go about shoving a camera in someone’s face?
Unfortunately, with this semester being taught remotely, I won’t be able to sign out cameras for you to practice photography with. If you happen to have access to a DSLR camera, great! You’re welcome to use that for your assignments. If not, no worries; your photo assignments can all be done on your phone for this course.
Regardless, we’re still going to go over camera settings and a bit of theory so you understand how it all works.
The first time you pick up a DSLR camera, the sheer number of settings and dials can be a little overwhelming. You may be tempted to stick with Auto when you start out — and that’s totally fine while you’re getting the hang of it.
But to make sure you are taking the best possible pictures, it helps to have control over a few key settings: ISO, aperture, and shutter speed, which collectively make up the three pillars of photography. Tweaking these settings will allow you to take different types of pictures, and all of them essentially come down to one thing: light.
The Bucket
It may be helpful to keep this analogy in mind.
Imagine you are using a garden hose to fill a bucket to the top. Next, imagine that our end goal — a bucket filled exactly to the brim, but without spilling — equals a perfectly exposed photograph .
A few things control how much water goes in the bucket and how long it takes to reach the brim: the width of the hose, the water pressure, and how long you let the water run. You can achieve your goal using endless combinations of these factors. A very narrow pipe running at a steady pressure for a long time will fill your bucket as surely as a very wide pipe running for only a few moments.
A camera works the same way to let in the correct amount of light. Imagine that the width of the hose is the aperture, the amount of time you run the tap is the shutter speed, and the water pressure is the ISO.
ISO
Basically, ISO refers to how sensitive your camera’s sensor is to light. The lower the number, the less sensitive it is and vice versa. The ISO range in the DSLR cameras we’ll be using usually goes from 100 to 6400, doubling as it goes (100 to 200 to 400 and so on until it gets up to 3200 and 6400).
It follows, then, that you will need to adjust the ISO for the available lighting conditions.
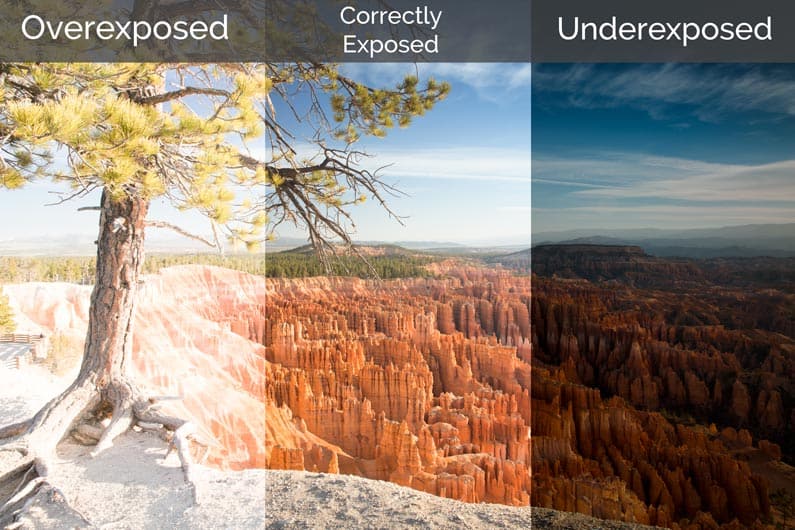
In broad daylight, there is plenty of light to work with, so a low ISO will be all you need. If you let in too much light, the image will be overexposed.
If you are shooting indoors in artificial light, you will need a much higher ISO — but be aware that you sacrifice image quality as you get up to the highest ISO settings, where you will start to notice a grainy quality. So before you reach for the dial to crank the ISO up to 3200, try letting a bit more light into the camera using a wider (lower) aperture or slower shutter speed.
Shutter speed is probably the simplest setting to understand. It refers to how long the camera’s shutter stays open. The longer the shutter is open, the more light is able to come in, and vice versa.
Shutter speed typically ranges from about 1/1000th of a second (very fast) to a few seconds (very slow). Slow shutter speed allow for a longer exposure time, which allows the camera to capture more movement. This can be a good thing or a bad thing, depending on the image you want to make.
A faster shutter speed would have captured the aqua-colored glove crisply. Using a slower shutter speed can create a sense of motion. Credit: Lindsay Armstrong
A long exposure can allow you to capture objects in motion in an artistically blurred fashion — or it can capture unwanted camera shake if you’re shooting without a tripod.
Sports photographers trying to capture crisp images, for example, are likely to rely on a fast shutter speed because their subjects are moving so quickly.
Aperture
Aperture refers to the opening in the lens. The wider it is, the more light it lets in. Somewhat confusingly, smaller numbers equate to wider aperture. Aperture is measured in “f-stops” and lenses can have different ranges. The wide-angle lenses that come with the journalism department’s DSLR cameras typically range from about f/3.5 (the widest) to f/22 (letting in the least amount of light).
Credit: Cole’s Classroom
A low aperture, in addition to helping you shoot in low-light conditions, allows you to capture a shallow depth of field. This refers to the effect where an object in the foreground is in focus but the background is blurred (or vice versa).
This also allows you to play with the bokeh effect, as we discussed a little earlier.
A high aperture, on the other hand, allows to retain detail at every layer of the image, which can be vital in terms of storytelling. If there are protest signs in the background, for instance, and your camera lens is focused on a police officer in the foreground, a shallow depth of field means we may not be able to tell what the signs say. In such a situation, you might want a flatter image, with a deeper depth of field.
Credit: Sean Cayton
Aperture Priority vs. Shutter Priority vs. Manual
As soon as you’re ready to leave the comfort of Auto behind, the next logical step is to experiment with Aperture Priority and Shutter Priority shooting modes (“Av” and “Tv” on your DSLR dial). These settings operate exactly the way their names suggest. You decide whether aperture or shutter speed is more important to the image you want to make and the camera will automatically adjust the other one for the correct exposure.
So if you’re shooting a soccer game, for instance, shutter speed is probably more important. There will be a lot of movement and you’ll want to capture the action crisply. But if you’re taking a portrait and you want to blur the background to allow your subject’s face to stand out, aperture priority is the obvious choice.
In both of these shooting modes, you still have to control for ISO, but they make your job a little bit easier than if you were to jump straight from Auto to Manual. Going back to our analogy, you only have to worry about two out of the three elements that fill the bucket. But once you’ve mastered Aperture Priority and Shutter Priority, you’ll be ready to take the final leap to Manual.
Screenshot. Credit: CameraSim
The best way to learn all of this is by doing it, so if you have a camera, practice with the different settings. If you don’t, a good way to get some practice juggling all the settings is by using CameraSim, an online DSLR simulator. It allows you to play with camera settings, lighting conditions, distance from subject, and a few other factors that go into taking a picture, and to check your best guesses against the resulting image.
Next: How to construct a photo essay
A photo essay is a thoroughly reported story, told in well-composed and curated images and captions. Ideally, there should be a mix of images so that the eye is always looking as something new as the viewer clicks or scrolls through: close-up shots, wide shots, portraits, colorful shots, bright shots, dark shots, action shots, etc. Intimacy is a powerful tool in these sorts of projects.
Pitch a photo essay. This could be a character-driven human interest story, or an event that is very visual in nature, or it could provide a local angle on an ongoing story. If stuck, ask yourself: What events are coming up that would make for cool photos? What are the big international, national or regional issues that have been making news of late? Obviously, we’re a bit limited at the moment because of the pandemic, so please make sure your ideas involve stories you can photograph safely.
Examples: Follow an essential worker like a delivery driver for a day. Photograph a barber who has set up a chair on the sidewalk for outdoor haircuts. Document a band that has started playing a regular, informal gig every night in the park. Cover a protest or vigil.
A major caveat: While intimacy generally makes for more powerful images, be safe and use your judgment. Some of us will have access to stories and moments that others might not, whether due to age or gender or race, and some of us might be at risk attempting to cover stories that others would have no issues with.
Pitches will be due next class, on Wednesday, July 15.
Post your pitches here on the class blog. Give a couple of paragraphs telling us who/what your photo essays will be covering, and why it is interesting or timely or relevant. Confirm that you actually have access to the story you want to do. And finally, tell us what kind of visuals you anticipate. Do yourself a favor and pitch a story that is visually interesting rather than trying to force an interesting but not-super-visual story to work for this assignment.
The photo essay will be due a week from Wednesday, on July 22.
—
Time-dependent: Photo Scavenger Hunt.
With the time you have left, go out and look for at least 10 strongly-composed images that capture some of the following elements of composition (some of these will inevitably contain multiple elements, and that’s fine—ideal, even). Please have them on your computers and ready to edit with by next class.
Contrasting colors
Monochromatic colors
Symmetry
Pattern
Rule of thirds
Close-up detail shot
Shallow depth of field
Portrait
Dramatic/beautiful/interesting use of light
Slow shutter speed
Internal framing
Movement
Decisive moment
Layers telling a story
Unusual perspective


 Credit: