Let’s quickly go around the room—tell me what school you’re representing and what elements of multimedia you’re hoping to do more of at your publication. I’m also curious what equipment most of you will be working with—do you have cameras and recorders, or are you mostly using your phones?
Good photography/videography is more about the photographer/videographer than it is about the camera, so there’s no reason you should feel limited by shooting with a phone camera if that’s what you have to work with. And sometimes they even give you an advantage—people are more comfortable with having an iPhone right in their face than they are having a DSLR camera with a big lens right in their face.
How many of your publications have active social media accounts? This can be a great opportunity to show some behind the scenes of the stories you’re working on, or you can also do some stories and features that are explicitly for social. These can be a little easier to produce and more informal with faster turnaround.
What does “multimedia” journalism mean and how is it changing?
The old forms of traditional media still exist, but they have adapted to new methods of delivery and consumption.
Radio stories on the air –> downloadable/streamable podcasts and web versions of stories with photos
TV news –> online video (compositional framing changes, video length changes, formatting optimized for mobile)—and the bar for web video is getting higher and higher (cinema cameras, drones, higher production value, etc.)
Newspaper-style photography and landscape orientation –> Instagram and the rise of medium format (square) and portrait orientation (contains more information)
Traditional forms like writing, radio and broadcast have moved online and can complement each other when it comes to telling a complete, dynamic story.
Here are a couple of student videos for inspiration:
This last one was made for the advanced multimedia reporting class I typically teach once a year. If any of you are interested in pursuing video further, I recommend looking into this class.
The classic sequence that every budding videographer learns when starting out is the five-shot sequence.
You won’t always edit things in this exact way when you do a sequence in the real world; sometimes it’ll only be three shots, or it might be ten, and they might be in a different order. But the five-shot sequence is a useful framework for thinking about depicting an activity clearly and engagingly with video. We’ll be shooting a five-shot sequence when we’re in Corona next week.
DSLR Camera Settings …and how we apply these settings to video
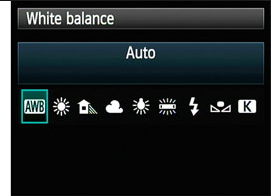
White Balance
You can always use auto white balance on the fly or if you’re uncertain as to the light temperature. The problem with AWB though is that it can change when light changes, even a little bit. So if you’re shooting a person talking and they lean forward, the colors in your shot could potentially take on a different tint.
White balance will only appear in the menu as an option if you’re not shooting in Auto.
There are little pictures in the camera to help you with white balance.
The picture of the light bulb is TUNGSTEN LIGHT. Tungsten light is most indoor light (except for FLUORESCENT LIGHT, which has its own setting)—lamps, non-fluorescent overhead light, most stage lights, etc. Tungsten light is ORANGE. So when you tell your camera you are shooting in this orange Tungsten light, it corrects for it by adding what is at the opposite end of the color wheel (blue).
The picture of the sun is for outdoor light, or KELVIN LIGHT. Kelvin light is BLUE, so the camera corrects for it by adding orange. There are also pictures for different gradations of light (i.e. shade, cloudy).
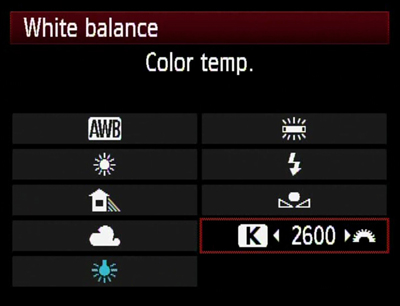
You can also MANUALLY set your white balance in numbers based on the KELVIN SCALE. This is very useful for two-camera shoots where you want the light temp of both cameras to match.
When using a DSLR, there are THREE WAYS to tell the camera how much light to let in
Shutter speed
ISO
Aperture (F-stop)
SHUTTER SPEED
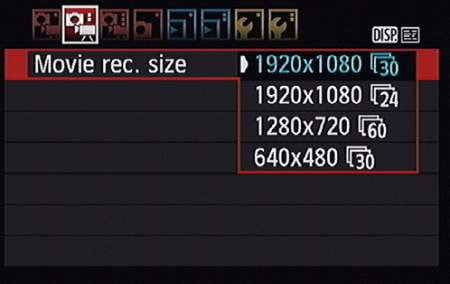
For still photos, the shutter speed is important because it tells the camera in what way you want it to freeze motion (do you want a bike whizzing by to be a blur in the photo or do you want it to be completely frozen so you can see every detail?) Since we are shooting moving images, we don’t have to worry about this. For video, as a rule of thumb, you want your shutter speed to be double the number of frames per second you are recording. Since with these cameras, we’ll be shooting in 30 frames per second, WE SET OUR SHUTTER SPEED AT 1/60.
We shoot with our shutter speed at 1/60 probably 99% of the time. However, to let more light in in a low-light situation, you can get away with setting your shutter speed at 1/30. DON’T SET IT LOWER THAN 30 BECAUSE IT WILL MAKE YOUR IMAGE STUTTER.
If it’s really bright out or you’re shooting a performance with hot stage lights and you want to let in less light, you can, however, set your shutter speed higher than 60 (in multiples of 30—so you can set it at 90, 120, etc.)
ISO
ISO tells your camera sensor how much light to let in.
THE HIGHER YOUR ISO NUMBER, THE MORE LIGHT YOU ARE LETTING IN.
Remember, with DSLRs it is always a give and take, push and pull relationship with letting in light and image quality. So the higher your ISO number, the grainier your image.
In general, if you are outside you’re using a lower ISO (like 100 – 320) since outdoor light is brighter, and inside you’re using a higher number (like 800 – 1600) since indoor light is weaker.
Generally if you use an ISO 2000 or higher you start to see grain on these cameras (although that doesn’t mean you should never do it.)
APERTURE (F-STOP)
F-stop tells your lens how much light to let in
THE LOWER YOUR F-STOP NUMBER, THE MORE LIGHT YOU ARE LETTING IN
The other important thing your f-stop controls is your DEPTH OF FIELD
DEPTH OF FIELD: the distance between the nearest and the farthest objects in a shot that appear in focus.
Even though a shallow depth of field looks really cool and cinematic, you have to ask yourself if it is serving the story well. There are absolutely storytelling reasons you would want everything in the shot in focus and other storytelling reasons you would want only a small portion of the shot in focus.
MAINTAINING FOCUS WHEN SHOOTING WITH A SHALLOW DEPTH OF FIELD IS WHAT TRIPS A LOT OF PEOPLE UP. At f/2.8, for example, your subject’s eyes might be in focus, but the tip of her nose is not. If she moves forward even half an inch, her eyes are no longer in focus. So you have to be on your toes at all times shifting the focus ring to maintain focus on her when she leans in to tell you that juicy secret, or your moment is lost.
The relationship between the ISO and the f-stop is what you’re always negotiating when deciding what to shoot.
The LCD screens on our cameras skew a little dark, so it is easy to OVEREXPOSE (let too much light in so your shot is blown out—similar to blowing out your audio because your mic levels are up to high, or “too hot.)
But if you can master depth of field, you can use pull-focus or rack focus shots to great effect.
It is really easy to shoot video that is OUT OF FOCUS with these cameras. If your stuff isn’t in focus, you just wasted a lot of people’s time. So pay attention to focus at all times.
Use the focus ring on the lens to shift focus (turn ring with your elbow down, not sticking out sideways)
Zoom in all the way on your subject and focus, then zoom back out to your desired framing; the subject will stay in sharp focus
Video Camera Workshop
Practice setting up your tripod and mounting the camera.
Connect the wired lav microphone to the camera and have your subject clip it to their collar, with the mic facing their mouth. Once again, I’ll remind you of the importance of good audio:
Practice framing an interview with your subject on one of the thirds, looking slightly into frame, not directly at the camera. Position yourself in the correct location as the interviewer to draw their eye line.
Try your hand at a pull-focus or rack focus shot.
Pull up your interview clip on one of the computers and listen back to confirm that your microphone was working.
With video, we build on the compositional techniques of photography and the structural, storytelling aspects of audio with one obvious additional element: Motion.
How does video storytelling for the web and mobile differ from TV and film?
Need to be CLOSER to your subject. Web videos are smaller and more compressed.
A large percentage of online viewers bail on a video within 10 seconds. So you don’t have a lot of time to grab your viewers and make sure they stick around.
How important is audio?
Good audio is of paramount importance. If you have low-quality video and good audio, the video will still be watchable. If you have gorgeous visuals but terrible audio, it will not.
Shooting Your Video
There are two main components to any video: your interviews and your B-roll. The rules of composition we learned for photography (thirds, colors, patterns, symmetry, etc.) all apply here, but you also need to keep an eye out for motion. Tracking shots involve following the action with your camera, while static shots involve keeping your camera still, but that doesn’t mean there’s no motion involved; you might just be letting the action go in and out of the frame.
As with the photo essay, since you will be shooting on your phones for this assignment, it is hugely important that you DO NOT SHOOT VERTICALLY.
Things to keep in mind while you’re shooting B-roll:
Shoot more than you think you’ll need.
Get a variety of shots. Close-up, medium, wide, detail shots, static shots, tracking shots.
Use a tripod whenever possible. If you don’t have one or you’re shooting in a mobile, chaotic situation, be resourceful about stabilizing your shots.
Think about your interviews and let them inform your B-roll shooting decisions. Look for shots that illustrate what the person is talking about.
Hold your shot longer than you think you need to. A good rule of thumb is to hold it for at least 10 seconds (AFTER it’s already steady).
Things to keep in mind when you’re shooting your interviews:
Frame the shot with your subject on one of the thirds, angled so that they’re looking slightly INTO the frame. Have them look at you, not at the camera, so be mindful of where you are sitting. It’s a bit intense when someone looks directly into the camera.
If you’re working with a translator, be mindful that the subject will want to look at them, so make sure they are positioned in the ideal place to draw the person’s gaze.
Prioritize good audio.
Make sure their face is lit, but not too harshly.
Think about composing the shot in a way that allows for some negative space where the Lower Third will eventually go.
When is narration necessary?
Sometimes, you can let the subjects of your video tell the story all on their own — as long as you edit with care, presenting what they’ve told you in a way that makes narrative sense. One benefit of non-narrated videos is that they can feel more organic. There’s no disembodied voice stepping in to tell the story, which keeps the focus on the characters in the story.
But sometimes, for clarity’s sake or for stylistic reasons, narration is necessary, or text.
These are more and more popular thanks to social media distribution because they automatically start playing as you scroll through your feed and they can be watched without sound.
As a reminder, we will NOT be having class as usual this Thursday Oct. 27; instead, we will be doing one-on-one edit sessions. Please sign up for one (that day or Friday) here if you haven’t already. The edit sessions will be over Zoom unless we have discussed otherwise; the Zoom link can be found in the sign-up sheet document.
Your final, mixed radio stories will be due by midnight a week after your edit sessions, either Thursday Nov. 3 or Friday Nov. 4. Please post the final script on the class blog along with the Soundcloud link. (So if you have your edit session on Thursday, it will be due the following Thursday night at midnight; if it’s Friday, due the next Friday night.)
On Tuesday next week (Nov. 1) please bring your cameras to class, as we will be shooting a practice assignment. I will be signing out tripods to everyone that day.
Thursday Nov. 3 will be a production day for your radio stories. Attendance is not mandatory. If you want to come in so I can help you with your final sound mix, or to record narration, or have me look at a last-minute change to your script, I will be here. If you need to do some last-minute reporting or prefer to edit at home, that’s fine too.
Tuesday Nov. 8 will be our annual Roz Bernstein reporting day, which will take the place of regular class. This year’s will involve a reporting trip to Corona, Queens. You are welcome to attend the full day of activities if you like, and get a free lunch, but please RSVP to me by email by the end of today.
Thursday, Nov. 10, we will be attending a screening and discussion of “The Territory” as a class.This will also be taking the place of our regular class. It takes place at 6pm at the Baruch Performing Arts Center. Please register at the link here. If you cannot attend since it is outside of regular class hours, please let me know in advance and I will give you a separate but related assignment.
Pitches for your final video assignment will be due on Tuesday, Nov. 15: a two-minute video news story/mini documentary. (Give or take as much as 30 seconds depending on how tightly paced and edited it is.)
This video can be narrated if you are interested in broadcast video and want on-camera clips of you doing “stand-ups” for your reel. A stand-up is that clip at the end of a news package where the reporter is typically standing there with a microphone summing things up and doing their sign-off.
If you are not interested in being on-camera, the video can be non-narrated.
Play/pause: space bar Split track: Command I Zoom in: Command 1 Zoom out: Command 3
In the tool bar, this is the selection tool that allows you to click and highlight and delete sections of track or select a spot where you want to split it:
This is the tool that allows you to move sections of track:
And this is the one that lets you adjust the volume, basically the same way the pen tool works in Premiere:
In both programs, when you’re finished editing, you’ll need to export the finished sound file before you can upload it anywhere.
In Audacity, it’s File –> Export Audio –> select “WAV” from dropdown menu and give the file a name and location, then hit “Save” and “OK.”
Assignment: Using Audacity, mix your practice radio story according to the script you wrote from the interview you did with your classmate. Upload the exported WAV file to Soundcloud and add it to your blog post with the practice script. Due by class time on Thursday.
Your drafts of your scripts for your actual, NOT-practice radio story will be due next Thursday, Oct. 27 or Friday Oct 28, depending on when you schedule your edit session. Everyone will sign up for a one-on-one editing session with me Thursday or Friday. (We will not have class as usual that Thursday.) You can sign up for a time slot here, first come first served:
There are several steps to producing a radio news story, so we’re going to do a short practice assignment to give you a feel for how it all comes together.
RECORD your interviews and other sound.
WRITE the script. (You can’t do this until you’ve completed the reporting, because you need to write around the scenes and sound bites you’ve gathered.)
TRACK. Once you have finalized your script with the help of your editor (in this case, me) you can move forward with tracking, or recording your narration.
MIX. Now that you have all the sound elements you need (sounds bites/acts, narration/track, and natural sound/ambi) you can go ahead and edit the radio story in Audacity and export the finished WAV audio file.
PUBLISH. You’ll upload the WAV file to Soundcloud and post a link to the class blog along with a good title and your final script.
By Tuesday’s class, you’ll need to have completed the first three steps (of the practice assignment, not your actual radio story).
Recording Exercise
Partner up with someone in the class and interview them for 3-5 minutes about a hobby or interest of theirs. This part we will do before we leave today. The other parts you can complete at home if there isn’t enough time.
Script Writing Exercise
Write a very brief practice script with only 2-3 sound bites taken from the classmate interview you did. Post your practice script to the class blog by class time on Tuesday.
Here’s my example script based on a very short interview I did with another professor back in the spring. Note some of the different elements of script writing:
Visual/descriptive, paints a picture to add context to the natural sounds
Sets up sound bites by introducing the person by their full name and often by paraphrasing or hinting at what they’re about to say.
No long, rambling, complicated sentences.
Ends with a final line of narration that looks to the future in some way.
HOST INTRO: With CUNY schools transitioning to online learning this week amid the coronavirus outbreak, professors across New York City are getting creative. Emily Johnson spoke to one CUNY adjunct about what it’s like trying to teach during a pandemic.
AMBI: Nat sounds of tea kettle boiling (FADE DOWN AS TRACK BEGINS)
TRACK: I’m here with Anna Ficek in her Brooklyn apartment, watching her make tea while she works from home. She’s a PhD student at the CUNY Graduate Center and when she’s not working on her dissertation she teaches art history at Baruch College and Borough of Manhattan Community College, or BMCC.
ACT: ANNA: When I found out that everything was getting shut down and especially CUNY I felt extremely sad. Because CUNY is such a big part of my life, such a great community that it was hard to feel that kind of dissipating.
TRACK: She says teaching from home has been a real challenge because of the way she runs her classes.
ACT: ANNA: It’s been very difficult to adapt to teaching remotely just because I really value the discussion I have with my students.
TRACK: Still, she’s trying to see this as an opportunity.
ACT: ANNA: What I’m hoping to get out of this is more time to really focus on what’s important both in terms of teaching and my own dissertation and my own research and trying to figure out creative problem solving ways to deal with these new issues that are going to come around like libraries being closed and inaccessibility to archives and how myself as an academic and as a researcher can get around that. So challenges, but also good challenges!
TRACK: CUNY schools will continue with distance learning for at least the remainder of the spring semester. For Baruch College, I’m Emily Johnson.
Recording Narration
Finally, record the narration you wrote in your practice script. You don’t need to submit this to me by Tuesday; you will use it in a sound editing/mixing exercise that day.
You’ll need to record your narration in a quiet place with sound-absorbing surfaces. Some people use their closet as a makeshift studio; others just throw a blanket over their head. If your room is carpeted, has curtains and lots of plush surfaces, the sound quality should be decent.
It’s best not to drink or eat dairy products right before recording narration; it makes your voice sound thick.
Try not to speak from high up in your throat. Speak from lower in your belly.
Good posture is important.
Some people in the radio world warm up their voices by singing, stretching, and/or doing tongue twisters.
So, to recap:
By the end of class time, you should have finished interviewing a classmate for 3-5 minutes.
And here’s what you need to have done by class time on Tuesday:
Write a short practice script based on your practice interview and post it to the blog.
Record the narration you wrote in your practice script.
Have those recordings, along with your interview audio, accessible for an audio editing exercise in class on Tuesday.
During a recent long car ride whose soundtrack was a medley of NPR podcasts, I noticed a verbal mannerism during scripted segments that appeared on just about every show. I’ve heard the same tic in countless speeches, TED talks and Moth StorySLAMS — anywhere that features semi-informal first-person narration.
If I could attempt to transcribe it, it sounds kind of like, y’know … this.
That is, in addition to looser language, the speaker generously employs pauses and, particularly at the end of sentences, emphatic inflection. (This is a separate issue from upspeak, the tendency to conclude statements with question marks?) A result is the suggestion of spontaneous speech and unadulterated emotion. The irony is that such presentations are highly rehearsed, with each caesura calculated and every syllable stressed in advance.
In literary circles, the practice of poets reciting verse in singsong registers and unnatural cadences is known, derogatorily, as “poet voice.” I propose calling this phenomenon “NPR voice” (which is distinct from the supple baritones we normally associate with radio voices).
“He was hinting at the difficult balancing act reporters face in developing their on-air voice. It isn’t just a challenge of performance — and it’s not as simple as channeling some “authentic” voice into a microphone. It requires grappling with your identity and your writing process, along with history of your institution.”
“…listeners have always complained about young women reporting on our show. They used to complain about reporters using the word “like” and about upspeak… But we don’t get many emails like that anymore. People who don’t like listening to young women on the radio have moved on to vocal fry.”
99% Invisible podcast responds to criticism about women’s voices
So all of this leads us to the question: How can we be intentional about how we use our voices to tell the best stories as effectively as possible?
Luckily, in radio/podcasting, speaking naturally is what we actually WANT. No one wants to listen to a robot, or someone who sounds like they’re reading.
I’m shaking up the schedule slightly because we are planning a reporting day/field trip on Tuesday, Nov 8. (More details forthcoming at a later date!) So I’ll be doing the intro to radio today and then another radio-oriented class on Tuesday. Next Thursday will remain a production day, and the deadline for the photo essay rough draft will still be midnight that night.
Intro to Radio Reporting
For your radio stories, you’ll be creating something called a wrap: a scripted feature with narration, natural sounds, and sound bites all woven together.
Here are some basics you’ll want to keep in mind as you set out to collect sound:
Choose your environment wisely. Be aware of your surroundings. If you interview someone under a subway track, your recording will be impossible to understand. Pick a relatively quiet space. A little background noise is fine and adds atmosphere – except for music. Music makes editing difficult, so avoid it if possible.
Cell phones off or on airplane mode. Yours and theirs. If you’re using your phone to record, make sure it’s set to silent.
Don’t forget your nats. Natural sound is a crucial element of any audio piece. Think about what sounds will most effectively place your listener in the scene. Footsteps, dishes clinking, phones ringing. Don’t be afraid to get in there and get close. Music is fine to use as a nat sound, but not as background to an interview. It will mess up your ability to edit.
Don’t forget your ambi. “Ambi” refers to ambient sound, also known as room tone. Basically, this is the background noise from wherever you happen to conduct your interviews. Even if you record in a very quiet place, nothing still usually sounds like something because of how the acoustics vary in different rooms. Before or after every interview, always record 90 seconds to two minutes of ambi. This will go under your narration to make the story feel seamless.
Ask open-ended questions. Yes or no questions won’t give you good long responses filled with usable quotes.
Get close, but not too close. Putting a mic right up against someone’s mouth can result in popping and crackling sounds on the recording. Make sure to test your equipment so you know roughly where to hold your recorder for optimal sound quality.
Ask your question, then shut up. Active listening is a fantastic skill for a journalist to have, but if you keep murmuring “Uh-huh,” “Yeah,” and “Sure,” while they’re answering your questions, you won’t be able to use the material. Stick with smiling and nodding.
Keep control of the mic. Always monitor your sound with headphones while recording, if possible. (This is not possible with the Voice Memos app, unfortunately.) Hold the mic 1-2 feet from the interviewee’s mouth. Never let the person you’re interviewing hold it. Try to keep handling noise to a minimum.
If recording an interview remotely, try to do a tape sync. A tape sync means recording both ends of a phone interview in person and then editing them together. This will allow the sound quality for both voices to be high-quality and clear. Typically, radio hosts hire freelancers who live in the same city as their interviewee to go out and record the tape syncs, but in the pandemic it’s become more common to ask the interviewee to do it themselves and then send it to you.
Thursday, Sept. 22: That class will be devoted to editing and production on the photo essays. Rough draft of photo essay due that night by midnight.
(NO CLASSES IN BETWEEN)
Thursday, Oct.6: Final draft due by class time.
Discussion: Practice Photo Assignment
We’ll look at all your posts together, give feedback, talk about your process, and troubleshoot any issues that might have come up with the cameras or editing.
We’ll look at your “scavenger hunt” photos together, watch a tutorial on editing photos in Lightroom, discuss caption writing, and talk a bit about best practices and the ethics of photo editing in photojournalism.
When it comes time to start assembling your photo essays, I recommend publishing them on Medium so that your photos display well and you aren’t limited by the compression/memory issues on our WordPress site.
Caption writing
Just because photojournalism is a visual medium, it doesn’t mean you get to be any less thorough when it comes to names, facts, dates, etc. You need to always make sure you get the names, locations, professions, ages (if relevant) to include in your captions. The Who/What/Where/When/Why.
Washington Post guidelines:
“A caption should briefly and clearly describe in a complete sentence what is happening in the picture, including an active verb (‘someone does something’). This will allow our internal systems to take sections of the sentence and automatically create keywords. In many cases, a single sentence will suffice. A second sentence is acceptable if it adds additional information, follows the required formula and does not editorialize.”
Caption example:
BEVERLY HILLS, CA – JANUARY 11: Actress Kate Winslet holds her award at the 66th Annual Golden Globe Awards on January 11, 2009 in Beverly Hills, California. Winslet won the Golden Globe for best supporting actress for her role in “The Reader,” as Hollywood set aside labor strife and a recession to honor the year’s best performances. (Photo by Rich Lipski for The Washington Post)
Notice how the first sentence is in present tense, describing what is literally happening in the photo, and the following sentence is in the past tense, giving background and context.
In a photo essay, the captions play the additional role of shaping a broader narrative. So while wire photos and breaking news photos might all include similar captions because most likely they’ll only be used one at a time, your captions in a photo essay will need to follow a somewhat more narrative shape. Meaning, the first one will include a lot of the 5W’s stuff, while the additional captions might fill in the blanks some more.
For your photo essays for this class, you have a choice in how you want to structure them. You can have ALL the writing be in captions, or you can have a more traditional story with the photos interspersed, and much shorter, more literal captions. You can space the photos so they are fullscreen and appear one at a time, or you can group a few similar ones together that serve a similar narrative purpose.
In-Class Assignment:
Edit your photos from the scavenger hunt in Lightroom and publish them in a Medium post, with captions. Due by class time on Tuesday.


