Last week I talked a bit about Lynsey Addario, and the realities of being a conflict photographer, and a woman in that segment of the industry. Women Photograph is a great resource that highlights women and nonbinary photographers and provides a database so that they’re easily found by commissioning photo editors.
The photojournalism industry is one that has long been an old boy’s club, though that is slowly changing as more people of color, more women, and more queer photographers break through. The gatekeepers of the industry are still largely white and male, and it is these people (photo editors) who have the hiring and commissioning power. Unsurprisingly, photojournalism had its own #MeToo reckoning a few years ago.
A common way for photographers to really launch their careers is through the Eddie Adams Workshop. It’s a chance to work directly with some of the top photo editors at the biggest publications in the country, and being in a position to develop that kind of personal relationship with them can be transformative for a young photographer’s career.
It takes place every fall. You usually have to apply a few times before you get accepted, so start assembling your portfolios now. Applications are due in May.
If you’re interested in working internationally, one of the best ways to network is to attend the International Festival of Photojournalism, held in early fall in Perpignan, France.
In the US, there has long been a pattern of Black photojournalists only being called on for certain kinds of stories.
Solomon recalls that “a lot of my fellow photographers were getting called to photograph these protests.” He mentions that Black photographers might get attention during Black History Month. But shouldn’t agencies call on Black photographers “for all types of stories, not just the Black-centric ones?” he asks. “So that we can bring that Black shutter kind of perspective to all types of different stories.”
Of course, when people report on their own communities, you often find a depth that can be lacking when outsiders attempt the same kind of coverage. But the flip side of that is also crucial: it helps to have people from outside a given group report on their activities because it often brings a certain fresh perspective or skepticism that can be healthy. It’s when the outsiders have had a chokehold on the narrative for a very long time that things become tricky.
Photojournalists Alexis Hunley, Vanessa Charlot, Dee Dwyer, Karisha “Kay” Hickman, Anthony “Tony” Mobley, and Montinique Monroe took the images during May and June while covering the historic Black Lives Matter protests following the killing of George Floyd by Minnesota police. They each captured frontline images of the protests in Los Angeles, St. Louis, Austin, Washington D.C., and New York City. The six photojournalists make a living, in part, through licensing fees they earn by documenting events such as protests.
Born in St Kitts in 1974, Lawrence regards himself as “an immigrant artist”. When he first moved to the US, he worked as a carpenter in southern California. Discovering American photographer Gordon Parks’s autobiography, A Choice of Weapons, reoriented him towards the field of photography. Parks, who was a staff photographer for Life magazine, is legendary for addressing racial discrimination in mid-20th century America. “Searching for my place in American society, I immediately identified with Parks’s life story,” he said. “For the first time I was faced with imagery that dealt with the human condition, and I committed myself to using photography as a tool to confront long-standing ideas about race and class.” He enrolled in community college in California, then later moved to New York with his family.
Thursday, March 9: Editing and production day for Photo Essay #1. This class will be a chance for people to check in one-on-one with everyone.
Tuesday, March 14: Photo Essay #1 due
The photo essay should consist of 15-20 images, with detailed captions, including at least two direct quotes from the sources you photographed and interviewed. They can be in either slideshow or scrolling format. The story can be related to the topic of your choosing, but there should be some news element to the story, and it should have a clear angle.
For today:
We’re going to have more of an interactive class. Together, we’re going to take a look at the photos that you and your classmates filed from the various Ukraine anniversary events around the city and put together a collaborative photo essay that we can potentially get published on Dollars & Sense. We have to pitch it to them, though, and it’ll be their decision whether or not to run it.
So for the next hour and a half, this is a newsroom on a deadline. Here are the different roles we need people to play:
Photo Editor, Editorial
The team of editorial photo editors will review all the images submitted, and their captions, and determine which ones will run with the story. In making these decisions, you’ll need to consider a few things: Which are the strongest individual images, which ones show evidence of strong reporting (ie, captions include first and last names and other relevant details), and the overall arc of the story we’re trying to tell. For instance, we might not want a lot of shots that are too repetitive, and to the best of our ability, we want to show the full breadth of protests and events that took place. You’ll send your final picks to the Lightroom team.
Photo Editor, Lightroom
These photo editors will look at each image that makes it through to the final edit. In Lightroom, they’ll do a final pass on the post-processing of any images that are a little dark, need white balance correction, etc. You’ll export and send the final images to the layout team.
Writer
The team of writers will be responsible for writing a brief intro for the photo essay (250-300 words). It should include a basic lede and nut graf—enough detail to give the reader the context they need and the scope of the events they’re about to see depicted in the photos that follow.
In order to write this effectively and accurately, you’ll need to read all the captions and talk to the various photojournalists/ reporters who were there, at each event, to find any relevant information that is necessary to paint a clear picture of what happened. You can also use social media and other online sources to fact check/confirm any details that you need to paint a clear picture of what happened—like the number of people who were there, who organized the event, how much money was raised, etc.
A transition sentence may be necessary like “Baruch College photographers fanned out across the city to document the events marking the anniversary.” You’ll send your draft to the editor team.
Editor
The editors will go through the written intro and do an edit, checking for proofreading errors and any missing information. They will give the writers their notes and corrections, and once both teams are happy with it, the final edit will be sent to the layout team.
Layout
The layout team will compile all the different elements into a post that will be published on Medium. Consider starting with one very strong lead image, and then include the written intro, and then follow it with the photos accompanied by captions. You can bring your artistic eye to this, deciding what order makes sense (chronological? geographical?) grouping several photos in a small batch if it makes narrative sense to do so, or grabbing a pull quote to stand on its own in a larger font. Once it’s all pulled together, you’ll have the copy editors take a look.
Copy Editor
The copy editors will take a final pass at the Medium post, correcting any typos, making sure there’s a date and a byline, making sure all the photographers are credited and all their names are correctly spelled. When satisfied, hit publish.
Today we’ll be workshopping your pitches as a class.
For Thursday’s class:
Please edit your photos from the practice assignment using Lightroom on your browser (if you haven’t already done it on your own computer) and send them to me via WeTransfer by class time.
Photos of the Week: The aftermath of the earthquake in Turkey and Syria
Mesut Hancer holds the hand of his 15-year-old daughter, Irmak, who died in the earthquake in Kahramanmaras, Turkey, on Monday. Credit: Adem Altan/Agence France-Presse — Getty Images
Photojournalism may be a visual medium, but that doesn’t mean you get to be any less thorough than any other journalist when it comes to actually talking to people, and getting names, facts, dates, etc. You must always make sure you get names (first AND last), locations, professions, ages (if relevant) to include in your captions.
Washington Post guidelines:
“A caption should briefly and clearly describe in a complete sentence what is happening in the picture, including an active verb (‘someone does something’). This will allow our internal systems to take sections of the sentence and automatically create keywords. In many cases, a single sentence will suffice. A second sentence is acceptable if it adds additional information, follows the required formula and does not editorialize.”
Caption example:
BEVERLY HILLS, CA – JANUARY 11: Actress Kate Winslet holds her award at the 66th Annual Golden Globe Awards on January 11, 2009 in Beverly Hills, California. Winslet won the Golden Globe for best supporting actress for her role in “The Reader,” as Hollywood set aside labor strife and a recession to honor the year’s best performances. (Photo by Rich Lipski for The Washington Post)
Notice how the first sentence is in present tense, describing what is literally happening in the photo, and the following sentence is in the past tense, giving background and context. The full caption, with that second sentence, would be necessary if the caption is accompanying the photo as a standalone image. But if it’s published as part of a larger photo essay, that crucial extra context probably makes the most sense to run along with the first photo in the series. Think in terms of the vital information (the who/what/where/ when/why) you would put into a nut graf in a print story, and make sure that info makes it into the first few captions so the reader/viewer of your photo essay knows what’s going on, and why it matters. (What is a nut graf?)
In a photo essay, the captions play the additional role of shaping a broader narrative. So while breaking news photos submitted in a batch to a wire service might all include very similar captions because most likely they’ll only be used one at a time, your captions in a photo essay will need to follow a somewhat more narrative shape. Meaning, the first one will include a lot of the 5W’s stuff, while the following image captions might fill in the blanks some more.
Photo Essay #1 (due Tuesday, March 14)
The photo essay should consist of 15-20 images, with detailed captions, including at least two direct quotes from the sources you photographed and interviewed. They can be in either slideshow or scrolling format. The story can be related to the topic of your choosing, but there should be some news element to the story, and it should have a clear angle. (What makes something newsworthy?What’s an angle?)
Do yourself a favor and pick a story that lends itself well to a visual medium! Don’t pick a story that’s going to be hard to photograph, like people working in a bland office setting.
Pitches for your first photo essay will be due on Tuesday, Feb. 14. Please post your pitch on the blog by class time. We will workshop your ideas together as a class. Your pitch should include not just a general idea for your photo essay, but also your angle, and a vision for the types of images you anticipate getting.
A RAW file is like the digital equivalent of a film negative. It needs to be processed or developed using software like Lightroom or Photoshop. The benefit of this format is that you can adjust various attributes such as contrast, saturation, sharpness, white balance, and others without degrading the image. Afterwards, it can be saved to another image format like TIFF (uncompressed, higher quality) or JPEG (compressed, easier for sharing and storing).
The changes you make during RAW file editing are called “non-destructive” because the alterations are not embedded into the file itself; they exist separately as a sort of roadmap for the image, and then you can export the processed image into a new file. Typically when you file your images to your editor, you file them as JPEGs because most online and print layouts of news publications are too small for the uncompressed image file to be necessary. But if you’re planning on submitting your work for a gallery show and it’s going to be shown as huge prints, you’re going to want that lossless file.
If time is of the essence and you need your images to be usable immediately, then you might want to consider shooting in JPEG instead so that you don’t have to spend time processing them before filing them to your editor.
RAW format can allow you to give your images an almost HDR effect, because of the increased ability to lift shadows and recover detail in highlights. Just be mindful that too much editing/processing can become controversial in the world of photojournalism, so it’s often best to use a light touch with this stuff.
The chairman of the World Press competition judges, Santiago Lyon, director of photography at the Associated Press, has said of all the winners: “We are confident that the images conform to the accepted practices of the profession.”
These accepted practices normally mean that photographers cannot alter the sense or the content of a photograph by moving any pixels in their images; a very easily understood rule.
AP pictures must always tell the truth. We do not alter or digitally manipulate the content of a photograph in any way. The content of a photograph must not be altered in Photoshop or by any other means. No element should be digitally added to or subtracted from any photograph. The faces or identities of individuals must not be obscured by Photoshop or any other editing tool. Only retouching or the use of the cloning tool to eliminate dust on camera sensors and scratches on scanned negatives or scanned prints are acceptable.
Minor adjustments in Photoshop are acceptable. These include cropping, dodging and burning, conversion into grayscale, and normal toning and color adjustments that should be limited to those minimally necessary for clear and accurate reproduction (analogous to the burning and dodging previously used in darkroom processing of images) and that restore the authentic nature of the photograph.
Changes in density, contrast, color and saturation levels that substantially alter the original scene are not acceptable. Backgrounds should not be digitally blurred or eliminated by burning down or by aggressive toning. The removal of “red eye” from photographs is not permissible.
In-Class Assignment: Process your photos from your homework assignment in Lightroom. When you’re satisfied with them, export them to .jpg and send them to me via WeTransfer. No captions needed, just the images. We will look at them together on Thursday.
As soon as you’re ready to leave the comfort of Auto behind, the next logical step is to experiment with Aperture Priority and Shutter Priority shooting modes (“Av” and “Tv” on your DSLR dial). These settings operate exactly the way their names suggest. You decide whether aperture or shutter speed is more important to the image you want to make and the camera will automatically adjust the other one for the correct exposure.
So if you’re shooting a soccer game, for instance, shutter speed is probably more important. There will be a lot of movement and you’ll want to capture the action crisply. But if you’re taking a portrait and you want to blur the background to allow your subject’s face to stand out, aperture priority is the obvious choice.
In both of these shooting modes, you still have to control for ISO, but they make your job a little bit easier than if you were to jump straight from Auto to Manual. Going back to our analogy, you only have to worry about two out of the three elements that fill the bucket. But once you’ve mastered Aperture Priority and Shutter Priority, you’ll be ready to take the final leap to Manual.
Screenshot. Credit: CameraSim
This is CameraSim, an online DSLR simulator. It allows you to play with camera settings, lighting conditions, distance from subject, and a few other factors that go into taking a picture, and to check your best guesses against the resulting image.
The best way to learn all of this is by doing it, so we’ll be getting our hands on the cameras today. Go ahead and sign out a camera if you don’t have one already.
The assignment: Go out and shoot a mini photo essay with your camera set to shoot in RAW. The goal will be to get it down to five strong, final images (although of course, you’ll likely shoot many more than that and then curate it down to the best ones.)
The images should be related to one another in some way, and tell a story. No two images should be composed very similarly. No captions are required for this assignment, but photos should not be staged. This will involve approaching people you’re not friends with or related to.
You have until next class to complete this assignment. Please bring your memory cards to class (or otherwise have the image files available to you) so that we can use them in a practice editing workshop.
Here are some basic rules and guidelines of photo composition to keep in mind as you start developing your eye:
1. The Rule of Thirds.
If you pay attention to only one element of composition, the rule of thirds should be it. If you start shooting with this “rule” in mind, your pictures will begin to look a lot better immediately.
The general idea is to imagine breaking an image down into thirds, both horizontally and vertically. If you place the main points of interest in your photo where the lines intersect, or along the lines themselves, your image will be far more visually interesting than if you just put the subject smack in the middle. Studies have shown that composing photos this way draws the human eye far more effectively.
Screen Shot: Google ImagesCredit: Emily H. JohnsonDmytro KavinskyMarcus Yam
2. Use color.
Black and white photography is a beautiful art form, but in photojournalism, most of the time you’ll be shooting in color. It helps to know what combinations of color to look for if you want your images to really pop.
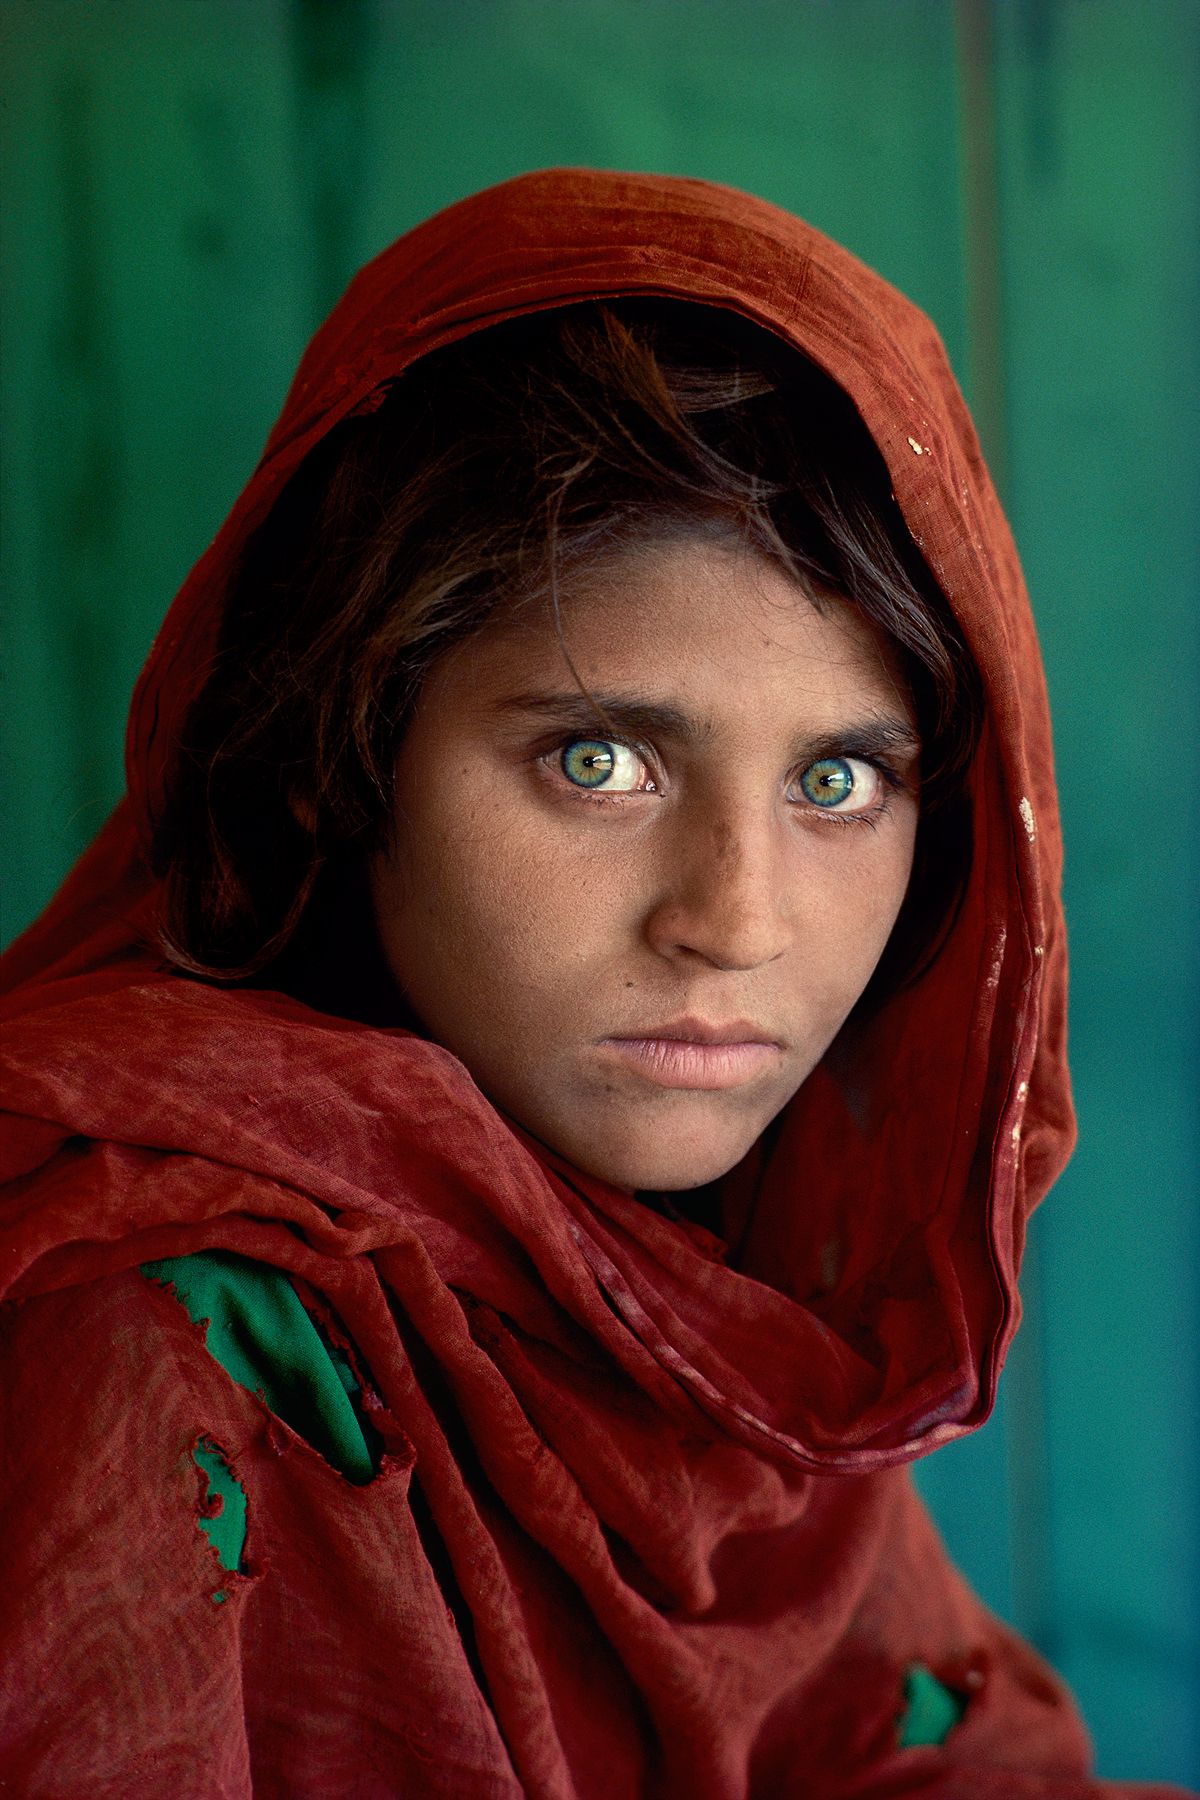
Credit: Steve McCurry
You probably recognize this photo. Known as Afghan Girl, it is one of National Geographic’s most iconic images and was taken by color master Steve McCurry. One of the reasons this relatively simple picture is so stunning and so well-known is the colors: red and green, which fall on opposite sides of the color wheel.
Opposite colors, paired together, can make each other look more vibrant. Notice how the green of the girl’s eyes is picked up by the wall behind her and set off by the rusty red of her scarf.
Credit: Emily Johnson
Images with variations on the same color, known as monochromatic images, can also be quite striking:
Credit: Emily H. Johnson
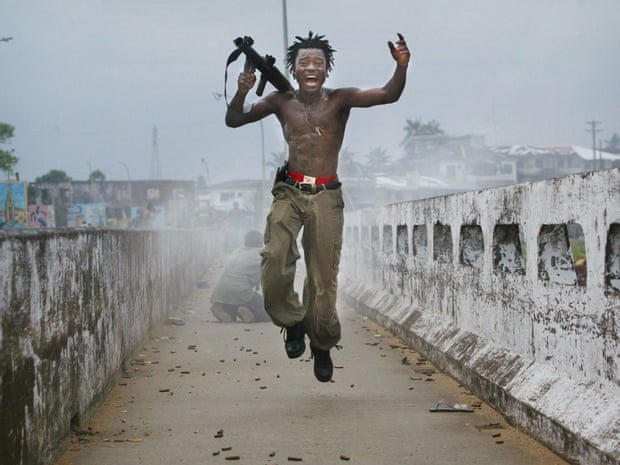
3. Capture the decisive moment.
“The decisive moment” is a term that was coined by renowned photographer Henri Cartier-Bresson. It refers to that fleeting instant that photographers love to capture: When someone leans in for a kiss, when a soccer player connects with with the ball, or when a protester throws a rock. If you aren’t ready with your finger on the shutter, you’ll miss the moment. If Bresson had taken this photo a split second earlier or later, it would have been a much more ordinary photo of a man splashing through a puddle. These moments don’t need to be that dramatic; for your assignments, it may be as simple as capturing the moment when the food truck owner you’re profiling flips some meat on the grill or hands the food to her customer. Action shots vs static shots tell more of a story.
Credit: Henri Cartier-BressonChris Hondros
A decisive moment shot doesn’t always need to be dramatic. A lot of the time it’s about having the foresight and patience to wait for the stars to align in your photograph, compositionally speaking.
Emily H. Johnson
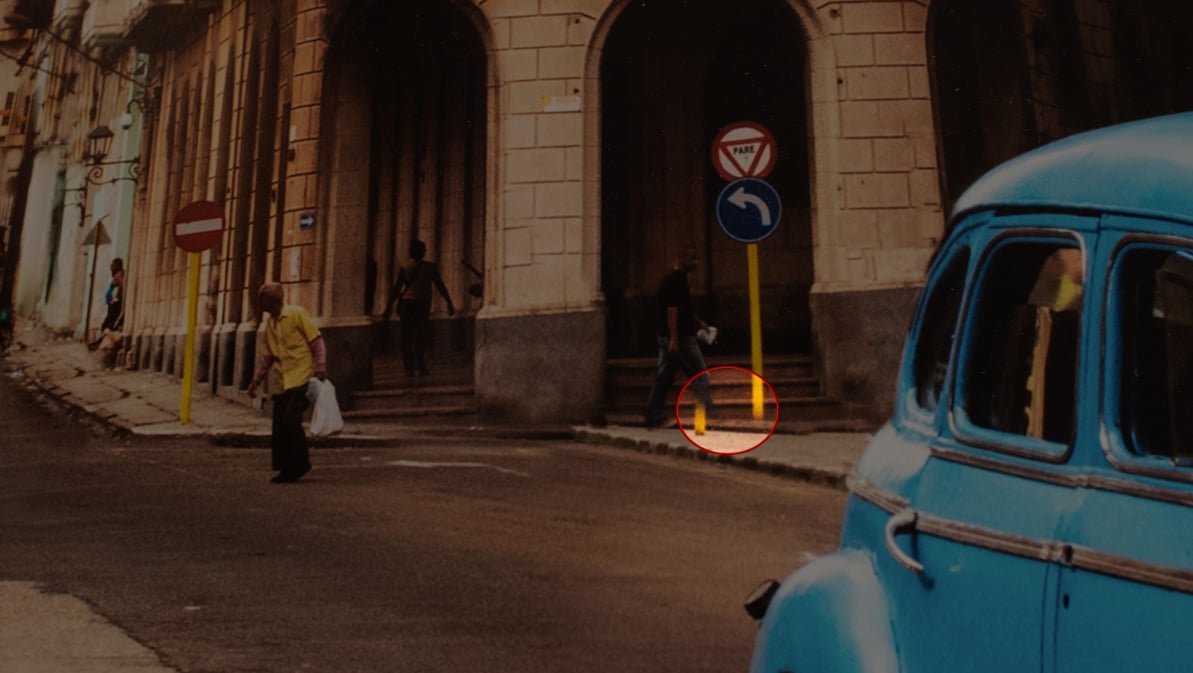
4. Leading lines.
Leading lines are lines that move the eye from one part of the image to another part, or sometimes out of the image. They add a sense of drama and perspective, so it’s always good to be on the lookout for roads, bridges, fences, shorelines and the like.
Credit: Emily H. JohnsonScreen Shot: Google Images
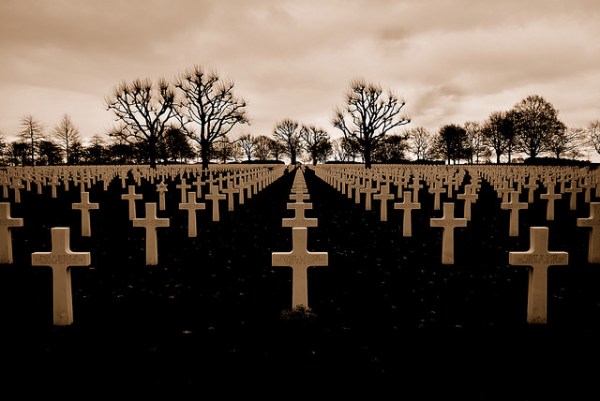
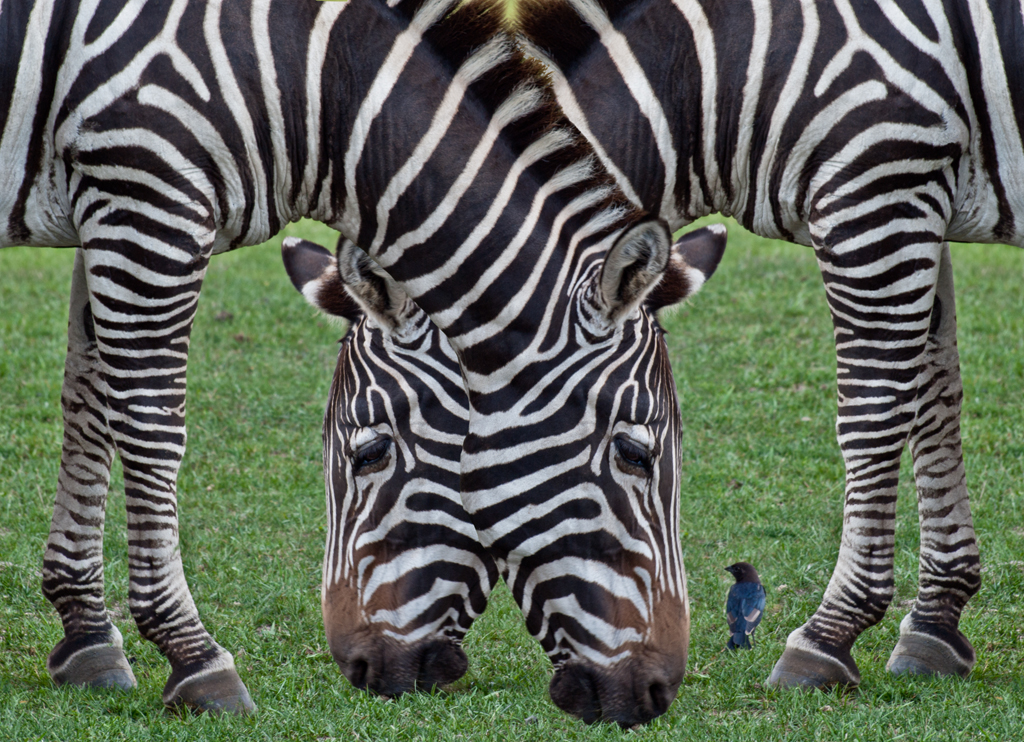
5. Symmetry and patterns.
Symmetry and patterns exist everywhere, both in nature and man-made sights. Looking for repetitions and symmetries, while staying alert to things that then break those very patterns (especially on the thirds!) is a sure way to make an arresting image.
Credit: Emily H. Johnson
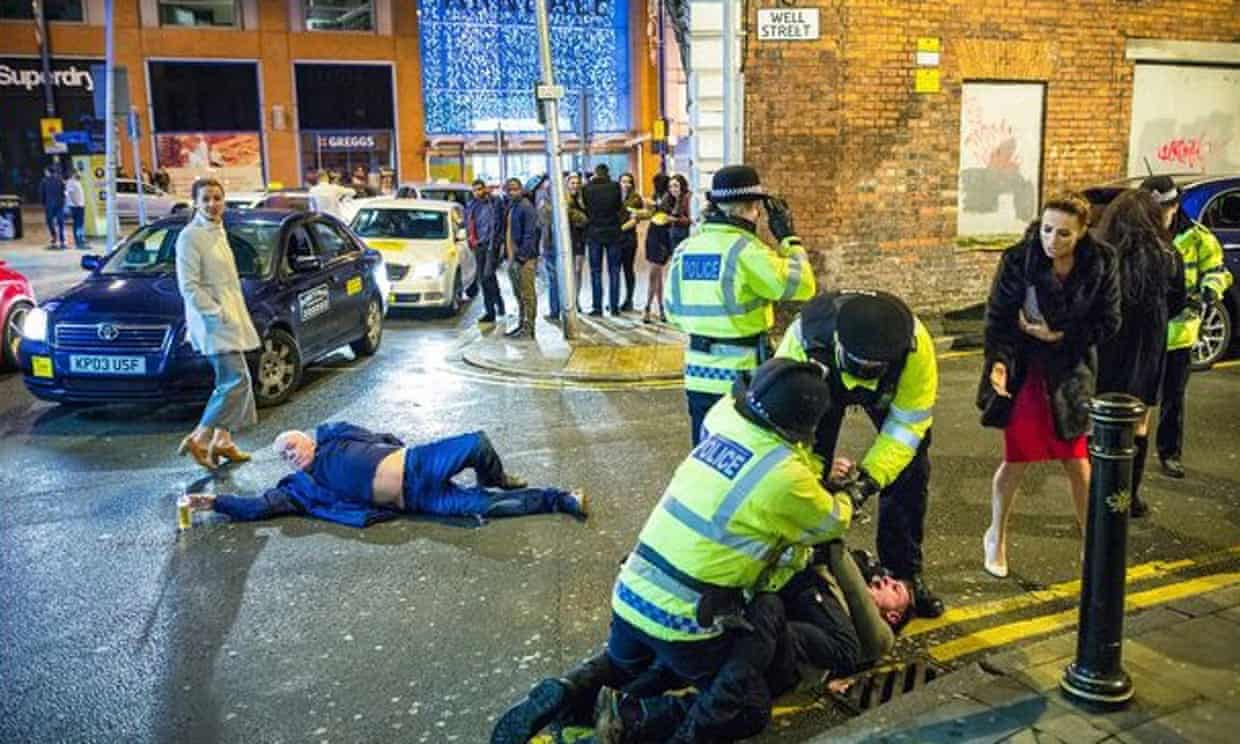
6. Layers.
Another great way to make sure your images are visually interesting is to keep an eye out for what’s happening up close, in the middle distance, and far away. Think in layers. If you can frame your shots so that interesting things are happening in the background as well as at your focal point five feet away, you’re onto something.
Joel Goodman
Layers will be one of your greatest tools as a photojournalist, because layers add context. They tell a story.
Credit: Emily H. JohnsonCredit: Emily H. Johnson
This is a famous photograph by South African photojournalist Kevin Carter. He won a Pulitzer Prize for this image, which showed the effects of the 1993 famine in Sudan.
Credit: Kevin Carter
“Photojournalism” means you’re telling a story, not just taking a picture.
Layers are also a great chance to play around with something called depth of field. This refers to the difference in focus between things that are in the foreground vs. the background—if there isn’t much difference, like in the Kevin Carter photo above, then you’re using greater depth of field. When that difference is dramatic, like when your phone is in Portrait Mode, it’s called shallow depth of field.
Washington Post
Shallow depth of field also gives you something called bokeh, which turns background lights into warm globes.
Depth of field is affected by a few things: the focal length of your lens, your distance from the thing in focus, and aperture. We’ll talk more about that when we get into camera settings.
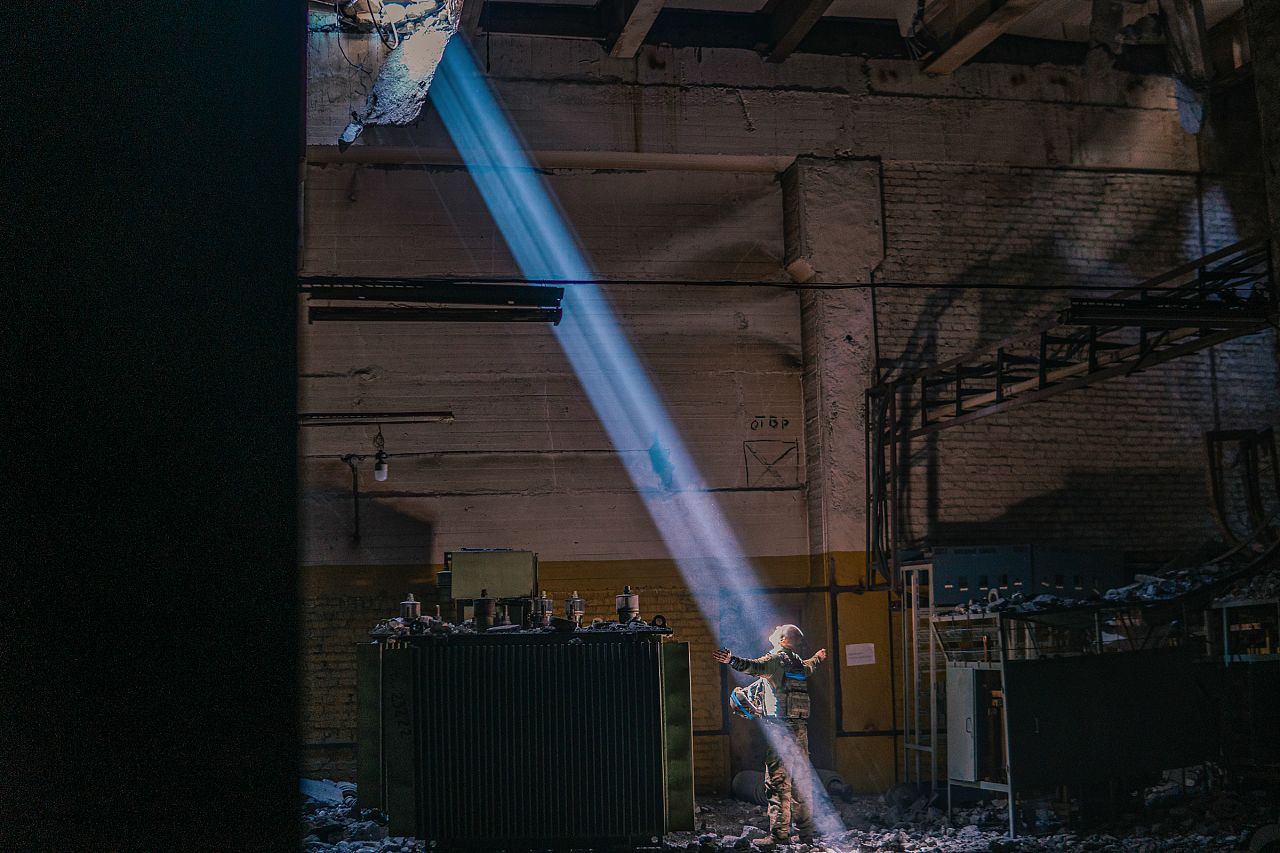
7. Light.
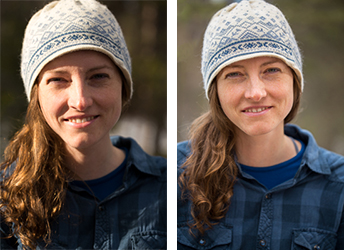
Light impacts everything we do as photographers. How much are we working with? Is it natural or artificial? What is the temperature of the light? What direction is it coming from? Is it harsh or diffuse? What time of day is it? Are you using a flash? Many photojournalists prefer to shoot with natural light as much as possible. Portrait photographers and fashion/fine art photographers often use studio lighting to create interesting lighting environments.
Different kinds of light will affect how different people look in photographs depending on their skin tone.
Photographer Robert Capa famously said, “If your pictures aren’t good enough, you’re not close enough.” Proximity with your subjects makes for more powerful and intimate photos. Don’t be afraid to get right in someone’s face with your camera. It may feel intrusive and strange at first, but a huge part of being a reporter is engaging with people and making them feel comfortable.
What’s that process like? How do you go about shoving a camera in someone’s face?
We’ll be doing an in-class exercise and getting our hands on the cameras. Please bring in your own memory card to shoot with. And if you’re planning on shooting with your own camera this semester, please bring that in as well.
If there’s time…
Intro to Camera Settings
The first time you pick up a DSLR camera, the sheer number of settings and dials can be a little overwhelming. You may be tempted to stick with Auto when you start out — and that’s totally fine while you’re getting the hang of it.
But to make sure you are taking the best possible pictures, it helps to have control over a few key settings: ISO, aperture, and shutter speed, which collectively make up the three pillars of photography. Tweaking these settings will allow you to take different types of pictures, and all of them essentially come down to one thing: light.
Imagine you are using a garden hose to fill a bucket to the top. Next, imagine that our end goal — a bucket filled exactly to the brim, but without spilling — equals a perfectly exposed photograph .
A few things control how much water goes in the bucket and how long it takes to reach the brim: the width of the hose, the water pressure, and how long you let the water run. You can achieve your goal using endless combinations of these factors. A very narrow pipe running at a steady pressure for a long time will fill your bucket as surely as a very wide pipe running for only a few moments.
A camera works the same way to let in the correct amount of light. Imagine that the width of the hose is the aperture, the amount of time you run the tap is the shutter speed, and the water pressure is the ISO.
ISO
Basically, ISO refers to how sensitive your camera’s sensor is to light. The lower the number, the less sensitive it is and vice versa. The ISO range in the DSLR cameras we’ll be using usually goes from 100 to 6400, doubling as it goes (100 to 200 to 400 and so on until it gets up to 3200 and 6400).
It follows, then, that you will need to adjust the ISO for the available lighting conditions.
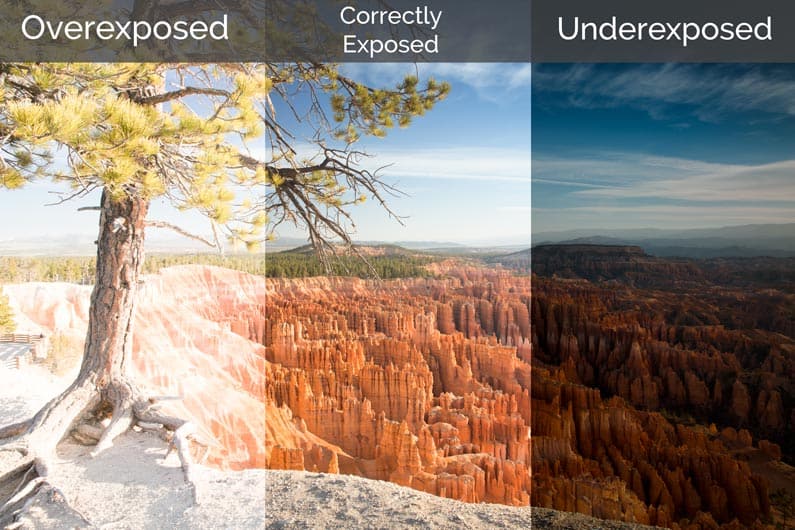
In broad daylight, there is plenty of light to work with, so a low ISO will be all you need. If you let in too much light, the image will be overexposed.
If you are shooting indoors in artificial light, you will need a much higher ISO — but be aware that you sacrifice image quality as you get up to the highest ISO settings, where you will start to notice a grainy quality.
So before you reach for the dial to crank the ISO up to 3200, try letting a bit more light into the camera using a wider (lower) aperture or slower shutter speed.
Shutter Speed
Shutter speed is probably the simplest setting to understand. It refers to how long the camera’s shutter stays open. The longer the shutter is open, the more light is able to come in, and vice versa.
Shutter speed typically ranges from about 1/1000th of a second (very fast) to a few seconds (very slow). Slow shutter speed allow for a longer exposure time, which allows the camera to capture more movement. This can be a good thing or a bad thing, depending on the image you want to make.
Credit: Amanda Mustard
Using a slower shutter speed can create a sense of motion. A long exposure can allow you to capture objects in motion in an artistically blurred fashion — or it can capture unwanted camera shake if you’re shooting without a tripod.
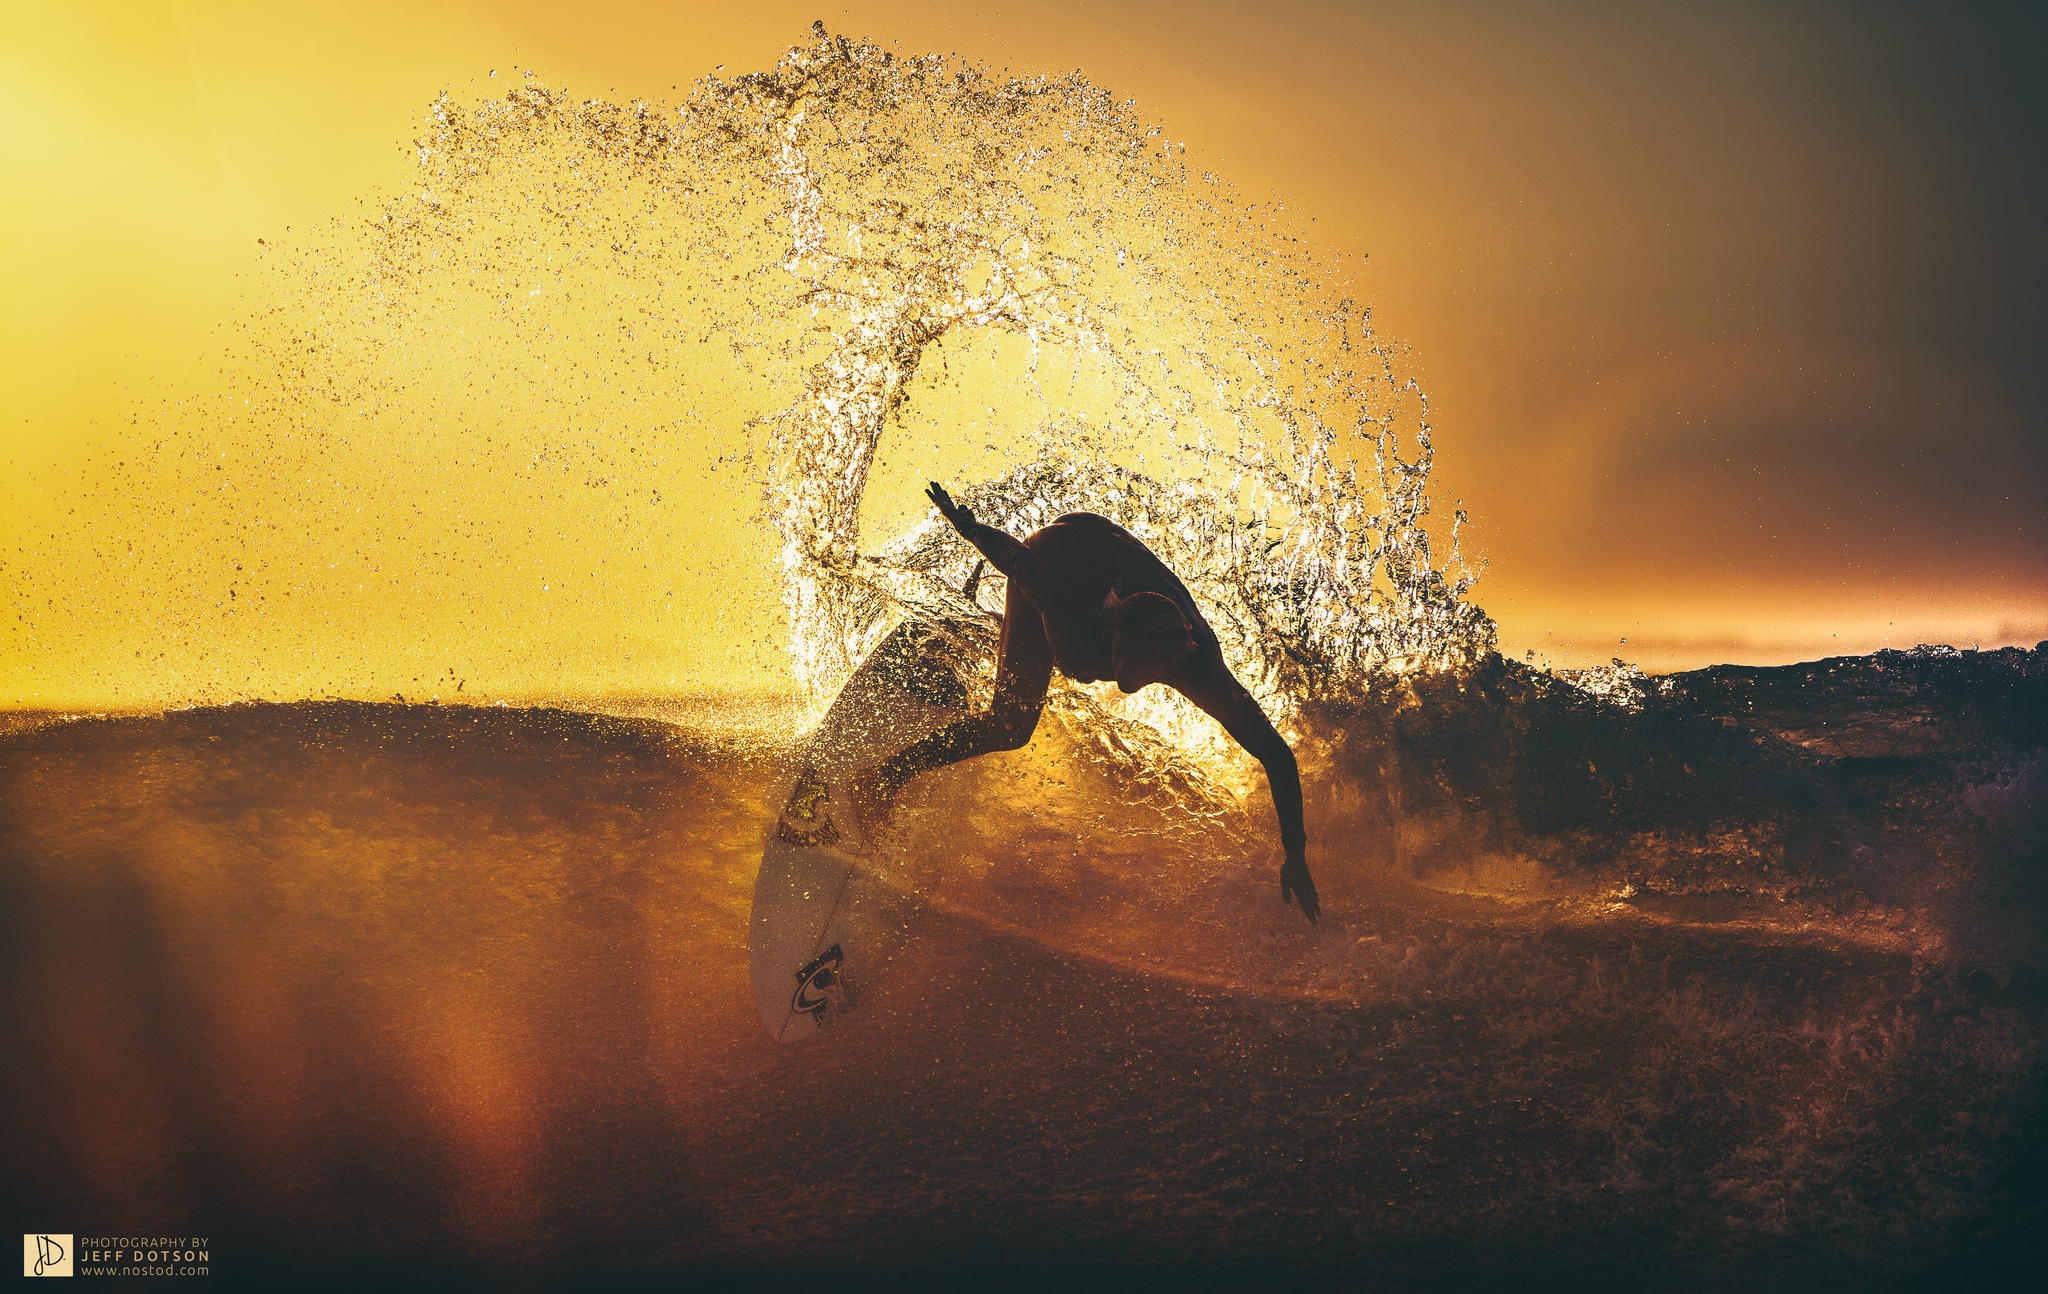
Credit: Jeff Dotson
Sports photographers trying to capture crisp images, for example, are likely to rely on a fast shutter speed because their subjects are moving so quickly.
Aperture
Aperture refers to the opening in the lens. The wider it is, the more light it lets in. Somewhat confusingly, smaller numbers equate to wider aperture. Aperture is measured in “f-stops” and lenses can have different ranges. The wide-angle lenses that come with the journalism department’s DSLR cameras typically range from about f/3.5 (the widest) to f/22 (letting in the least amount of light).
A low aperture, in addition to helping you shoot in low-light conditions, allows you to capture a shallow depth of field. This refers to the effect where an object in the foreground is in focus but the background is blurred (or vice versa).
This also allows you to play with the bokeh effect, as we discussed a little earlier.
A high aperture, on the other hand, allows to retain detail at every layer of the image, which can be vital in terms of storytelling. If there are protest signs in the background, for instance, and your camera lens is focused on a police officer in the foreground, a shallow depth of field means we may not be able to tell what the signs say. In such a situation, you might want a flatter image, with a deeper depth of field.
Aperture Priority vs. Shutter Priority vs. Manual
As soon as you’re ready to leave the comfort of Auto behind, the next logical step is to experiment with Aperture Priority and Shutter Priority shooting modes (“Av” and “Tv” on your DSLR dial). These settings operate exactly the way their names suggest. You decide whether aperture or shutter speed is more important to the image you want to make and the camera will automatically adjust the other one for the correct exposure.
So if you’re shooting a soccer game, for instance, shutter speed is probably more important. There will be a lot of movement and you’ll want to capture the action crisply. But if you’re taking a portrait and you want to blur the background to allow your subject’s face to stand out, aperture priority is the obvious choice.
In both of these shooting modes, you still have to control for ISO, but they make your job a little bit easier than if you were to jump straight from Auto to Manual. Going back to our analogy, you only have to worry about two out of the three elements that fill the bucket. But once you’ve mastered Aperture Priority and Shutter Priority, you’ll be ready to take the final leap to Manual.
Screenshot. Credit: CameraSim
The best way to learn all of this is by doing it, so we’ll be getting our hands on the cameras during Thursday’s class. Before that, there’s CameraSim, an online DSLR simulator. It allows you to play with camera settings, lighting conditions, distance from subject, and a few other factors that go into taking a picture, and to check your best guesses against the resulting image.