How To Use This Site
¶ 1 Leave a comment on paragraph 1 0 For help, please contact Craig Stone ([email protected]) or Erin Glass ([email protected]).
¶ 2 Leave a comment on paragraph 2 0 CommentPress is a simple interface that allows multiple students to comment on specific portions of a text within the Blogs@Baruch system.
¶ 3 Leave a comment on paragraph 3 0 Before posting comments, please take a moment to add your name and an avatar to your Blogs@Baruch profile so that your posts are more easily identifiable. To do this, go to the Blogs@Baruch homepage, log in, and then click the Your Profile button on the right side of the page. From there, click the “Edit” link under the Profile tab and enter your name in the “Name” field. Make sure to click the Save Changes button at the bottom of the page when you’re done. To edit your avatar image, click the “Change Avatar” link under the Profile tab, use the Choose File button to select an image (in JPG, GIF or PNG format), then click the Upload Image button. You will then have the option to crop your image to select the portion that will be your avatar. When you’re done, click the Crop Image button.
¶ 4
Leave a comment on paragraph 4 0
 Click image to enlarge.
¶ 5 Leave a comment on paragraph 5 0
¶ 6 Leave a comment on paragraph 6 0 Now, go to this this link and update the options for your “display name”. This will ensure that your faculty and classmates know who has left the comment.
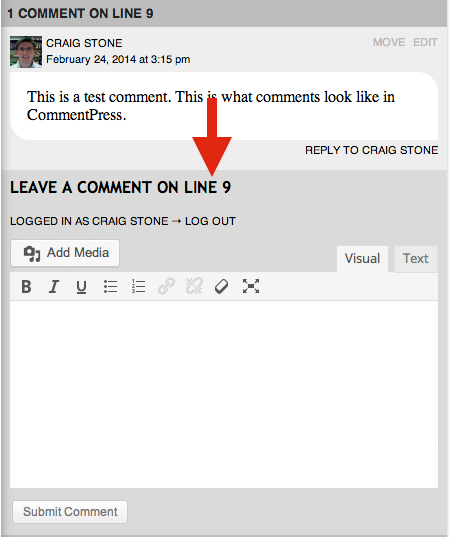
¶ 7 Leave a comment on paragraph 7 0 When CommentPress is active on your course site, you will see a gray sidebar to the right of the site content with tabs for COMMENTS and ACTIVITY.
¶ 8
Leave a comment on paragraph 8 0

Comments
¶ 9 Leave a comment on paragraph 9 0 Under the Comments tab, you will see a breakdown of the number of comments on the page as well as for each paragraph within the page. Each paragraph is given a “Line” number, and you can see the corresponding line number to the left of each paragraph.
¶ 10 Leave a comment on paragraph 10 0 To view the comments associated with each paragraph, you can either click on the paragraph itself or click on the line number under the Comments tab. The stream of comments will show up under the line number in the right sidebar. To add your own comment to the paragraph, use the comment entry field that appears below “Leave a comment on line #” at the end of the comment stream for that paragraph.
¶ 11
Leave a comment on paragraph 11 0
 Click image to enlarge.
¶ 12 Leave a comment on paragraph 12 0 The comment entry field provides basic editing functions similar to what you’d see in Microsoft Word, including Bold, Italics, Underline, Bulleted Lists, Numbered Lists, and Hyperlink.
¶ 13 Leave a comment on paragraph 13 0 When your comment refers to a specific line, phrase, or word in a paragraph, please make sure to identify that portion by making it bold and putting it in quotation marks at the beginning of your comment. (If you’re referencing a whole line, just provide the first few words followed by an ellipsis…)
¶ 14 Leave a comment on paragraph 14 0 When you’re done writing your comment, click the Submit Comment button to post it.
¶ 15 Leave a comment on paragraph 15 0 You also have the option to reply to another user’s comment by clicking the “Reply to” link underneath a comment. This allows for comment “threads” where responses show up directly below the comment they are referring to. Replies are also indented so that you know they are referencing the previous comment.
¶ 16
Leave a comment on paragraph 16 0
 Click image to enlarge.
Inserting Links
¶ 17
Leave a comment on paragraph 17 0
To insert a link into your comment, type out the text that you would like to appear as a hyperlink, highlight that text, and then click the chain icon. ![]() This will open an “Insert/edit link” window. In the field that says URL, paste the URL from the web page that you want to link to, then click the Add Link button at the bottom of the window to insert the link.
This will open an “Insert/edit link” window. In the field that says URL, paste the URL from the web page that you want to link to, then click the Add Link button at the bottom of the window to insert the link.
¶ 18
Leave a comment on paragraph 18 0
To remove the link, highlight the text and click the broken chain icon. ![]()
Adding Photos
¶ 19 Leave a comment on paragraph 19 0 The media uploading function has been disabled, so you will need to upload any images to a free photo hosting service such as imgur or flickr before adding it to your comment. Once you’ve uploaded it, copy the image’s “direct link” URL. In imgur, click “Images” in the top right corner when you are logged in, then select the image you’d like to view. The direct link is on the right side of your image when you are viewing it. In Flickr, you must go to your “Photostream” and select the photo you wish to embed, then click the … icon at the bottom right of the photo and select “View all sizes” from the expanded menu. From there, select an image size (ideally small or medium, since larger images will take up the full screen in the comment stream), right click on the image and select “Copy Image Location.”
¶ 20 Leave a comment on paragraph 20 0 Note: If you are embedding images that you do not own, make sure they are in the public domain or are licensed for sharing. All Flickr images show usage rights information beneath them. You can also find public domain images by doing a Google image search, then clicking the gear icon at the top right of the search results page and selecting “Advanced Search.” From there, scroll to the bottom of the page and select “free to use or share” from the “usage rights” drop-down menu, then click the blue Advanced Search button. To get the URL, click the image you wish to use, click the View Image button to see the full size version, then copy the URL from the URL bar in your browser or right-click and select “Copy Image Location.”
¶ 21 Leave a comment on paragraph 21 0 Once you’ve copied the image URL, you can return to the course site and add it to a comment. When you’re in the comment entry field, click the Add Media button above the comment entry field. This will open the “Insert Media” window (keep in mind that will not be able to upload your own media directly into the system). Select “Insert from URL” on the left side of the window, then paste the URL of your image into the field that begins with “http://” and click the blue Insert into page button. You should see a small preview of your image in the comment field.
¶ 22
Leave a comment on paragraph 22 0
 Click image to enlarge.
Embedding Video
¶ 23 Leave a comment on paragraph 23 0 You can include video in your comments by using YouTube or Vimeo, both of which allow you to upload your videos for free or to embed videos that others have uploaded.
¶ 24 Leave a comment on paragraph 24 0 In YouTube, go to the video you’d like to embed, then click the “Share” link beneath the video player (on the same line as the Like/Dislike buttons). From there, click “Embed” and copy the code that appears in the field below.
¶ 25
Leave a comment on paragraph 25 0
 Click image to enlarge.
¶ 26 Leave a comment on paragraph 26 0 In Vimeo, the sharing icon is a paper airplane in the top right corner of the video player. Click on that and then copy the code from the “Embed” field.
¶ 27
Leave a comment on paragraph 27 0
 Click image to enlarge.
¶ 28 Leave a comment on paragraph 28 0 Once you’ve copied the embed code, go back to the course page and paste the code into the comment entry field where you would like it to appear.
Activity
¶ 29 Leave a comment on paragraph 29 0 You can view recent commenting activity on a page by clicking the ACTIVITY tab at the top right corner of the page and selecting “Recent Comments In This Document” from the menu that appears. Please note that “Recently Active Members” and “Who’s Online” shows results for the entire Blogs@Baruch system, not just this course site.
Contents
¶ 30 Leave a comment on paragraph 30 0 When CommentPress is active on your course site, you will see a gray bar sidebar to the left (under the word “Contents”) with the following subpages:
- ¶ 31 Leave a comment on paragraph 31 0
- Search allows you to search the site’s pages, but will show instances of the word or phrase you searched that appear in pages and posts to the course site, not results from comments.
- Special Pages allow you to view a list of all comments to the site (by selecting “All Comments”) or to sort comments by author (“Comments by Commenter”). It also provides a space for general comments about the site that are not attached to any specific page or paragraph. Please note that “Site Home Page” will take you to the Blogs@Baruch home page, not the course site’s home page.
- Table of Contents shows you all the pages on the course site.
¶ 32
Leave a comment on paragraph 32 0

Comments
Comments are closed
0 Comments on the whole Page
0 Comments on paragraph 1
0 Comments on paragraph 2
0 Comments on paragraph 3
0 Comments on paragraph 4
0 Comments on paragraph 5
0 Comments on paragraph 6
0 Comments on paragraph 7
0 Comments on paragraph 8
0 Comments on paragraph 9
0 Comments on paragraph 10
0 Comments on paragraph 11
0 Comments on paragraph 12
0 Comments on paragraph 13
0 Comments on paragraph 14
0 Comments on paragraph 15
0 Comments on paragraph 16
0 Comments on paragraph 17
0 Comments on paragraph 18
0 Comments on paragraph 19
0 Comments on paragraph 20
0 Comments on paragraph 21
0 Comments on paragraph 22
0 Comments on paragraph 23
0 Comments on paragraph 24
0 Comments on paragraph 25
0 Comments on paragraph 26
0 Comments on paragraph 27
0 Comments on paragraph 28
0 Comments on paragraph 29
0 Comments on paragraph 30
0 Comments on paragraph 31
0 Comments on paragraph 32